New Feature Makes Your Videos Look 10x Better
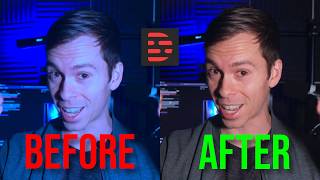
Ross Zeiger shows how to use Descript's new color-adjustment tools to fix poorly lit footage. The white-balance eyedropper automatically neutralizes color casts by clicking a white pixel, and preset filters let you shift the mood from cool sci-fi blues to warm desert oranges.
Chapters
Descript just rolled out the ability to make your horrible footage that looks like this look like this. It's called fixing the white balance. And let me show you how it works. Now, before we begin, if you don't know what white balance is and you want to learn about it, I'm going to talk about that later in this video at the timestamp on your screen. But for now, I'm going to show you how to actually do it inside of Descript. So here's my video, the one that you just watched at the beginning. And if I click on it, then you see here on the properties tab, if you click on properties, that opens up this menu and you can put your mouse right here and make it a little bit bigger like this. And then you can see right here that there's a section called color adjustment, and this is what's brand new. So right now, no color adjustments have been applied. I'm looking at the raw footage. And what I can do is there's a bunch of different presets. These are kind of like filters. If you've ever used filters on Instagram or on your phone's photo editing app. And so if I click on neutral, I didn't see a whole lot of change. It made my background a little bit darker, but let's go ahead and click on the warm one next. That made everything a little bit more orange, if you noticed. And then we're going to click on cool. That made everything a little bit bluer. And if I click this little arrow right here, it scrolls me to the next page. I can click pop. That kind of makes everything a little more saturated. It makes the colors in my face stand out a little bit more. And then if I click black and white, B&W, it takes out all the color, it unsaturates it, and we're left with just a black and white image. Okay, so those are your presets, but I'm going to show you how to actually fine-tune this a bit. So let's leave it on none and then come up to the color adjustment, come over to the right to where these little dials are, click on that, and notice something just popped up. Below it. So these are a bunch of different settings related to the colors and the exposure of my image, my video image there. If I click on these presets again, so if I click on neutral, for example, notice that some of these dials just changed for me. So these are automatic preset settings related to what you can do manually down here. And if you click any of these presets or you make any changes here, you can click this little back arrow and that resets all the colors. It resets you back to none so that your image looks exactly how it looked when you shot it. So the thing we're going to focus on is this button right here that says white balance. When you click on that, it opens up an eyedropper. So you see that I'm— my cursor is magnifying what's on my screen. So if I look at the word color here, I'm seeing extremely magnified, extremely amplified that word. And in the very center, it's probably hard to see in the very center of my cursor, there is a little square and that's showing me one individual pixel on my screen. And what we want to do with this white balance is come over to our video and find a white pixel, ideally as close to pure white as possible. So if you see my, my microphone just over my left shoulder in the background, I have some white tape on that covering up the lights. So if I hover my magnifying glass over it, there's the white tape and I'm just gonna click and notice it made my face a bit more neutral looking, a bit more how it looks in real life, a bit less orange. And then in the background you can see my blue lights got a little bit nicer. So let me hit undo so you can compare the difference. I'm gonna hit undo right now. So there, there it is. My face looks pretty orange and the background blue light isn't as intense. But if I redo that, if I add back that edit, now I look a little bit more neutral. And that's what you're going for by the way, is you want to look neutral in your images as close to your human eye sees it as possible. Now if we come back over to our dials here, you can see that the, what just happened by clicking on that white pixel, it lowered my temperature to -16.5%. So the temperature— I'm going to explain this more later, but it's a spectrum of making the pixels that make up your video either more blue or more orange. So if I adjust this down, notice as I'm sliding to the left, I'm making it cooler. My pics— my picture gets more blue. And if I do the opposite, I slide this to the right, my picture's getting more orange all the way to the extreme where it looks really bad. Most modern cameras, cell phone cameras, if you're shooting in automatic mode, it does a pretty good job of replicating how the human eye would see the colors, but not always. And so that's why you need to come in here. And adjust this until it looks right. And I'm also gonna talk at the end of this video about times where you might use colors intentionally and creatively to get different moods. So a, a bluer look can be more intense, more dramatic, and a lot of sci-fi movies use this, or you can make it a little more cool. And a lot of romantic films use something cooler. So there's different cases where you might want to go for a different effect. But for YouTube, if you're making educational stuff, you're probably gonna want to go for something neutral like this. And then after you've got your temperature dialed in, you could play around with the tint. And the tint, if I scroll this to the right, it makes everything a little bit more red. And if I scroll it to the left, it makes everything a little more green. So again, you wanna play with this until it looks until your skin colors and the colors in the image look as close to real life as possible. And at the very top you have saturation. So saturation is the intensity of the colors. So if I scroll this to the right, you can see everything. The, the oranges in my face get very intense. The red of my lips get very intense. And if I scroll this down to the left, The colors are getting less and less intense. And as I get further to the left into the negative numbers, it's starting to look black and white all the way until it is completely black and white. All the colors are gone and I'm only left with shades of gray. Okay. But once again, if we click on this little, this little button right here, that resets everything to the original look of how it came out of my camera. Now everything I just showed you is related to the color of this image. Below that you have stuff related to the light. I'll save that for another video. But for most situations, the auto white balance here is going to do great. Again, you just find a white pixel, click on it, and it'll automatically rebalance your photo. You can also find a gray or neutral pixel, and that'll give you a slightly different result. And so click around and try different images and see which look you prefer. Now, what actually is white balance? Here's the definition: in photography and video, color balance is the global adjustment of the intensities of the colors. The goal of this adjustment is to render specific colors and specifically neutral colors like white or gray correctly. And correctly, as I mentioned, is like, what does a human eye see? So we already saw some examples where you can have— this is an extremely warm image where it's, it's too orange. And then here it is after it's been corrected. Here's another one, same image where it's too blue. And here it is on the right side, corrected. The goal of white balancing your video is to neutralize the color cast for realistic true-to-life colors that match what your eyes see. And it can also be used creatively to achieve certain moods. So for example, a cooler look can be dramatic and menacing. Many sci-fi films use a cool look. So here is a, a, a clip from Blade Runner where you can see it's very blue. The skin looks very blue and it creates a very dramatic and menacing look. As for warmer looks, you can use it in a situation like a desert film, like Dune uses it, or Mad Max. It can also look very apocalyptic, and you can see how intensely orange the sand is and the, the orange of the vehicles, the rust on the vehicles and the flames. So very, very warm look. Now you know how to white balance your footage, but if you wanna make sure you're shooting good footage from the start, you're gonna need to learn how to use the recorder. So watch this tutorial next where I show you the entire recording process to get the best possible footage.








