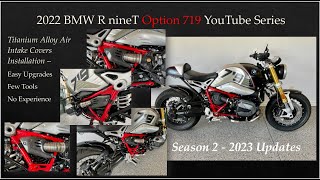
In this DIY video, Dr. Chris Stout walks viewers through the installation of titanium air‑intake covers on a 2022 BMW R nineT (Option 719). After briefly referencing a companion video that replaces the original plastic trim with carbon‑fiber pieces, he focuses on removing the existing plastic cover, dealing with a zip‑tie and wiring, and fitting the lightweight titanium covers. Using only a Torx wrench and a few finesse techniques, he demonstrates how to detach the original clips, manage the wiring, and secure the new covers on both sides of the bike. Throughout the process he notes challenges such as avoiding paint damage, navigating a brake line, and ensuring proper wire slack. The video concludes with a visual inspection of the finished look—highlighting the contrast between the dark engine and the new metallic and carbon‑fiber accents—and a brief engine start‑up check for vibration or rubbing. Stout also provides part sources and encourages viewers that the upgrade requires minimal tools and experience.
Chapters
Hi, Chris Stout here. Welcome back to the channel. This is going to be a little bit of a different video. It's actually an introduction. The parts that I put on are already on, but I have this video. Well, the balance of it will be focusing on my installation of this titanium cover. There's a companion piece that also talks about replacing the original plastic that was here with this carbon fiber piece. I did it on both sides, so taking that piece off the plastic original that was in this area made a lot of sense to simultaneously then put this piece on. So what follows will be sort of a combination of that. But there's also a more specific standalone companion video that I'll have links in the notes below on the removal of the original plastic and the putting in of this carbon fiber piece. I hope you enjoy them. So I was able, after very carefully not wanting to cut myself or nick the paint, get the one zip tie off of here. So the wire right now is not reattached yet. But I've just got it kind of out of the way back here. Unfortunately, the way that this is put in, I don't think I'm going to be able to. I'd hope to be able to take this whole thing off and run it back through, but I can't. So I'm going to have to figure out maybe I can do some scooching around or something to get this out of the way because I'm pretty sure it's going to be right in the way of this connecting the other thing. I don't know if I make one or two videos of this, but I also now that this is off and available, I also got these covers, titanium covers to go over that, which I think will give a really interesting look to it. Get rid of some of all the dark and black here going with the. And I think it'll complement nicely with the carbon fiber. So I'm going to try fitting that and we'll see what that looks like. But since this is off already, I think it might make life easier to try and install those as well. Well too. So as far as those go with installation, they're very light and just should kind of fit on there. So I'm going to monkey with it a little bit and then let you know how that goes. Well, as this series is called, minor upgrades, few tools and no experience. This went on really surprisingly well. I hate to take it off. We've got another one to do. So I. I don't know if I can do it one handed and show you but it's very pliable. The hose that was underneath there. I think this will. Not that it needed a lot of protection, but I think it'll give it a lot more protection and it just really kind of adds a little bit of a more radical look to things. So I think it'll give a much more open feel. I like the carbon fiber. I think they play well, nicely together. Now if I can figure out what to do with my wires, we'll be in good shape. Well, that was not a whole lot of tools. Torx wrench to get these guys on, but good Lord, I'm have to rename the show to a lot of finessing. I've got my plug in for my trickle charger hidden back here. It's right there. Maybe a little hard to see certainly from anyone casually walking by. The piece is in. I think it looks really nice. I'll do a walk around once I get the other piece in. Other side in. This again, I think looks really nice together. Here's my solution for the wire. I just kind of ran it down with as much slack as I could kind of possibly pull out of it. I hope I didn't disconnect anything. But all in all, I think it's kind of, kind of working here. I like it like up close like this. And I think it'll look good both sides. And I'm going to start working on the other side next. Okay, here we are on the left side. So I used my little cheat of this with the Torx screw. So this was the screw that was right back in there near the battery. So that's the only screw that holds this. The others are just kind of clips. So it really makes it easy. Easy. Much less scary to. To take it out. So again, sorry to lose the little Easter egg there, but I think it's a reasonable trade off to be able to get the this on. And I won't have all the wires and whatnot. Hopefully that were such a pain on the other side. I do see. I think that maybe that's a brake line, so I hope that won't be problematic. But again, just to show you this for the fit of it, I think you have an option of either this way or this way. And I'll monkey with that and put that on next. But then just really can't do it with one hand very well. But this really squishes, obviously until it gets to the ends. But in the middle it's very squishy where it pinches the most. You can kind of see that curve that way, perhaps. So it's a zero tool installation, but you really do need to take this off. Even if you put it back on. You'd need to take it off to put that on if you're not replacing with the carbon fiber like we are. So we'll take a look at what it looks like next. Well, that took a little longer than what I was expecting. You never can tell just with the finessing. The right side, I tell you, is a lot trickier with the wires and whatnot than the left side. So maybe it was good to do it first and learn to, you know, once you've done one side, you learn to some of the tricks for the other side. But I am really very happy with. With this look. I don't know if the camera does it justice, but I'm really, really happy. It brings a little more. A little less black, a little more contrast, which is what I like. I know a lot of people like just all black engines or whatever, or black pipes or whatever, but I like getting rid of the plastic that was all here, the carbon fiber. I think it also adds a little sheen to it. Maybe I don't have to have a carbon fiber piece for that. I have to look for that next. But anyway, happy with how this has turned out. I'm going to start it up and make sure, not on the video, but just to make sure that there's no vibrations and nothing rubbing. I don't think there should be because the engine is mounted to this part of the frame. But of course, there's always going to be vibration, especially with a Boxster. There's always that little torque when you first start. Even so, I hope you've enjoyed this video. It was. It was just quite, quite. This is quite the project, but happy with the results. And if you're interested, I've got the parts and where I source them, so you can too. And now you know how to do the installation, what you'd be getting yourself into, really. Again, not a whole lot of tools. This one, a lot of finesse. I'm really happy with the result. Ride safe.