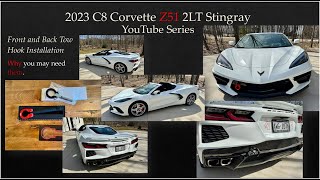
Chris Stout installs front and rear tow hooks on a 2023 C8 Corvette. USCA track rules penalize cars without them, and they're essential for extracting a disabled vehicle safely. The job takes basic tools and reversible bumper removal.
Chapters
Hi everyone. Chris Stout here. In this episode we're going to be talking about the installation of front and rear tow hooks on a 2023 Corvette C8 Stingray Z51 package. I believe these will also fit on the Z06 and other contemporary models. This is 2024 that I'm filming this. So I think any of the new C8S 2020 to current model year it's going to be I hope pretty straightforward. A lot of times in my other videos there's been some surprises but maybe we'll just start off with a little bit of background with them. The ZL1 add ons feather light is what this is. We'll do a little unboxing of it before we do. This is just pretty much kind of what it looks like. ZL1 has a variety of GM Mopar and Ford applications so please do feel free to check them out. That's where where this is or that's what this URL is to. I'll also put this in the show notes where I bought both the front and the rear separately. The so just again to unbox it. It's really pretty straightforward as to what it looks like. They also have their URL here on the back in the front that says toe and for the other one pretty similar. I'll describe them both and just a second but really pretty straightforward pieces of equipment. So the ZL1 add ons the details about it are that it is a stainless steel shaft with a what's called a cerakote finish which is very nice kind of a flat finish. It doesn't have, I believe it's pronounced heim joint. Heim. It doesn't have a heim joint in it so that's in some instances considered to be stronger. If you know much about that, please put it in the comments below. So while this is coated stainless steel, this is a billet D ring that's powder coated which is nice and it's made in the United States. This rear One is an SR1 Performance rear tow hook. Pretty straightforward. Also stainless steel shaft and it's got a black anodized ring. Basically the color differences are I've got little spots of red on my car. If you've seen some of the other videos. I've got red brake calipers. I've got a little red Easter egg in the dash, red center centering stripe on the steering wheel. I'm going to have red road course maps of Road America and Blackhawk Farms where I'm going to be racing this year. So I wanted just little teeny spots of red, you know, periodically throughout the car. And this really kind of does the trick with that. Plus, I, I hope I won't have to use either one of these, but I feel like this one also is really going to kind of, kind of do the job. It's very beefy, very heavy duty for the rear since there's more black. I know there's black in the front, etc. But there's Chrome tips. I've got the chrome tips, not the black tips on the exhaust pipes. And it's more so, you know, with little black highlights back there. I don't have the black spoiler. I have the white rear spoiler, but it's got the black Corvette lettering and the black rear diffuser. So I just kind of felt that that was a little black and chrome underneath the bumper, so to speak. That area, it just kind of made more sense. So personal taste, we'll see how it looks and you can weigh in on that. The tool is basically just going to be a small little pry to take off the outside coverings and the. Why? Why am I doing this? Some people do it just for cosmetics that they, you know, kind of think it looks cool. You'll see this on a variety of other cars toodling around town that are never on the track. But for me, it's purpose driven. The US CA United Sports Car, or pardon me, Ultimate Streetcar association will give you a 5 point penalty out of 100 points on your car setup and configuration if you don't have tow hooks. The other reason is I'm going to be on the track. I'm going to be on a variety of tracks and God forbid anything go wrong, but if something did, this is the. These are the quickest, easiest, safest to your car way to get your disabled car off the track without then creating further damage and mayhem. So again, bits of insurance, maybe. They also look cool. I've not been a super fan of these kinds of things. I'll probably show them in this installation and then take them back off. But anyway, that's what the plan is. And next up we'll show you the front installation and then the rear here. Okay, we are now in the garage. I've done just a little bit of prep here. This is just really a pretty straightforward setup. I used these tools. I'm not sure, I might have gotten them for some kind of electronics or whatever, but they've got just like a little hook in them and I try and get one open and then get the other One in there. This is probably the trickiest part of the whole process is getting this piece off. So without scratching it or anything. There's is a little indentation here. I think that shows and that's kind of where I started working with it down here. Get that open pride a little bit and then use one of the other tools to catch it on this edge and then drop gently open it up. Now if I hard to make sure you see this and I can see it but there's a little. This has got a little rounded piece in it. I don't want to break it. That kind of keeps it on. Like if you were to not have to take the whole piece off. I'm going to take the whole piece off once I have the piece in it. And then it won't be flapping around or anything. So actually I'm going to take two hands to do that. Be right back. Okay. So now that's removed. There's just kind of like this little vertical slot there that this would go into. So if you get a good hold of this part of it and gently pull, this will squeeze in and it'll pop out. And then obviously if I want to put it back in, just reverse that process. So just being careful with it. I've also waited till it's a bit warmer. I'm in Wisconsin. I would imagine that gets fairly brittle when it is cold out. So I'm just now looking down into this tunnel here. There's an outer sleeve which is sort of hard to see and then the inner sleeve where things get serious and start to bind and connect. So let's see. So I'm just taking this. No big deal and lining it up into that hole left handed, one handed until it gets started. I think you have a lot of choice of taste. Once this is in, you can have it. That's kind of it. There's the installation. So it is. Some people like it vertical. I think I might like it vertical a little bit. That's when it's super taut. So you might have it vertical. You might have it more horizontal and dropped like that if that's your preference. So either which way I have seen with people on the road with C8s and other cars as well. So I don't know if I can get you a very good angle or look with it here. But it. It's not showing so much in the camera to me. But I certainly do see it here. So it is kind of cool. Gives it. Yeah. I'm a race speed racer kind of guy. So here it is from this other angle as well. And if you like it vertical, here's what that would look like. I think I've seen that actually more Japanese cars, Honda's in particular, speed racers like that. So there's kind of what it looks like at this point. So all really kind of a matter of whatever your taste is. Now we'll go around to the back and do it. So here we are now at the rear. This bright sunlight on this first warm day of spring is really showing up all the garage dust that I have on it. So again, similarly, I used these two tools to pry open this piece in the back. This one's more square. And again, I don't know if you can see it, but there's a little niche, not little notch right there. So same process, got it started with one and finished it off with the other. And then likewise, if I can maybe I can do this one this time just gently pull. Oh, that one's. That one's broken. So I did not do that. But this one's broken, sadly. Or maybe that's how it is. I don't know. This is. I've not taken it out before. I guess this is actually how that one is. If I can get it right in the sun. Sorry. There you go. If it's focusing, it's like that one's like really more of a hook. So I think it was actually made that way. That's interesting. If people know different, put it in the comments below. So here is the back one. And again, likewise, it goes in through a tunnel. And I'm going to try and do that with my other hand. This one's shorter, much shorter. As you can see, it doesn't have as much body work to avoid from the rear bumper. It does the front. And again it just goes right in there like that. Now this one gives us again choice. We can have it be this way or we can have it be vertical. It's all really a matter of taste and choice of what you like. We do have the difference here that we have adjustments for tightness. It's fairly tight from the factory like that. Or we can also. We've got other adjustments here so that it's perfectly taut with whichever way we like it. So you can just take a open end wrench or a adjustable wrench to tighten that up. So I'll probably mess with it a little bit and see what look I like better. Probably will go with it down like this. But again, just from the perspective of as I get up here, here's kind of what it looks like down and again I tried to go with the black of the rear diffuser with the pipes etc rather than the red. So anyway, I hope you like that and more to come. Please check out the other videos if you enjoy this. These are really pretty simple modifications. Again, this was done just to be able to meet standards with usca, so and easy enough to put in take off. So I guess that's that's it's so simple it seems like there should be more to be said, but thank you for watching. If you like this, please do hit like and subscribe and check out our other videos in the notes below. Thanks for watching. Drive safe. Race safe.