Scientist Stories: Julia Joung, Genome Engineering and CRISPR Screens
In this talk, Julia Joung provides a comprehensive, step‑by‑step overview of how to design, execute, and analyze genome‑scale CRISPR screens, incorporating updates to the 2017 Nature Protocols method. She contrasts traditional forward genetic screens and shRNA knock‑down approaches with CRISPR‑Cas9 knockout and dCas9‑based activation (SAM) screens, highlighting the superior signal‑to‑noise of CRISPR. The presentation walks through the full workflow: selecting or constructing a guide‑RNA library (commercial GECKO/GEKKO, Brunello, SAM, targeted or de‑novo designs), cloning and quality‑control (Gibson assembly, representation scaling, NGS verification, skew metrics), lentiviral packaging (lipofectamine 3000 vs 2000, PEI, AAV for non‑dividing cells) and precise titering to achieve a low MOI (<0.3) that ensures single‑guide integration. She details how to calculate cell numbers for desired coverage (≈500 cells per sgRNA for typical screens, higher for negative selections), set up bioreplicates, choose selection strategies (positive, negative, marker‑gene/flow), and determine drug dosing (IC50). The talk also covers downstream analysis (MAGeCK, Rigor) and validation (indel PCR, Western blot, RT‑qPCR) and stresses best‑practice principles such as maintaining coverage, using non‑targeting and known‑gene controls, and keeping protocols consistent throughout the screen. The talk ends with acknowledgments and an invitation for questions.
Chapters
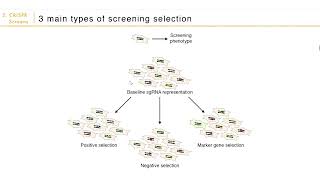
Hi, good afternoon everybody. So today I'd like to give an overview about how to perform and design CRISPR screens. And this is an overview about what we've published a few years ago, the details on how to perform a CRISPR screen in a Nature Protocols paper from 2017. So today I would like to just give you the overall highlights of what's important when designing and performing a CRISPR screen, as well as any updates we've had to the protocol since the publication. Forward genetic screens are very powerful tools for studying any genes that lead to a particular phenotype of interest. Traditionally, this was done with Drosophila, and what people traditionally did was they would chemically mutagenize the flies, and then after growing the flies up, picking out which ones had interesting phenotypes that they wanted to focus on. Then they would go back and figure out which genetic perturbations in the fly of interest led to that phenotype. So, basically forward genetic screens are very powerful tools for mapping specific genetic perturbations to phenotype. Now, the problem with the Drosophila screens is that going back to figure out which perturbations led to the phenotype of interest was very difficult to do. And with the advent of shRNA and CRISPR-Cas9 screens, this became a lot easier. So to give you a brief overview, shRNA screens work by base pair complementary pairing to the mRNA of interest. So what you can do is you can introduce a pool of thousands of shRNA sequences into a pool of cells. Then to figure out which genes led to your phenotype of interest, you would just sequence the shRNA, and you can tell by, because shRNA base pair complement the mRNA of interest, which gene was perturbed. To get to that phenotype of interest. Now the problem with shRNAs is that even though they did lead to a lot of interesting discoveries, especially in the early days, shRNA screens were hampered by the fact that shRNAs are often nonspecific. So you could get hits where it was producing the phenotype of interest just because the shRNA had a particular off-target. With CRISPR, what we have is the CRISPR-Cas9 knockout as well as activation screens. With CRISPR compared to shRNAs, CRISPR-Cas9 had fewer off-targets, which means that the screen that you are getting had better signal-to-noise ratio. Just to give a brief overview again, the way a Cas9 knockout works is that you can cleave the mammalian genome at a particular designated site, site guided by an sgRNA, and once you cut that site, there is most likely an NHEJ-mediated repair, which means that there's an insertion or deletion, and from there you are likely to get a frameshift in your protein sequence, and that leads to depletion of your target mRNA. And protein. With Cas9 activation, so dead Cas9 is basically a catalytically inactive Cas9. What it does is it becomes a programmable DNA binder. Today here I will cover dead Cas9 activation, but of course all the principles that apply to dead Cas9 activation also applies to repression and other epigenetic modifiers. For screening. In our lab, the dCas9 activator that we worked on is called SAM dCas9 activator. What it consists of is 3 different activation domains that have been built onto the dCas9, the BP64, P65, and HSF1 activation domains. Together, this forms an activator complex that can very robustly activate target genes when you position this dCas9 activator at the promoter. And after the positioning, this leads to mRNA upregulation. So together the CRISPR Cas9 and dCas9 binders have become very useful in discovering a series of different phenotypes of interest. So, I will just name a few of these things. More and more every year there's a lot more different phenotypes that people have been interested in screening. But just to list a few examples, CRISPR-Cas9 screens have been very useful for drug and toxin resistance, discovering gene essentiality, and more recently people have used them to study the viral host factors as well as immunotherapy. Now going beyond the coding genes, you can also engineer CRISPR libraries to target non-coding elements, and that has been of recent interest because now you can study what these non-coding elements do at large scale. And basically you can do a CRISPR-Cas9 screen for any biological process with a screenable phenotype. So what do I mean by a screenable phenotype? There are 3 main types of screening selection that is possible. So, for example, if the, the blue cell here has a perturbation that leads to your screening phenotype, then in the positive selection screen, which typically gives you the best signal-to-noise ratio, in the positive selection screen, after you apply the selection pressure, you get more of these blue perturbations enriched at the end of the screen. And so you can say that your target cell is positively enriched. In a negative selection screen, this is the exact opposite, where the blue perturbation is no longer found at the end of your screen. Typically negative selection screens are a bit more difficult to perform and require slightly higher coverage because you are measuring a decrease in signal. And the last one, perhaps the most versatile one, is the marker gene selection, where you care about one or more genes that lead to your particular phenotype, and after you apply the screening pressure, you can apply a series of different methods, whether it's by sorting a reporter gene or doing single-cell RNA-seq, you can select for your perturbation of interest at the end. The marker gene selection screens typically are, even though they're more versatile, they're a bit more difficult to perform because generally the ways that you would go about selecting for this particular perturbation of interest are not as scalable as, for example, a positive or a negative selection screen. So that's something to keep in mind. So to give a very broad overview of how the steps are involved in CRISPR-Cas9 screening, first you start with choosing or designing a library. And then you package this library into lentivirus for delivery and into your pool of cells of interest. And then you apply a screening selection to your pool of cells where you then enrich or deplete the cells with a perturbation of interest. And then at the end of the screen, you isolate the genomic DNA, and based on the guide distribution in this genomic DNA, you can then select candidate genes for validation. So now I will go into detail about each of the steps. So to start out, the library construction part, depending on whether or not you're picking an existing library or designing your own, this can take anywhere from a few weeks to many more weeks. [LAUGHTER] So starting with the easy parts, the ready-made libraries on Addgene. So right now there's a lot of different libraries on Addgene. I will talk about what our lab has put out so far and also mention some of the new ones that I would recommend using. So first, the knockout libraries. From our lab, we have the GECCO libraries, which many of you probably have heard of. The GECCO libraries come in either a one-vector system where the Cas9 and the guide RNA are on the same vector, or a two-vector system where you have the Cas9 and guide library separate. Typically, people will choose the two-vector system because it's easy to make a cell line with a Cas9 and then just introduce the library at low MOI afterwards. Worth after building the cell line. And the second one that we've put out is the activation libraries. The activation library, because the dCas9 activator from our lab has multiple components, this comes in a 2-vector or 3-vector system. In the GEKKO library, there are 6 guide RNAs per gene in the library. And then in the SAM library, there's 3 guide RNAs targeting the promoter regions of each gene. Now moving beyond the GECCO and SAM libraries, more recently there's been a number of libraries put out by the GPP, which I would recommend looking at if you don't already have the GECCO library. I think from the knockout, the most recent one might be the Brunello library, and then for activation, I think they have a newer version out as well. So those would be worth looking into if you're just starting out because those libraries have better on-target and off-target scoring systems, more up-to-date on-target and off-target scoring systems. Now, if you're looking at a marker gene screen, for example, and you don't want to have to deal with all the genes in a genome-scale library, what you can do is you can design a targeted library based on an existing library. So, in the protocol we have a script for isolating the guide RNAs of interest based on the list of target genes that you want to isolate. And so again, typically you would do this if you want to screen at a smaller scale, and I'll talk about the scale of the screen afterwards, but a screen typically, a genome-scale screen will require hundreds of millions of cells. So if you're doing a marker gene screen, screen, for example, and you don't want to deal with that many cells, you would want to scale down your library to only genes that you care about. In many instances, this could be genes that are expressed on the cell surface or kinases, for example, that you are interested in. And so the last one is a de novo library design. We also provide a script in the protocol for designing a de novo library. This could be very useful if For example, you are designing a, what we call a bashing screen where you are interested in 100 kilobases of genomic DNA, non-coding region surrounding a gene of interest, and you want to identify any interesting regulatory elements in that area, then you probably want to design a custom library from scratch because there's no existing library that targets the region of interest. So just briefly, the way the library design works is that you have your genome of interest, genomic region of interest, then you look at all the guides that are in that region, and then we will select guides based on minimizing off-target activity and maximizing on-target activity, as well as a few other filter criteria, like GC content and homopolymer stretches. These two criteria make the guides easier to synthesize by existing companies. And we will also include multiple guides per target to offset any potential off-target activity, and include non-targeting guides as control. So moving on, we then, if you are designing, starting out with a custom library, we provide detailed steps on how to scale up the cloning portion. But briefly, you would synthesize the oligo pool using, for example, Twist or CustomArray, and then you would PCR amplify these oligos. Then you would restriction digest your plasmid backbone of interest, and then Gibson in your library into the plasmid backbone. Then before you put this into E. coli, there's an isopropanol precipitation step to purify the DNA. And throughout this cloning step, the difference between cloning a library versus a single plasmid is that throughout this process we maintain representation of the screen by scaling up the reactions accordingly. And we have a table for how to scale this up in the paper. So then moving on, before we start the screen, it's very important to do a quality control step where we will sequence the library that you've cloned and make sure that all the guides that you think is there is actually there and the library is not too skewed. So we do this using next generation sequencing where we will do a PCR to amplify the guides and then we sequence at a depth of 100 reads per guide. And then based on the guide RNA distribution, if you followed, If while you're preparing the library, you've followed all the steps that we listed, and your oligo manufacturer is very good, then you should have about 70% of your guides should be perfectly matching, and with lower than 0.5% undetected. And the skew ratio here refers to the top 10% versus the bottom 10% of your reads, what that ratio is. So how skewed your library is. So then after NGS verification, then we proceed to package the library into lentivirus. And the reason why for screens we always do lentiviral, or almost always do lentiviral delivery, is that the lentivirus integrates into the genome of your cells. So if you're doing a positive selection screen or a negative selection screen, where you're measuring, trying to measure cell growth, before death, then the number of copies of your guide RNA will be representative of how many cells you have from that particular guide. And in the protocol, we include both a lipofectamine version and a PEI version, and so you can pick and choose depending on what you want to do. In the protocol, we list lipofectamine 2000, but now we're using lipofectamine 3000, and I've posted this, the details of this particular protocol on our CRISPR Google forum if anyone is interested. Basically the difference is that Lipofectamine 3000 is much more efficient at less than half the cost, and so it was a no-brainer to switch from 2000 to 3000 for us. And if you are interested in non-dividing cells, you can also use AAV for delivery. Okay, then the trans— once you have the library, then we move into putting this into your pool of cells of interest. Now before every single screen, it is very important to calculate the lentiviral titer, because what you want to make sure is that it is most likely that every single cell you only have one copy of the guide RNA. If you start integrating multiple guide RNAs into one cell, then you are confounding the the effects of that particular guide RNA. So before screening, we always do a lentiviral titer step. And what this is, is we will either spin infect or mix depending on your cell type of interest. Spin infection is more efficient than mixing, but at the same time, not all cells can handle being spun for 2 hours, and so we provide both methods. And what you do is you put different amounts of lentivirus onto your cells, Then after selecting for 3 days using the whatever drug corresponds to your library, then you can calculate the multiplicity of infection, which is a ratio of the cells that have survived your selection versus the cells that did not survive selection. For the sgRNA library, you want to make sure that you use an MOI of less than 0.3. This ensures that you don't have to start out with a gazillion cells, But at the same time, you try to minimize the number of cells that have multiple guide RNAs in your screen. And then from here, after calculating the lentiviral titer, you will scale up accordingly using the same exact method that you used to do the titering in the first place. So how do you scale the transduction? So as I alluded to previously, A screen is a lot of cells. For the transduction of a screen, per biorep of the screen, if you have 100,000 guide RNAs in your screen, and you want a coverage of 500 cells per sgRNA, which we recommend, and you have an MOI of 0.3, this means that you need to start with 167 million cells. And during your screen, after the selection, you only need to maintain 100,000 guide RNAs times 500 cells per guide RNA, which is about 50 million cells. So every single time you passage your cells, you need to make sure that you retain 50 million cells to make sure that you maintain the coverage of your screen. So to give you an example, for a knockout screen, what you would do is if you are using a two-vector system, you would introduce the Cas9 at an MOI of less than 0.7. For a Cas9, it's less important that you use an MOI of less than 0.3, because you don't really care if one cell has multiple copies of Cas9. And then again, you transduce the guide RNA library at MOI of less than 0.3. And then for knockout screens, we typically start the screen 7 days from the start of the library transduction, because this is where the indels will saturate. After 7 days. And then during the screen, you can maintain representation at 500,000 cells per guide RNA. And for screens, it's very important to do multiple bi-reps, just like any experiment. And so you will start out with usually 2 bi-reps, I would say, if this is your first time setting up the screen, because you're not sure if it's going to work. And then for a very noisy screen, you can increase this up to 4 bi-reps. An activation screen is very similar to a knockout screen where you put in all the components first, and then you put in the library. But the difference is that for an activation screen, you can start the screen at as soon as 4 days after library transfection because these cells have already been selected for the library. And for activation, you don't need to wait for the activation to saturate. It usually is pretty quick. So one of some of the main considerations during screening selection is that this, this really changes for every screen, how you do the screening selection. But there are a couple of main points that I want to get across because these are things that apply to every single screen, the setup of every single screen. So first, you want to pick parameters that maximize the difference between experimental and control conditions. If you are lucky, there's probably a few genes that serve as good positive and negative controls that you can use to set this number, whether it's the drug dose or other conditions. For drug dosing, since a lot of people do this, typically we will screen at the IC50 of the drug because this is like, there is selection pressure but it's not so strong that you're killing off most of your cells. And so for drug selections, we typically use IC50. Again, very important throughout the screen, maintain the coverage of 500 cells per guide RNA. This will reduce the noise in your screen. And if this is your first time setting up a screen and you don't really know at what time you should be harvesting the cells, just collect multiple time points. You can always resuspend the cells, freeze some down, throw it in the MiS-80, and it's not a lot of work, but if you have these time points, and at the end of your sequencing, if you realize that you need to go back to the other time points, it's very easy to just thaw another vial of cell pellet. So it's very important to do this, especially if you don't know what time scale you're going to be looking at. And during screening, it's very important that we keep all the experimental protocols consistent. So if you are doing the lentiviral titer one way, do the exact same thing when you're scaling up the screening. Screen, use the same lot of FPS throughout your screen because a screen is already very noisy so you want to minimize noise as much as possible by keeping your technical procedure very consistent. Okay, so then moving on to harvesting and analyzing the screen. In the protocol we describe how to use Rigor, but at this point Rigor is fairly outdated. Most people in our lab actually use Magic to analyze our screens, and I would recommend looking into using MAGeCK for analyzing your screens. But Rigor and MAGeCK and any other screening analysis program are very similar in that they follow like a similar trajectory where you first normalize the experimental guide counts to control. For positive and negative selection screens, usually for drug dosing, for example, you will have a drug-treated and DMSO-treated control. For flow screens, typically you will have the high bin versus the low bin, and the low bin is your control. So you do this normalization to account for any initial starting skew of the library, and then you rank your guides, and then both of these methods will use the, so take each gene, look at all the guide rankings for that particular gene, and then calculate how enriched each particular gene is relative to random chance. And then looking at your bioreps, you would take either the average enrichment value or the overlap depending— and this depends on the person. Either one, both methods should look very— produce very similar results. In this case. So, at the end of the screen, it's very, very important that you validate your candidate genes. A screen only produces a ranked list of candidate genes, and you have no idea if— well, unless all— some of them have been characterized in literature, you really don't know for sure if that particular gene actually produced the phenotype that you are interested in. For every screen, it's very important to go back and validate guide RNAs. So for validation, the process is extremely similar to doing a normal screen, except now you're replacing the library with a single guide RNA targeting a single gene of interest. So you repeat this entire process, and Oh, one second. Um, I think it just went blank for some reason. Is it scrolling? There is— well, there should be. Okay, but now we're missing the— yeah, it's just slightly offset. I guess we could do this. Okay, so for a knockout screen, this means that after you put in the guide RNA, you extract the genomic DNA, and then you verify that there is indel, and your screening phenotype occurs once you put in the individual guide. And because not all indels will deplete the protein, it's also very important that you do a Western blot to verify that your protein of interest is depleted. And in the protocol, we list out a very fast way to do a two-round PCR for evaluating indels. So for the activation screen, what you want to do then is verify that— activation or repression, you want to verify that your RNA is increased or decreased as you would expect. In the protocol, we provide this homebrew protocol for rapid extraction of RNA as well as reverse transcription. It's very similar to the cells to CT protocols, by Thermo, except Thermo sells this kit for I think a couple thousand dollars per plate, and ours cost maybe 1% of that, so I highly recommend looking into this. Basically, the way it works is that you make your lysis buffer, you throw the lysis buffer onto your cells, pipette up and down a couple times, and then you can transfer the cell lysate directly from the plate into a reverse transcription transcription reaction, and then do your reverse transcription, which takes about an hour. Then you can directly do TaqMan qPCR on that reverse transcribed reaction. So it's very quick, and if you're doing a lot of RT-qPCR, this is a very quick way and cheap way to do it. So again, you would want to verify your screening phenotype and also do a Western blot to make sure that your protein was actually overexpressed. Expressed, as you would expect. So just to highlight again the most important considerations during a screen is, like I repeated several times, you want to maintain coverage throughout the screen at at least 500 cells per guide RNA screen. Now for noisier screens, or for instance, for negative selection screens, you might want to increase this number to 1,000 or 2,000. And it's also very important to include controls. For a screening library, the controls are, for example, the non-targeting guides in the library itself. So you can look at how the non-targeting guides in your library changes before and after selection to figure out how much noise was in your library. And known sgRNAs that, well, sgRNAs that target known genes that should affect your phenotype should be used to select your screening parameters, and you should always include the negative control biorep in your screen, which is the condition that did not have your screening selection. And again, throughout the screen, remain consistent, use the same protocols for screening and validation. And I just have my acknowledgment slides, so if anyone has questions, I can take questions now. Yeah, it's doing the same thing. Yeah. Ah, so this is actually a very ancient photograph of our lab. Most of the people in this picture aren't here anymore, but the people who really helped me set up this protocol, taught me all the initial stuff about screening are in this picture, and so I'd like to acknowledge them. For example, Neville, as a lot of people know, is also a screening person, and he helped write part of the protocol as well. Thank you.
More from Joshua




Scientist Stories: Hans Waterham, The value of phenotypic assays in peroxisomal disorders

Scientist Stories: Joel Zlotogora, Genetic carrier screening programs for reproductive purposes