7 STEPS to YouTube SUCCESS | Unlock Your Channel Potential
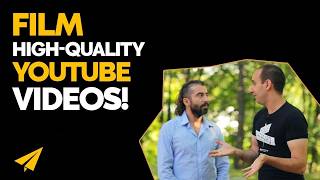
In this conversational interview, host Evan Carmichael and photographer‑videographer Richard Yagatilove walk viewers through seven practical, low‑budget steps for creating better YouTube videos and growing a channel. They begin by urging creators to start with whatever camera they already own, emphasizing that high‑end gear isn’t required. The second step stresses the importance of clear audio, recommending the use of built‑in mics in quiet environments or inexpensive external clip‑on microphones. The third step covers background selection, advising simple, non‑distracting backdrops such as a blank wall or affordable foam‑core panels, and offering tips on paint finish. The fourth step focuses on lighting, suggesting natural soft light from windows or inexpensive front‑facing lamps and warning against harsh shadows. The fifth step explains basic editing techniques using free or built‑in software (iMovie, Movie Maker, Camtasia), urging creators to cut pauses, ums, repeats, and keep videos tight. The sixth step highlights the value of building a small team—editors, researchers, comment managers—to let the creator focus on strengths and scale output. The final step stresses consistency, encouraging regular uploads (at least weekly, ideally daily) to improve skills and audience growth. Throughout, both speakers share personal anecdotes about their own gear upgrades, workflow evolution, and the psychological challenges of starting a channel, ending with a motivational call to action and contact information for Richard.
Chapters
Hello everyone, I'm joined by my good friend Richard Yagatilove, who is a celebrity photographer and videographer, and he's joining me today to talk about the 7 steps that you need to take in order to make amazing YouTube videos without spending a lot of money. Okay, so what's step 1?
So step 1 is you want to figure out the camera you're going to use to record yourself. So you can use pretty much in the beginning, you don't know if you're going to like this, you know, if you're going to continue on doing it, so you don't want to spend 2, 3, 5 grand on setting up outfitting your equipment. So start with what you have, whether it's a cell phone camera or an old video camera or anything that's digital and can easily be converted or can be input to your computer for editing and for posting. So start with anything that you have that's good enough, and preferably, hopefully it's got HD quality, which most stuff does now.
I started my first videos with my DSLR Canon camera and then went to my flip There was that— I don't know if they're still around, the Flips. I went to the Flip. And then I got a camcorder from Costco, and I kept upgrading at Costco because they had a generous return policy. So Henry's and other stores, they give you like 7 days and then you gotta bring it back. Where Costco, I could try it, return it, try it, return it. And I eventually got a camcorder, Sony— no, Sony Handycam? Is that what it is? Sony Handycam?
I still have one of those.
For like $400 from Costco, and then I used that for over a year before upgrading to the next level. And so yeah, I totally agree, you start with what you have. A lot of people feel like, "I can't get started because I don't have the right gear." That's just in your head. Get started. Get started with what you have right now. So what are you using to shoot this right now?
Right now we're using my DSLR, which is a Canon 5D, and I've got a really nice lens on it that I use for portraiture, for photography, and it's a beautiful 85mm f/1.2, so it's super bright, super fast lens. And that's my favorite, that's what I'm using right now. Yeah, but you can also do this on your camera. And here I've got my little Samsung camera already ready to record, and it's in selfie mode, so it's a lesser quality camera than the back camera. And we're just gonna press record. Here you go, so this is what this camera looks like. This is us on camera.
Yeah, and this is good enough quality to start. Yeah, just get started.
You can do it like this. The only thing is now you're hand-holding it, so maybe you want to figure out a way to something to put it on. Maybe some selfie stick or a tripod that can hold a cell phone. A lot to manage if you're hand-holding. You might want to consider putting it on a tripod.
It's just for me and 2 people. But quality is good enough. Don't let the gear hold you back.
Yeah.
So what's step number 2?
Step number 2 is sound. It's so important to get good sound because if the picture is decent but the sound sucks, no one's gonna watch it. They can't hear it. They can't engage. Yeah. So, and you don't want to go out and spend a few hundred dollars on a mic and then learn how to set it up. So you could use your onboard sound. That means the sound that the microphone that comes on the camera you're using, or even on the cell phone. But now the only thing that you can control, since you can't control that mic, you can control the environment. So you want to make sure you're at a space that is actually quiet, that won't have a dog running around or someone honking their horn or, you know, music playing all of a sudden. You want to be able to have a quieter space. So whether that's like here in nature, or if it's a room in a house that you know is going to be quiet, or anything like that, that the sound is controlled.
Yeah, when I first started, that was the number one complaint that I got, was the sound quality. I was just talking into the camera or talking into like my webcam. Here we're using— we have a ClipMic that we're kind of sharing. It's on me but kind of pointed this way so it could share. When I do my normal videos, I've got a mic as well now, but when I first started growing, the first investment that I made, the reason why I went for the higher end, the higher end $400 Costco camera, was because it had an external microphone jack so that I can go to Sony store, I bought a $90 clip mic, and it just made a huge difference. I think most of the cameras now should have an external microphone jack.
Yeah, they are.
But that was the number one complaint. Yeah. So even now I'll still record videos on my iPad where I'm walking on the street and a number of you guys commented that, "What are you using? The sounds, it sounds really good." And so I think the devices are getting a lot, a lot, a lot better at being able to pick up sound, as long as there's not too much wind or car noises or airplanes overhead. Here we've got birds in the background, we might have the occasional airplane going over, but it's not being picked up as much because we have the clip mic. So the first investment that I made after getting the camera was getting that $90 external clip mic, 'cause it really makes a big difference on the sound quality. So what's number 3?
Number 3, I would say, third consideration is the background. You want to make sure that the background is not distracting and is actually complementary, looks nice. So whether— here we chose this background, although it's rather busy, but because the lens I've got going on, we have extra control because of the equipment we're using. So I can make the background go out of focus, and it actually becomes a really nice shot because we're in focus and the background is all just colors and lights and out-of-focus bokeh. But if you don't have that, and for most people starting out they won't have that, my recommendation is to start with a background that's just a blank wall. So going into your home, your office, or some interior environment where there's just a blank wall. And if that doesn't exist, then take a room that's got stuff on the walls, but go to an art shop. You can buy this— it looks like— it's like a Bristol board that's taped onto a foam core. It's called foam core, white foam core. They also sell black foam core. You could buy a big 4-foot by 8-foot piece for $20 at an art shop. You can even buy a smaller piece, so for $10, $15, you can have a great background and just set it up behind you. Or you can even— you can even just paint a part if you're that dedicated, you're up to doing it. Just paint a little square behind you on the wall somewhere that you can control. This way you have a nice simple background.
Yeah, when I started my videos, they were always on a blank wall for the most part when I was shooting myself. And it was just a white wall in my office. That was it. And now most of the videos that I shoot myself are on the office that I have now. And I painted my wall black.
Nice.
And then I had my logo, which is black, printed off. And it's just one of those removable stickers that I have on the wall. So if you ever watch some of the Hangouts, you'll see the big black Believe and the black wall behind me. And my wife thought it was crazy at the first. Why are you painting the wall black? We don't want a black wall here. But now she thinks it looks good.
Yeah, and you know what, to add to that, if you're gonna paint the wall, use the dullest, flattest, most matte paint you can because the paint will reflect light, which will make it really less pleasant. So make it really flat or matte. And the other thing about backgrounds, the reason you don't want to just handhold it and walk around is because the background is so distracting that we as the viewer will watch you and we'll get distracted from your message because we're looking at the pretty background behind you, the people walking by, or the birds, or the sky, or the snow, whatever it might be. So it's better to have a really simple background so that the focus is on you and your message rather than getting distracted with everything else that's going on. We've used this background right here because I could blur it and bokeh it so you have a really nice backdrop. You can't really tell what it is except for that it's trees. It's not distracting. The focus is more on Evan dancing, so it works. But had we have chosen another background here, which he's not really in the sun, but it's a little bit busy still. You know, the eye is going to that lamp on the right side, and it's going to all the bricks. Evan's dancing is awesome. And it's going to the bricks. There's too much going on. To this background, which we could have also used right there. Now we've got Evan right in the sun, squinting, really not looking that great. Plus we also have you know, a house in the background. It's not as interesting, and there's windows— it's too much going on.
So what's step number 4?
Step number 4 is lighting. You want to make sure you're well-lit, which means pleasant light all over your face so there's no hard shadows. So how do you do that? And also the color of the light also matters. So right now, being outside in ambient light, meaning no direct sunlight, sunlight. So that's the perfect light you can get because then the light is very soft and it's always filling. It fills your face and the color is right as well. It's all one color. So how do you manage that out or indoors? Indoors, I would say either bring a light to put in front of the camera, like just one light source, a soft light, or, or maybe take a lamp and, and have it facing you from the front. Overhead lights are also good. The only thing is depending on where you stand with the overhead light, it might cause or cast some really nasty shadows. So you want to try to get a light in front of you. Or another thing you could do is just stand in front of a window like Evan here used to do. Stand in front of a window with softer light, so no direct sunlight on your face. That's a really great way to do it.
Stealing my points, man. I gotta add something here. Come on, man.
It was there, so I took it.
One of my very first videos I did on P.T. Barnum, and I was so happy because I borrowed a friend's camcorder to shoot it. But I did it in front of a window, there was a window behind me, and I thought, "Oh, because I need to get light in on me, right? You're supposed to do it with the window there." And I was so dark and all you could see was outside. And so from that video on, I always just tried to face a window so there's light on me. And it may not be the most advanced technique, and some of my friends in the video editing world are like, "Oh, come on, you need to have a setup and lights and softboxes and—" all of this stuff, and I mean, that could help, but just standing in front of a window makes a huge difference, and I did that for years when I was starting my channel. Now in my office, when I'm filming on the black wall, I have one overhead light and just two lamps that I point— not softboxes, just lamps from IKEA with soft light and kind of pointed up at the ceiling so it bounces instead of being right on me. So what's step number 5?
Step number 5 is editing. So what, as a beginner, what you can do for editing is use what you have on your computer. Most computers come with a simple editing format or editing software. So yeah, on a Mac you got like iMovie or Movie Maker, on a PC or Camtasia, all that stuff. So use those for editing. They're usually drag and drop, very simple. Keep it simple. What I would say is edit out all prolonged pauses where there's nothing said, or edit out ums and ahs, or or searching for words. Edit those things out, make it really tight, or as tight as you can. Also edit out where you repeat yourself, because we tend to repeat ourselves, right? We'll have like the same point said 3 times in slightly different words. So as you're editing, you're watching it, you're listening to it, be aware of what you're saying repetitively that you can maybe cut out, because it makes it much better for the viewer just to see it shorter and get the point once rather than being inundated with the same message. Yeah, I love it.
I think editing saves you because if you make a mistake, you just keep going, right? A lot of this— this video is probably like 10 times longer than what is actually released because we made mistakes and had bloopers and had some fun and ran away from bees and—
Holy crap, that's a huge wiggle!
That went on camera. And so Like if you make a mistake, it's okay, just keep going and you can cut and edit it out. I started using Movie Maker that's free with Windows. Yeah. Uh, actually pretty powerful and easy to understand program. It does all the basics that you need. I stepped it up to Camtasia, uh, somewhere probably about a year in. And then after that I turned it over to an editor to help me with. But, um, super valuable. Cut out your, cut out your ums like I just made an um. You know, you can cut out the repeats, cut out the bloopers, but I like adding those in at the end, you know, little bloopers, some fun at the end. And also let's make a cool intro and outro. Don't worry about being the best editor in the world because the most important thing is going to be your message and getting that out and having something powerful to say on camera. So step number 6 is get a team. Now Rich is lucky enough to be able to have all the skills himself to do the recording and editing because that's what he does. For me, I've had to build up a team because I think what's important is to figure out what you're really good at, where you can shine, and focus your strengths on that and not do the things that you suck at or are weak at. Because if you're only spending 10% of your time on the things that you're really, really good at and 90% doing stuff that you're mediocre at, then you're never going to be able to do anything great with your videos. And so the first person I hired for my team was an editor, and That allowed me to go from making 1 video a week to like 7 videos a week because I could just be in front of the camera. I still shot everything myself and then gave it to her, just send it through Dropbox, and everything else magically happened, right? She would post it to— so Christina now is my full-time editor. She'll post it to my YouTube channel, she'll name it, she'll add the thumbnail, all of that stuff that I can contribute to, but it's not my core strengths. We've expanded to now I have her husband Sam helping me on the editing too, so we've got 1.5 editors. The second person I hired was Ivan, who helped me do a lot of the research for my videos, especially the top 10 and the espresso videos. That is an insane amount of research finding clips to be able to put on the channel, and that allowed me to go from 7 videos a week to 14 to 21 videos a week, right? So now I'm just shooting me, I'm doing the best that I can, and I've gotten people on to help me with everything else. I have a videographer who comes in once a week, and I shoot my videos normally on a Wednesday, and he just gives me the files and I send them to Christina. And now Nina is helping with the comments because I have so many comments coming in that I can't keep up myself with them. So it's Ivan, Christina, Sam, Nina, and Jason, and me. So it's 6 people on my team to make this channel happen.
That's awesome. It's a good quality problem to have.
Yeah, but it started with the editor because that's what I wasn't great at.
Step number 7. So that is consistency. Like everything else, you can't just start and drop it and hope to get better at it. You start it, just keep going. Keep going for a while until you know for sure that either you're not gonna do it or you know for sure that you are gonna do it. But keep consistent until that point. So pump out videos all the time. Don't get stopped. Get outside your head. Don't criticize yourself. You're going to suck at the beginning, but you're going to get better. Everything's going to get better. The picture will, the sound will, and so will the quality of the video.
What do you have to say? Yeah, I think this is one of the most important lessons for people getting started on YouTube, because at the start you're all excited, you got energy, "I'm going to be a YouTuber!" You get your videos up and you look at them and you hate them, and maybe you don't post it, and then you do post some and they don't get a lot of views, nobody's commenting, and then you post more and there's still not a lot of views or comments and you start to feel discouraged, like, "Why am I doing this? Like, maybe this isn't gonna work out." And just like any other thing that you learn, you suck at the start, right? Learning how to operate a camera, learning how to ride a bike, learning how to garden, right? Like, the first time you do anything, you suck, it takes you way longer to figure it out. And so, that's gonna happen here too. And the key thing is that you keep doing it, right? Every week, I'd say at least one video per week. The people that I've seen really grow start to amp it up. They put out a video a day, just not even worrying about the quality so much as getting better. Like, if you do it more— I am way better than I was when I started because I put out 2,000 videos. And so the more you do it, the better you get, the better you get, the better you get. Like riding the bike, like learning French, you'll get better every time you do it. So be consistent, at least one a week and ideally one a day to focus on helping you get better. So that's it. Those are our 7 tips. Thank you guys so much for watching. If you want to learn more about Richard, where can we find you?
You can find me on my YouTube channel, which is right now my name, Richard Yougottalove, or my website, which is yougottalove.com, and I'll put that right there in the title or the credit.
And if you guys have any questions on how to get started with YouTube or you want to share your experiences, leave it in the comments below and we will both join in on that discussion. Sounds good. Thank you guys so much for watching. Continue to believe, and we'll see you soon.
More from Evan


How the Biggest Mistake in History Created A Trillion-Dollar Empire | Sergey Brin


9 Machiavelli Principles That Force People To Respect You | Machiavellian Philosophy


The First 10 Words That Instantly Ruin A Sales Conversation | Vanessa Van Edwards