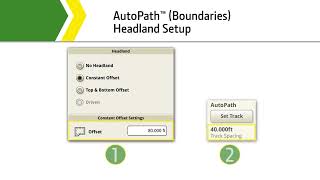
John Deere's AutoPath feature lets you set up headland boundaries and guidance tracks in your field. The video covers headland offset, track spacing, and how to calculate the number of passes you need around the field edge.
Autopath Boundaries creates guidance tracks in the headland area of the field, shown here in blue. The headland area is the area between the pink field boundary and the yellow dashed headland line. You'll notice that those guidance tracks follow the shape of the boundary on the north side. With a straight boundary, you get straight guidance tracks on the south side of the field. However, with the curved field boundary, the guidance tracks are also curved, providing accurate guidance along the edge of the field, even if it's not straight. You will need to set up your headlands in the Fields and Boundaries app to ensure that Autopath gives you the proper number of guidance tracks around the edge of the field. In this example, I've chosen a constant offset that 120ft. Let's see what that means. As we zoom into the corner, you'll see that that 120ft is showing the distance from the pink field boundary to the yellow headland line. So as that number gets bigger or smaller, that will move that headland line closer to or further away from that pink field boundary. In order to get the proper number of tracks around the edge of the field, you'll need to know two numbers. What is the offset that you have for your headland and what is your track spacing? In this example I have a headland offset of 80ft. I also have a auto path track spacing of 40ft. So doing some quick math, with an 80 foot headland and a 40 foot guidance track spacing, I'll get two guidance tracks around the edge of the field. This works out nicely, but that's what I need now. In this example, I've increased the headland size from 80ft to 120ft. However, the track spacing still remains at 40ft. So with 120 foot headland and a 40 foot track spacing, I now have three even guidance lines around the edge of the field. What happens, however, if your headland size is not an even match to your track spacing? In this case, my track spacing is 40ft, but I've set my headland offset to 100ft. 100 divided by 40 is actually two and a half. So Autopath is going to create three guidance lines. Two of those take the full 40ft of working width and the third line is going to give you the remaining 20ft that left over. We recommend that when you're setting your headland size up for Autopath that you always use an even number that goes into your track spacing for the best performance. Here's a chart that shows the different headland sizes that you would need to enter to get a specific number of passes based on some different track spacings. If we look at the very bottom of the chart, if I have a 60 foot track spacing and I want to have three passes around the edge of the field, I will need to have a headland that is 3 times 60 or 180ft. So the easiest way to determine your headland size is to take your autopath, track spacing and feet and multiply that by how many passes you want to take. That number is the size of your headland. If you're running a custom track spacing in this example 26ft 9 inches, you simply need to multiply that by how many passes you would like to have around the edge of the field to get the correct number of guidance tracks. So If I want three and my track spacing is 26ft 9 inches or 26.75, I would multiply that and get 80.25. I would enter that amount into my offset. Don't forget there is a calculator built into your display. So if you need a little help here, you can use that or the calculator on your phone and get the precise headland width to get the precise number of passes that you're looking for. Sa.