12 Tools Every Beginner Jeweler Should Own
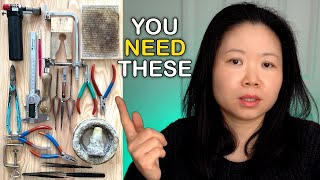
In this instructional video, an experienced jeweler walks viewers through the twelve fundamental tools needed to start jewelry making. He explains each tool’s purpose, how to use it correctly, safety considerations, and practical tips for maintenance and replacement based on his 20‑year experience. The tools covered include a digital caliper, metal scriber, jeweler’s saw with blades, bench pin, metal shear, a set of four basic pliers, a honeycomb ceramic soldering board, a borax dish/cone with brush, precision and reverse‑action tweezers, a butane gas torch, a pickle cleaning solution, and sandpaper. Throughout, he offers cost‑effective recommendations, common mistakes to avoid, and guidance on how long each item typically lasts, emphasizing that these tools form the foundation for simple projects and can be expanded as projects become more complex.
Chapters
Hi, if you are at the beginning of learning jewelry making, this will be the most basic 12 jewelry making tools you will need to collect at the very beginning. With these 12 tools, you will be able to finish some very simple jewelry making projects. After collecting these 12 tools, you can gradually build up your collection based on the complexity of different project you are working on. And you can also collect some tools which will help you to achieve the results much quicker. But without these 12 tools, you will not be able to start. As these are the most basic tools, each of them doesn't cost a lot. In this video, I'm going to show you what they are, what they are for, and also I will share with you how often I replace them in the past 20 years. Some of these tools you only need to buy it once, A lot of the tools I'm using today are from the first week when I start learning jewelry making more than 20 years ago. Let's get started. The first thing you will need is a caliper. For the beginning level, you will need the caliper to measure the thickness of the metal piece and the diameter of the wire you're going to work with. Later on, you will need the caliper to measure the diameter of the drill bits the ballbirds, and also different type of gemstones as well. If you're interested in stone setting, to make life much easier, make sure you choose a digital one, because in that way you can just read the number much more straightforward. I am working on, um, 8 to 10 hours daily basis. I use my digital caliper daily. So far it only need to be changed every 2 to 5 years. To make your digital caliper last longer The best way to do is when you are not using it, keep it on a flat table which doesn't shake at all. What mistake I make previously was by putting it on the table where I hammer as well. So every time I hammer, the impact transfer onto my digital caliper, which shorten its life. That one lasts for 2 years and then I have to replace it. As far as I don't put the digital caliper on a table like that, it can easily last for about 5 years. Don't make my mistake. If you like this video, do you mind clicking the like button? Thank you. The next thing you will need is a metal scriber. Obviously, it is for marking on the metal you're working on. For safety reasons, it is really normal that when your scriber arrives, the tip will look flat or dull. That's why before using it, you will need to sharpen the tip. And also, from time to time, the tip will go dull, so you will still need to sharpen it. The one I'm using here is from the first week when I started learning jewelry making, so that is definitely more than 20 years ago, and I'm still using the same one. Which is this one. So I don't think I will need to replace this ever, as far as I don't lose it. The next thing you will need is a jeweler's saw with saw blades. It is for cutting the metal into the desired shape and size. I'm going to show you how to set this up. The saw blade comes in a pack like this. It normally wraps up with a very thin brass wire. So all you do is to take it off and then you pick one. The teeth on the saw blade is really fine. If I zoom in, you can see it better. The teeth is on one side of the saw blade, so you want the teeth to face it downwards like this in order to cut it properly. This is my way of finding the direction of the saw blade teeth without zooming in. I have it gently slide on my finger like this. If it slides smoothly, then I know it is facing the wrong direction, so I need to flip it upside down. And then if I do it like this, if it catches a little bit of my skin like this, then I know it is facing the right direction. Now we come to the saw frame. You can see there are two screws here like this. So you open this one with the right direction of the saw blade facing downwards. You put the top of the saw blade into this gap and then tighten this screw, right? When it comes to the other side, Open this gap, slide it in. This is a basic saw frame. I'm going to show you how to tighten this one. From this angle, you can see that I am resting the saw frame against the edge of my table like this. Next, you are going to rest the end of your handle half an inch under your collarbone like this. Next, you push your body against the table. Make sure the other end of the saw blade is in this gap, and then you tighten the screw. The way to test if your saw blade is tight enough is to pluck it, just like how you would do it on a guitar string. If you hear the noise like this, That means it's tight enough. One thing about the jeweler's saw and the saw blade is it is really sharp. So when you use it, make sure always put your fingers behind the saw blade, not in front of it, because I cut myself many times. To make things simple, as a beginner, you will only need to use number 2 saw blade. In all my YouTube videos, you can see I only use number 2 saw blade. The only time I will change for the saw blade is when I cut wax. Otherwise, only number 2 saw blade. As for the saw frame, this is the exact one I bought on the first day when I started learning jewelry making more than 20 years ago, so I'm still using the same one. For the saw frame, you will only need to buy it once. The next thing you will need is a bench pin. This is made of hardwood, so it's very durable. As a beginner, you can use this one instead. It costs only $10. The one I'm using, the setup, it's more than $100. The only difference is the one I'm using, I can adjust the height. For the standard one, you cannot. But it comes with a price. So based on the budget you have, you decide. Obviously, it depends on how you use it. Some people like to cut into the wood, so in that case, you will need to replace it once the wood is worn out. In my situation, I try my best to not cut into the wood. In this case, mine have lasted for about 15 years so far. I have only changed it once, but even if you need to change it, it's not a big problem because it is not expensive at all. The next one you will need is metal shear. It is for cutting metal pieces and metal wires. In my situation, I use the metal shear to cut up to 0.5mm thickness for silver, gold, and platinum. For wire, I use the metal shear to cut up to 1.5mm diameter. Sometimes you can use the jeweler's saw to do it, but sometimes you can only use the metal shear to cut it, especially when it is on solder. If you want to cut the solder into small pieces, there is no way that you can do that with the jeweler's saw. So in this case, you can only use the metal shear to do it. Also, sometimes I find it, it's much quicker instead of using the jeweler's saw to cut it. I use the metal shear to cut it much faster. Again, the one I am using these days is from more than 20 years ago, so you only need to buy it once, at least for more than 20 years. When I need to change it, I will let you know. The next thing you will need is pliers. You will need to have 4 basic type of pliers to begin with, which is round pliers, needle nose pliers, half round pliers, and flat pliers. They look more or less the same in a distance, but if you look closer, for the round nose pliers, the section of the nose is are both round. You can see that for the needle nose pliers, the section look like this. Both look the same. These sides are completely flat and outside is a bit rounded. You can see that from the section. So this is how it look on the side. Once it is closed, the pliers look like this. So the gap disappeared, just a line left. That's also how you choose a needle nose pliers. You need to make sure this line is straight and closed properly like this. If it's closed like that, that is, that is not a good one. This is a half round nose pliers. The section of the noses look like this. Here the inside bit is flat. You can see here it's flat, and on this side it's curved. They call this half round nose pliers. So for the flat nose pliers, let's have a look at the noses. Both here and here are flat, so when it's closed, it looks like this. I use round nose pliers to make jump rings, half round nose pliers to make rings, the needle nose pliers to bend things, the flat nose pliers to make it straight. Together, the flat nose pliers and the needle nose pliers can close jump rings pretty well. The next thing you will need is a honeycomb ceramic soldering board. It works as a heat reflector during the soldering process. As far as you don't break it, you don't need to replace it. Even if you break it like what I have done, this one, what happened is I drop it onto the floor by accident. You can always sew it back with stainless steel wire and keep using it. I have a video here show you how I did it. I have all these listed in the description below if you want to have a look. The next basic thing you will need is a borax dish, borax cone, and a normal paintbrush. You don't need a fancy one, the most basic one will do. Borax here acts as flux, which helps the solder to flow during the soldering process. To use it, you only need to put a drop of water onto the borax dish and then grind your cone on it until the liquid turns a little bit milky. That will be the best mixture. And then you apply it with the paintbrush onto the area where you want to solder. The borax dish is made of ceramic, so as far as you don't break it, you don't need to replace it. And then for the borax cone, it depends on how often you use it. For me, I only need to change it every 5 to 6 years. This is my second cone in the past 12 years. And I still have a lot left. The next thing you will need is tweezers, and for tweezers, you will need to have two types. The first one is for picking up things precisely. For example, solder, you need to pick it up and then put it precisely on where you want the solder to go. The second one is called reverse action tweezers. It's for holding things during the soldering process. You can see that there are two pieces of wood on each side of the handle. These are for protecting your fingers during the soldering process. Otherwise, the heat will transfer from the tip all the way up to where you are holding the tweezers. But with these two pieces of wood, your fingers are well protected. The tweezers are sprung, so it allows you to squeeze the handle and the arms open. Again, this set of tweezers, I only bought it once, and I am still using the same set for the past 20 years. So you don't need to buy this very often. At some point, you might want to repair the tip of your tweezers, and I have a video here that you can check out. It shows you how to quickly repair it in about a few minutes. In that way, you don't need to buy a new one at all because you can always repair it by yourself at home. The next one you will need is a butane gas torch. Basically, I use a kitchen torch. The difference between an expensive one and a cheap one is Based on what I found, the external lighter on the expensive one lasts longer than the one on the cheaper one. This is where the lighter is on this torch. So the solution is whenever the external lighter worn out, just to light up with a separate torch. That's what I do. Other options involves gas bottles, different type of tube and regulators. I think that might be a bit daunting for beginners. At least that's how I found when I first started. I found that I always worry if I put the wrong tube onto the wrong bottle or connected to the wrong regulators, and I will always worry if a very simple mistake will lead to something very bad to happen. So I will highly recommend to use a butane gas torch. Torch to begin with because it's much simpler and also it doesn't cost a lot. Whenever the gas runs out, you can always refill it the same as how you refill a traditional gas lighter. I use this butane gas torch to solder all my small jewelries like cufflinks, earrings, necklace, tie pin, lapel pin, all sorts. The next one you will need is pickle, which is for cleaning fire stain and flux residue. When choosing the pickle, make sure it is not toxic and also it is made of food-grade material. It comes in the form of white powder like this. All you need to do is to add some water to dissolve it and then keep the mixture in lukewarm temperature. About how much water you need to add, you just need to follow the instruction on the package. In my situation, I use 1 tablespoon of this pickle powder and add 200ml of water. Once it's fully dissolved, the liquid will turn clear. I only need to change it once every 2 to 3 months. The tub I have here is half a kilo tub. I bought this 12 years ago and I still have this much left. The last basic tool you will need is sandpaper. The general guide is you will use the coarse sandpaper to take off excess material material and then use the fine sandpaper to smooth the surface. A pack of sandpaper can last for a few good months. These are the most basic jewelry making tools you will need to start your projects. Later you might be working on something much more complicated, but you will still need this on a daily basis. If you like this video, you might want to check out the one here It's about health hazards for self-taught jewelers. I will see you in the next video. Bye!
More from Haiyi











This ring took me 3 hours just for the stones #howitsmade #jewelry #craftsmanship