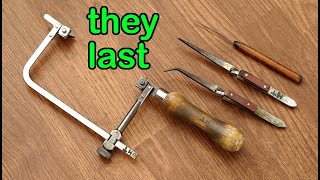
A jeweler shares three tools he's used daily for 20 years: a jeweler's saw frame under $20, a soldering pick for $7, and cross-lock tweezers for under $10. All are inexpensive, require no maintenance, and work as well now as they did in 2003.
Chapters
I have been making jewelry for over 2 decades. There are a few tools that have been with me since day one, and I have been using them every single day. In this video, I'm going to show you 3 of these amazing tools. They are not just good, each of them costs less than $20. The first one is the jeweler saw frame. There are many versions out there, The one I got when I started is this very basic one. There are 3 screws altogether. If I loosen the one out here, the section can slide outwards and inwards. So when I wanted to hold my saw blade at full length, I stretch the arm out. If I have broken the saw blade to a shorter piece, I can slide the arm back to hold a shorter saw blade. But most of the time, whenever my saw blade broke, I didn't bother to loosen the screw and reset the frame. I just move on to a brand new one to save time. Also, when the saw blade is longer, it cuts more efficiently. So basically, this screw controls how long a blade my saw frame can hold. Before moving on to the other 2 screws, I make sure this one is tight, and I know I will have a solid frame to work with. The other 2 screws here align with the wooden handle. They are for holding the ends of a saw blade. It doesn't matter which side you put the blade on first. After putting one end of the blade into the gap, tighten the screw. I never use a pair of pliers when doing this. Just as firm as my thumb and index finger can get it is enough. To get this very thin saw blade to cut metal, it needs to be stretched out tight. To install a blade, I first rest the far end of this frame on the edge of a table. Put the end of the wooden handle under my collarbone. Push the saw frame towards the table. With the frame bent a little bit, I tighten the other screw. In this way, when I release the frame, my saw blade is held tight by the tension in the frame. I have been using this exact setting to cut all my silver, gold, and platinum since 2003 on a daily basis, and I can't think of a day that I'm not using it. Pricewise, it costs less than $20, and it requires zero maintenance at all. I haven't put any oil or anything on it. As usual, the link for this item is in the description below if you are interested. The second tool in this list is the soldering pick. I use this tool to help my solder float. So when the solder is in liquid form, and it still doesn't go to where I want it. I use the tip of this tool to quickly guide it to the place. There are many versions out there. The one I have is this most basic one. It's made of a hardwood handle and a tungsten stick. There used to be a metal collar around here, but it came off at some point. Occasionally, when the wooden handle went too close to the fire, it burned to black. Whenever I saw some smoke come out from this end, I know it's time to retreat. I only hold the very end of the wooden handle, so having a little bit burn out at the other end doesn't affect its function. This stick used to be straight, and I don't know when it bent a little bit here. Despite losing the metal collar, having the tip of the wooden handle burnt, and the pin bent, I don't see the point of replacing it anytime soon. Maintenance-wise, I have never ever polished the tip of this tool. This is how it has been since I first got it in 2003. You can see there is some flux residue sticking to the tip of my soldering pick. This doesn't need to be cleaned. It can actually come in very handy when helping the solder float. When the flux residue is gone, it's still fine. It always works like a charm. As of today when I'm making this video, This amazing tool costs only $7. Link in description below. The next one is this cross-lock tweezers. I have 2 styles and 5 of these altogether. I mainly use the straight ones and occasionally the one with curved tips. These tweezers are made of steel steel. The two panels attached to each side of the handle are made of insulated wood, so when the tweezers are holding something hot, the heat won't be transferred to my fingers. To open the two arms of the tweezers, I simply squeeze the handles. For instance, I put an air pin in between the tips, Once the handles are released, the air pin is held tight. This allows me to focus on the soldering job rather than holding the pin tight myself. Sometimes I use this as a third hand to hold a jump ring upright when soldering. In this way, I can use one hand to hold the soldering torch and the other to hold my soldering pick. Price-wise, you can get a set of 3 for less than $10. I've been using the same tweezers since 2003. Zero maintenance is required in the past 22 years, no complaints at all. So these are the 3 tools that I have been using daily from day one as a working jeweler. When you are getting this as a beginner, you know that you are making a great and lasting investment. Hopefully this helps, and I will see you in the next video.