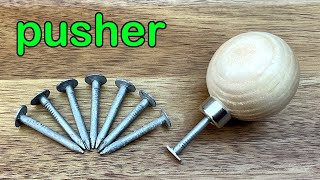
A jeweler makes a bezel-setting tool from a nail, a wooden sphere handle, and a bench grinder. He shapes the nail head into a rectangle, attaches a cheap wooden handle with a metal collar, and sands it smooth. The finished tool costs under $2 and successfully sets a 0.6-carat tourmaline into a ring.
Chapters
Today I need to set a 0.6-carat tourmaline into a ring but can't find the tool I normally use. So after hunting for 2 hours, I gave up. The time I spent looking for it is enough for me to make a brand new one. So before my bezel setting tool reappears, I have decided to make a quick quick and cheap one to set the tourmaline. To get prepared, I found a few random nails in my toolbox. I don't know what they are originally for, but the size is good for making a bezel setting tool. The head of the nail measures about 9.4mm diameter, the body is 3.1mm, and it's about 30.5mm long. This is the bench grinder I'm going to use to make my tool. The speed is 2950 RPM, not a very fast one. I bought this a few years ago to use for for general tool making. It's less than $60. Before starting, I have prepared a bowl of water. So when my tool turns too hot, I will dip it in to quickly cool it down. This tool is very simple to make. There are only 3 steps. First, get the rough shape right. Basically, I want to use the machine to grind the round head to a rectangular shape. I could have used the small diamond wheel at my studio, but the small diamond wheel is much more expensive than this entire bench grinder, so I'm saving my diamond wheel for some precision job. The two big wheels on my bench grinder are made of aluminum oxide. This is very good for quickly removing materials. I'm wearing a pair of safety goggles during this entire process. Also, for safety reasons, I always keep the eye shields down on the grinder when doing this. If the nail I'm holding is caught up with anything, I always prepare to let it go and jump back immediately. I could have wrapped my fingers with some tape, but it's going to take less than 1 minute to grind it. Wrapping the tape takes longer than that, so I don't bother in this case. Whenever the nail gets too hot, I dip it in the bowl of water next to me. This is the shape I want. I have ground the left and right away from the round nail head and took a little bit off on both the top and bottom. That's how I've got this long rectangular shape. Because the disc on the bench grinder is quite rough, all the edges are very sharp at this point. I need to make sure it doesn't scratch or cut my skin. Step 2: Put a handle on. These are wooden handles in a sphere shape. I always keep a few of them in my drawer. They are less than $2 each. Very cost-effective. Really handy whenever I need to make any quick tools like this. On top of this wooden sphere, there is a metal collar on the neck to retain the shape of the wood and prevent splitting when installing any tool. The guide hole here is quite useful when pushing the tool in. They are also available in pear shape and mushroom shape to fit various needs. I have very small hands and have found this sphere shape suits me the most. The one I have here measures 35mm diameter. Here's my bench vise. If I remove the old cloth, you can see it better. To get a better grip, I like to place a cotton cloth between the jaws of the bench vise before putting the nail in. I have the tip of the nail facing perpendicularly upwards. You see the guide hole here on my handle. I press it onto the tip of my nail, checking it from different angles. I try to keep it straight. With the help of my rawhide mallet, I hammer the nail into the wooden handle. I won't say it's 100% straight, but good enough for its purpose. You see the end of the nail is still quite rough. I'm going to fix that in the final stage. To do that, I need to remove all the sharp edges with some sandpaper. I'm not going to use the sandpaper for jewelry. Instead, I found this general-purpose sandpaper in my garage. I think we bought that for some DIY woodwork. The one I'm using is 70 grit. First, I have the end of the nail facing downwards on on the sandpaper. Gently grind the surface smooth. And then soften the 4 sharp corners. I don't want to mirror polish the flat end. Personally, I prefer having it matte finish with the 70-grit sandpaper. Now the head of the nail is smoother than before, and all the sharp corners have been removed. I'm ready to set the tourmaline on my ring. If you prefer the end to have a smoother finish, you can carry on to polish it further. This is how my bezel setting tool looks compared to the nails before it was modified. You see that the nail I used to make my tool is quite short. If I want this tool to be longer, I would have chosen some longer ones, but for my situation, I am happy with this size. As I haven't bought any tools specially for making this bezel setting tool, everything I use is here already. The handle cost me less than $2. As for the nail, I found it in my toolbox. I don't know how much it would have cost if I needed to get it brand new. I'm sure it won't cost more than a quarter. Before I can find the bezel setting tool I normally use, I'm going to settle with the one I just made. This is how my tourmaline ring turned out after it was polished. I will see you in the next video.