6 Simple Tools Used For Jewelry Making
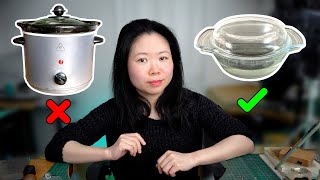
A GIA-qualified jeweler shows six cheap tools that speed up jewelry making: a glass teapot for pickling, a casserole dish as a faster pickle pot, a split mandrel with loose sandpaper, bamboo chopsticks as tweezers, sample tiles as heat shields, and a quick-change handpiece.
Chapters
I'm sure you have noticed that the prices for many things has jumped up a lot in the past few months, and so have jewelry making tools. In this video, I'm going to share with you 6 of the simple tools that I use in my jewelry making studio to help me save money. They also work much more efficiently compared to their alternatives. If you're new here, I am a jeweler professional optical diamond setter, and a GIA graduate gemologist based in the UK. I have been using real gemstones and precious metals to make jewelry since 2003. It has taken me over 20 years to get to this point. I will not just show you what the tools are, but also how to use them and why they are better. The first one is this transparent glass teapot. It comes with an infuser like this. This glass infuser is really good for cleaning a lot of small findings. If you want to put a lot of things into the pickle to clean it in once, instead of picking them up one by one, you can just put it in this infuser and then dip it into the pickle, and then you can just rinse all of them together once. With this transparent glass teapot, what I normally do is to put the jewelry that I want to oxidize inside of this teapot, and then I pour the oxidization solution inside of this teapot. Because the material is transparent— I mean, the glass teapot is transparent— I can easily see if it is done or not. Once the process is done, I just pour the liquid back into the bottle to save for next time. That's how I recycle the oxidization solution. And also, because it is a teapot, when I need to clean off the oxidization solution of the jewelry, it is really easy as well. If you like this video so far, do you mind clicking the like button? Thank you. The next thing I use is a glass casserole dish. I use it to keep the safety pickle when I need to clean the fire stain and borax residue off my jewelry. The most popular alternative option is a slow cooker made of thick ceramic.
The good thing about this glass casserole dish is, first, it is transparent, which means I can tell if the item is clean or not. Second, because the wall is quite thin, it's much quicker to heat up compared to ceramic. In my situation, I only heat it up for 2 minutes and then I turn the oven off. The heat on the surface of my oven will keep the solution warm even the oven is off. And also, you don't need to keep the solution warm all the time. If it takes more than an hour to clean your jewelry, that means your pickle needs to be replaced. One thing I want to point out is when I choose the glass casserole dish, I would like to make sure the lid is flat because in that way I can rest my things on top of the lid. For instance, I like to rest the clasp of a chain on the lid because there is a spring inside of the clasp. The spring is made of steel, so if I dip that into the pickle, the pickle will get contaminated. So I use a small round one for jewelry and a larger rectangular one for silver objects such as spoon or any hair jewelry, which they don't fit inside of the round one. The other option would be a slow cooker. The pot of a slow cooker is made of very thick ceramic, which means it's going to take forever to heat it up compared to the glass casserole dish, which I only need 2 minutes. Think about how much electricity you would have saved if you use a glass casserole dish compared to a slow cooker. The lid of a slow cooker Normally is either made of solid plastic or glass. If it is made of solid plastic, every time you check the jewelry, you will need to lift the lid up. If the lid is made of glass, there will be always some metal components because they need to attach the glass lid onto a plastic knob. In this case, they will use a screw to do it. I always worry if the screw will contaminate my pickle. But you won't have this kind of problem with a glass casserole dish.
The third simple tool is a split mandrel.
So I use a split mandrel with loose sandpaper instead of mounted sandpaper roll. It comes in two different styles. One is the parallel one, the other one is a tapered one. The tapered one is for cleaning small areas. That the parallel one cannot get into. Compared to the mounted sandpaper roll, with the split mandrel, I don't need to use any glue to stick the sandpaper on. That means I will have a wider working area. Also, I will only need one mandrel for each style. The loose sandpaper itself is much cheaper to get compared with the rolls. With the mounted sandpaper roll, you will have to commit to a big roll or a big pack of the same grit. So in order to have many grits, you would end up having lots of rolls.
A quick safety note for using the split mandrels. I always make sure to wear safety goggles and have my extractor on to suck away all the dust. In this way, I know both my eyes and my lung are well protected. It. The next simple tool I use in my studio, it's a pair of bamboo chopsticks. I use it for picking up anything from the pickle solution. If you don't know how to use them, let me show you. First, you hold on to one of the chopsticks like this, a bit like how you hold on to a pen, with your thumb point finger and middle finger. Next, you slide the other chopstick in like this. Rest it on your ring finger, use your thumb to press it down. So in this way, this chopstick will not move. The only one you want to move is this one with your 3 fingers like this.
In this way, you can pick up everything basically with your chopsticks.
The good thing about bamboo is you can put it anywhere. You don't need to worry about the sunshine might destroy it, and it is cheap. It lasts forever. You can see the pair I have here, I got it over 15 years ago. Because the liquid is pickle, so you cannot use anything made of steel to pick things up from the solution. Because that will contaminate the solution, causing a chemical reaction that can copper plate your silver and gold, which means when you pick up your jewelry, the surface of your silver or gold jewelry may turn pink. That is because the surface has been covered with a very thin layer of copper, which you don't want. So you cannot use steel to pick up anything from the pickle. For other options, I have tried both brass and copper. They both worked, but they are quite expensive. I have also tried plastic tweezers. It works for 1 or 2 years until they broke.
When I use plastic tweezers, I always have to put it away from the sunshine, otherwise it will break much quicker because plastic aged. And the sunshine makes the process much faster.
With bamboo chopsticks, you don't have any of these problems. The next simple tool I use to save money in my studio is small sample tiles.
So with the small sample tile, I flip it upside down, make the non-glazed side touching the ceramic soldering board. In this way, I can prevent the heat to go through the ceramic board. And then go on to my table. You don't need to have an expensive one because it is the non-glazed side that works. Mine is only $2. I picked it up from my local tile shop. I chose the cheapest one. Another option is you can put a solid soldering board under your ceramic soldering board, which is much more expensive.
The last tool I use to save money in my studio It's the quick-change handpiece.
Before using the quick-change handpiece, I got the other alternative option to begin with. The reason for that is, first, it's slightly cheaper, but it took forever to get any accessories out. Second, the alternative option weighs a few grams lighter. Who wants to get the arm ache when you don't need to? So basically, I wanted my jewelry to look the best, but didn't want to invest for the better quality of tools, and I certainly didn't want any hard work if I can avoid. In the end, I bought a brand new quick-change handpiece, because no matter what age or stage you are in, time is money. Saving you half a minute here and there is going to be a lot adding up. All the tools I use in my studio are listed in the description below if you want to have a look.
If you like this video, you might want to check out the one here. I will see you in the next video.
More from Haiyi











This ring took me 3 hours just for the stones #howitsmade #jewelry #craftsmanship