Budget vs Expensive Rotary Tools for Jewelry Making
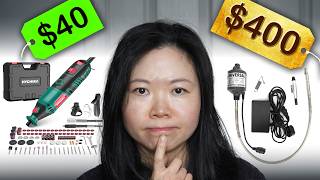
Haiyi Tan, a GIA-qualified gemologist, tests a $40 Hychika rotary tool against a $400 professional setup across five jewelry tasks: drilling, sanding, polishing, and engraving. The budget tool performs nearly as well, though the expensive one offers a foot pedal, variable speed, and quieter operation.
Chapters
This rotary tool with the flexible shaft and lots of accessories together costs $40, and this one with the handpiece costs more than $400. All the accessories are bought separately. So in this video, I'm going to see if this $40 high-chica rotary tool can do what this expensive one does for me. From drilling to grinding, I'm going to compare the performance of these tools with the most common accessories I use for jewelry making. This will help you decide which one is right for your needs and budget. Whether you are a DIY enthusiast or a professional, this will give you a clear idea of what to expect from each tool. Watch to find out which rotary tools offer the best value for money and which ones are worth the extra investment. Hi, I'm a jeweler, optical diamond setter, and a GIA graduate gemologist based in the UK. I've been making jewelry using real gemstones and precious metal since 2003. It has taken me over 20 years to get to this point. In my channel, I help jewelry enthusiasts to start their jewelry making and hand engraving projects with very limited space at home. First, let's see what comes with this $40 package. In the interest of transparency, Hychika has sent me this tool free of charge for testing, but that will not in any way bias the comparison.
So this is how it arrives. After removing the packaging, here's the toolbox inside. Everything has been neatly packed. And every component has its own seat. Here's the rotary tool. What really caught my eye in this box is the range of accessories inside of this plastic box, because I have the impression that if I needed to get these accessories separately, they would cost me more than $40. Anyway, I'm going to try the ones I use most often, to see how this rotary tool performs. Here is the cutting guide. Nicely made. There is one high-speed steel drill bit in this box. It's 2.3mm diameter. For this drill bit, I am going to put it on the rotary tool directly. Later, I will put the flexible shaft on. To install the drill bit, I press the red button down and then turn the black collet nut anti-clockwise. To tighten the collet, turn the collet nut clockwise. The little spanner tightens it in place. Once this is done, Release the red button on the side. On the other side of this tool, it has a number wheel next to the switch button. 1 is for the slowest, and 6 is for the highest speed. For what I'm gonna do, 1 is enough. In my case, this size is good for wood drilling when I make tools. I normally use much smaller ones for jewelry making, so I'm going to switch this for my own drill bit. This one measures 1mm diameter. As the demands on jewelry making tools are higher than those used for wood, if it works for this small one, it will have no problem when using the 2.3mm one on wood. It fits perfectly well. Before trying this $40 rotary tool, let me show you how the expensive hang-up motor with the separately bought handpiece performs when drilling a hole in sterling silver. I have a separate video showing the difference between all these handpieces. The link is in the description below. Now, let's see how this budget one handles the task. Nice and straightforward. To remove the drill bit, I just reverse what I did when putting it on.
So for handling the drill bit, based on the look of the holes and how easy it was to drill them, I have to say both are very similar. By the way, if you find my video useful, would you consider clicking the subscribe button? It will help my channel to grow and also encourage me to make more videos like this. It's completely free. Leaving a like and a comment also really helps support the channel. Thank you.
Next, I'm going to try the drum sander. It actually comes in two different sizes. Here I'm trying the smaller one first. The shank is a different size, so I need to change the collet. There are 3 different sizes of collets in the accessory box. I need the biggest one to hold this shaft. Here I'm trying to remove some unwanted solder on this surface. The material is sterling silver. I normally remove it with a file, but let's try to find out if I can do that with this drum sander. All together, less than 1 minute, and the result is quite good. I'm impressed what this little sander can do. And the surface of the sander has barely worn down at all. Here's the other one. It's bigger. Each of these comes with a perfectly matching size holder. I think the black section is made of rubber, so it grips onto the surface very well. All I need to do is to put the sander on. As you can see, there are so many of these ready-to-use sanders in the box. These are going to last for a while. Don't forget, these are all included in the set. For the expensive hang-up motor, I roll my own sandpaper to a mandrel to make a sander like this and attach it to the handpiece. As you can see, it's much longer and bulkier. It's not suitable for getting into small areas, but it's good when I want it to cover a bigger area. I have a separate video showing how I make this mandrel. Check it out if you are interested.
In this round, both rotary tools perform equally well when handling sanders. If I need to get into small areas, I prefer the drum sander. If I want to polish a bigger area, I will use the mandrel with sandpaper.
Next, I am going to try this stainless steel wheel. The wires are quite hard. I am happy with the quality. A very important note here: in the entire process trying any of these tools, I'm wearing a pair of safety goggles to protect my eyes, and you should do that as well whenever using any rotary tool. Safety first. Once the engine is on, you can see one or two little bristles coming out of the wheel. This is actually quite normal. Once that odd one comes off the wheel, as far as the rest are tightly holding on, I'm not worrying. Again, I'm trying this on a piece of sterling silver with a dull surface. I only use this wheel to brush half of the surface. So you can see how it looks compared to the original surface. It's pretty impressive. I know the surface is reflecting the very bright light here, but you can still see the contrast between the polished half, which is quite white, versus the unpolished half that has a grayish dull color. Next, I use the expensive combo with the stainless steel wire brush I have here to polish the other side of this same surface, so we can compare the difference. Now both halves have been polished. You can see the side with the new wire brush is brighter than the other, because it has polished the surface much more aggressively. But I have to take into account that one is brand new, and the other one has been used for a few months. You can see the shape of the wire brush wheel is holding up very well. If I put both wheels together, you can see them better. The one on the left-hand side comes with the $40 set. I bought the other one separately for my everyday use handpiece. The wires on both wheels are almost equally hard, but the ones on the left-hand side are held much tighter by the nut in the center. I think that's the main reason why it can polish more aggressively, taking into account that it's newer than the other.
In this round, I will say both rotary tools perform equally well when holding the wire wheel. As for the stainless steel wire brush, I like them both because sometimes I needed to polish the surface more aggressively, but other times I prefer to have it softer.
So far, this is like a treasure box for me. Next, let me try these abrasive pink wheels. The texture of their surfaces are quite fine. The shapes will fit different profiles of my work. But first, I want to try this column shape, because in my case, I use this shape the most. So far I am very happy with the performance of this rotary tool. It's quite light, and it doesn't vibrate much. This is very important when looking for a rotary tool, because if it vibrates a lot, you won't be able to use it for precise work. Up to this stage, I don't have any vibration issues with this tool. With its current performance, I'm sure it will work with this pinwheel. Actually, let's try to see how the flexible shaft will work with this tool. The flexible shaft is tightly mounted on one side of this toolbox. It requires some effort to get it out of the box. Compared to other brands I have used before, this one is not too heavy. This is good for me because it means I don't need too much strength to hold it. Instead, I can focus on maneuvering the tools. To install the shaft, I first remove this umbrella cover in green and then the collet nut in black. I think this collet might be too small for the flexible shaft, but we'll see. These are the two ends of the shaft. This end is for holding my accessories. The other one is for attaching it to the motor. There's a very long drive shaft inside of this housing. It needs to come out a bit so I can find a collet to hold on to this end. I was right. This one is too small. The middle one barely fits. Apparently, I need the biggest one in the set. Instead of putting any of the accessories into the hole, I pull the drive shaft out of the housing and put it inside of the hold. Tighten the collet nut as usual. One thing to remember, I have to press the red lock button down all the time when I'm tightening the collet nut, because once it's released, The spindle inside is unlocked. Unlike the collet, which I have to tighten with the spanner, for the housing of the flex shaft, I only tighten it by hand. This is how it looks once it's done. I put this on the floor so you can see how this entire thing looks. The structure is quite simple. In order to use the flexible shaft, I have to hang it up. Here's a hanger on the other side of the on and off button. These are the two hang-up motors I use on a daily basis. One is faster than the other. They are for different tasks. I have videos talking about them in my channel. Check them out if you are interested. Both of them cost much more than this budget one. In this video, let's focus on trying out the $40 version. As the broken motor can reach speeds similar to the high-chica one, That's the one I have been using to compare the budget motor with. I am taking the grey one down so I will have space to hang up my flexible shaft to try. This is how it looks next to the expensive hang-up motor with the attachable handpiece. Its total length is about 2 inches shorter than the one next to it. I have a sterling silver ring here. There is some extra solder on the surface. I normally use a flat file to remove it. Let me try to use the drum sander and see how effectively it works. After tightening the collet nuts with my fingers, I have to put this L-shaped pin into the hole on the other side of the handle and tighten the collet nuts with the spanner. Because the handle is quite light and slim, it enables me to easily hold it still when polishing my ring. Removing the extra solder takes seconds. For the inner surface, I will use the smaller drum sander. It gives a silky look to my ring. I am happy with the result. Now I can use the pink stone to make my silver ring smoother. As it runs, I found that the only thing that comes into the air is the silver dust. To give the entire ring an even finish, I go over the entire surface once. This is how the pink polishing stone looks after I have used it on the silver ring. It hasn't lost any of its shape. This is very different from what I normally use. Here's how the surface on my ring looks after it's polished with the pink stone. Let me show you how it looks when I use the other wheel in my collection. Can you see the dust that comes out of the wheel? That's a mixture of the silver and the polishing wheel. As a result, this wheel easily loses its shape when I use it to polish. That's why you can see the uneven surface on its edge. Actually, I have to change this every other week because it wears out very quickly. But when you compare the polishing result, I can hardly tell which section is by the pink stone and which one is by the wheel I normally use.
So in this round, I must say that performance-wise, both the $40 flexible shaft and the expensive handpiece hold the accessory equally well. But I will definitely choose the pink stone over the polishing wheel I normally use because it holds its shape, which means it will last longer for the same polishing result.
Besides the 4 types of accessories I have tried, I also use the diamond-coated burr quite often. So I'm going to try this very last one before I draw a conclusion. This is on solid sterling silver. I'm trying to engrave the number 925 on the surface. A bad one I used before vibrated a lot, but this one is very light and allows me to hold it quite still. This is how it looks. I'm quite happy with it. These are other accessories that come with the set. There are 2 different sizes of polishing wheel, 3 small cutting discs, 2 huge packs of sandpaper discs. Each with different grits. 3 different slightly bigger cutting discs. I don't use these very often, but they come in handy and are all included.
After using them to try 5 different types of accessories, I must say both the $40 flexible shaft and the expensive hang-up motor perform very well. But there are 4 major differences between them.
First, there is an on and off button on the budget one. You will have to press the button to turn it on, and this is controlled by your finger, while the expensive motor is controlled by the foot pedal. To turn it on, I just press it with my foot. Second, the speed on the budget rotary motor is fixed. You have 6 different speeds to choose from. Once chosen, the speed will remain the same. On the expensive one, the speed is controlled by how hard you press the pedal. The harder you press, the faster it rotates. The next major difference is that this budget rotary motor is much noisier than the expensive one.
Finally, this budget one is much lighter than the expensive one. This I quite like because this saves my energy and therefore allows me to be more efficient. Let alone that it comes with all these very useful accessories. Altogether, there are 173 of them. So I think if I were a totally beginner, I would definitely get this Hychika rotary tool to start with. It holds its own in performance compared to expensive rotary tools at a fraction of the cost. I'm not a beginner, but I'm very happy to add this to my collection because you can see tools in this set can do something what my others can't. And I have more than one jewelry bench. As usual, the link for this rotary tool is in the description below if you're interested.
Because you have watched all the way through, I have a 10% discount code if you want to get this rotary tool yourself. Just type in T-A-N, that's 10, T-A-N. At checkout.
If you like this video, you might want to check out the one here. I talk about the difference between handpieces. If there's anything else you want me to show you or any tools you are interested in, let me know in the comments below. I will see you in the next video.
More from Haiyi











This ring took me 3 hours just for the stones #howitsmade #jewelry #craftsmanship