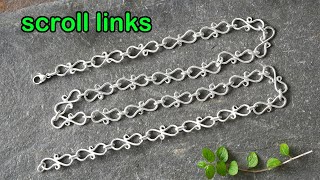
Haiyi Tan shows how to make a scroll-link necklace from recycled sterling silver wire. The finished piece has 27 links, each soldered individually, and weighs 9 grams. The tutorial covers wire annealing, forming scrolls with pliers, soldering jump rings, and assembling the 16-inch chain.
Chapters
In this video, I'm making a scroll link necklace in silver. You can use this method to make yours in gold, platinum, copper, or brass. The wire I'm using is about 0.9mm diameter. I drew this wire myself using recycled sterling silver. I cut 2 pieces of wire, each measures 1 inch long. This will make 2 links. Before forming them, I anneal both to make sure they are soft to work with. You can see the texture on the surface of my wires turns from shiny to a matte finish. Finish. I put them on my bench block to cool down to room temperature. Here I use the tip of my round nose pliers to roll one end of my wire into a scroll shape because the tip of my pliers are not sharp enough. I need the help of my chain nose pliers to tuck the tip in. Do the same on the other end of the wire. This time, I roll the tip of my wire in the opposite direction from the one I just did. From this angle, the shape I just made is a bit like an elongated letter S. These are my step nose pliers. The links for the tools I use in my videos are in the description below if you are interested. I push the end of the wire around the smallest step on my pliers. Stop once the wire reaches the previous curve. Do the same on the other end, but in the opposite direction. In between, I adjust the wire to make the shape flat. This is what I get in the end. But it is not so much of what I'm aiming at. It's too chunky to my liking. This is the second piece of wire I cut out. I'm going to file both ends a bit pointed and try again. I use the tip of my round nose pliers to roll the tip half round. And then use my chain nose pliers to push the tip to form a circle at the end of the wire. This is what I get up to this stage. Next, I wrap the wire around the smallest step on the opposite direction of the little circle I just made. Do the same on the other end. I think the shape is okay, only wish the wire is longer so the shape can stretch out a bit. Third time lucky. I'm gonna try again, but with a longer wire this time. This is the same wire I cut off earlier. It measures 0.9mm diameter. The 2 pieces of wire I tried earlier were 1 inch long. I am going to try 1.5 inches long this time. Heating it up will make sure it won't bounce back when I bend the wire later. This time, I think the previous step would be too small for my wire. So I use the second smallest step on my pliers when wrapping the wire. Flatten the shape with the flat nose pliers. It looks much better this time. After 2 test pieces, I am happy to settle with this size. If I put 3 of them together, from left to right. You can see how I have improved with each piece. Actually, when making jewelry, this happens very often. Lots of the gemstones I work with are one of a kind. Just like life, there is only so much we can plan. We roughly know what we want and have to adjust our plan as life unfolds. Maybe I have gone too far. What I'm trying to say is making a few test pieces is a good way to avoid expensive mistakes. If you prefer, you can move on to make the next piece. But personally, I like to solder all the openings of my links, because this will make my necklace stronger. As I don't need too much solder here, the pieces I cut are no more than 1mm long. Try to use heat to guide the solder to go into the right place. But the tips of this wire are so delicate. At the end, I can't avoid my solder going into the tip of the little circle. For that, I will have to remove the excess solder at the tip with a flame drill bit later. To flatten the shape, I lightly hammer it with my other bench block. If your flat hammer has a smooth surface, you can use that to do this as well. But my flat hammer has too many marks on. It's not good for this purpose. Now I move on to make more links in the same size. I find that I only have enough wire to make another 8 links. The link I just made measures about 14mm long. To make a necklace, I need more than that, but I just found the right size. I'm too excited to stop to make any wire, so for now I will carry on with what I have got and see how many more I will need later. Once you have found the right size, it's much easier and faster to make a few at the same time. Making chain is definitely very soothing for me. These are all the 9 links I have so far. Running out of 0.9mm round wire, I have no choice but to make more. Before I can go back to my enjoyment making links. Altogether, I cut 19 pieces of wire. The rest of the wire is saved for making the jump rings to connect all the links together. Out of 19 links, these 6 are the ones that the solder failed to go into the gap. So I will have to do them again. These are all the lengths I have up to this stage. Next, I am going to join all of them together. This is the silver wire I have left after cutting off my 19 pieces. It has been hardened when it went through the draw plates earlier. I need to anneal it to remove the internal stress on the silver, so when I use this to make jump rings, it will be more workable. Wrapping my wire around the two steps on my pliers, I make two sizes of jump rings to test which one looks better for the length. I think this one looks too big. The small one looks better. As I have 27 links to join, plus 1 at each end to connect a clasp for the chain, I need to make 28 jump rings altogether. This is how it looks after I have attached and soldered all the jump rings on. If you notice, each link faces a random direction. To have them lay flat on the skin, I squeeze each of the round jump rings to an oval shape. This is how it looks after my chain necklace is clean. All jump rings are individually soldered to make sure the chain is strong. You can see all my scroll links face the same direction. This will make sure it lay nicely once it's put on. Each of the scroll link measures about 5mm wide. And 0.9mm thick. This 16-inch chain necklace weighs 9g. If you like this video, you might also like my other jewelry making and hand engraving videos. I will see you in the next one.