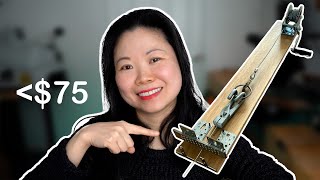
A jeweler built a functional drawbench for wire and tube making from hardware store parts for under $200, versus $750-$2,000 for commercial models. The tabletop bench uses an engineered wood base, a 1,200 lb capacity winch, and L-plates to hold the draw plate, and has worked reliably for over ten years.
Chapters
In this video, I'm going to show you how I make the tabletop drawer bench from scratch. I first learned how to make jewelry from a very traditional jewelry making school. The school was really well equipped and the staffs there were really supportive. So when I was a student there, I never had any problem using any of the tools for my projects. The only problem I figured out later is After I graduated, if I want to keep using any of these tools in my future projects, I will have to own every single one of them. And the drawbench is one of these tools that I want to keep using. When I look at the price tag for the very first time, I realized that the basic model drawbench cost $750, and that is just the entry-level one. If I want the next level up, it costs $1,500. If I want to have the same model as the one I used when I was at school, it cost more than $2,000. That was totally out of my budget as a newly graduate. That's the reason why I have to make the tabletop drawer bench by myself at the very beginning. At that point, I have graduated already. But I still remember it really clearly, the structure of the drawbench and also which part of the drawbench that make it work. So based on my memory, I walked into my local hardware shop and found different components that they perform the same function as different parts of the drawbench, but these components were originally designed for something else. And because of that, they were much cheaper. In the end, I was managed to make my tabletop drawer bench at the cost of 1/10 of what they priced in the shop. In this video, I will not just show you how I make it. I'm going to share with you the pros and cons of this DIY tabletop drawer bench and the solution for some of the problems. Previously, I had made a video showing how I make this tabletop drawer bench. In that video, I didn't explain anything, so in this one, I'm going to walk you through the entire process. But if you prefer the non-narrated version, the link is in the description below. Let's get started.
This tabletop drawer bench is made of 3 parts. The first part is this piece of engineered wood. It holds all the components together for this drawbench. This piece of wood is a leftover from a previous DIY project. It measures 43.5 inches long, 6.5 inches wide, and 1 inch thick. If you don't have a piece of, of cut like this hanging around, you might have to buy a brand new one. Previously, I have seen that in my local hardware shop and building suppliers, they sell this kind of, of cuts for less than $10. So maybe you can ask your local shops. Just try your luck, it won't hurt. As far as it is not a piece of MDF, it should be fine, because if it is MDF, it will not be strong enough to withstand the stress. I think solid wood would be fine as well, but it could be quite expensive. The good thing about engineered wood is if you accidentally drop a piece of water on the surface, it will survive it, but it will not if it is MDF, let alone the structure of MDF. It's much weaker than engineered wood or solid wood.
If you like this video so far, do you mind clicking the like button?
Thank you. Once we got the base of this tabletop drawer bench sorted, The second part of this drawbench is made of a heavy-duty bolt winch. This bolt winch is for holding on to the bench tong, which is for dragging the wire through our draw plate. The one I have here has the capacity of over 1,200 lbs. The cable here is made of steel. It measures 4.6mm diameter. I have no problem using this for making round tube up to 8mm diameter. Anything above that, I have never tried it. To fix this bolt winch onto one end of this piece of wood, I drill 3 holes through it and then I use a hole saw to cut halfway into the wood. In this way, the head of the bolt will be hidden inside of the wood. Otherwise, you will not be able to lay it flat on the table because the head of the bolt will stick out. The bolt I use here measures 6.5mm diameter. The last part of this tabletop drawer bench is for holding the drawer plate when we drag the wire or tube through. It is made of two L plate brackets. And 2 T-plates. The little ridge here is for strengthening the structure of this L-plate. These 2 are for holding on to the draw plate when the wire or tube are drawn through it. After the wire or tube are through the draw plate, it normally falls backwards. The two T-plates are there to catch it. All the screws here I use are leftovers from other DIY projects. So as far as they fit through the holes and if they are not too flimsy, they fit for purpose. Again, because I use some bolts here, in order to hide the head of the bolts, I use the hole saw to cut a bit into the wood. In this way, they will be all hidden. I cut the end of these screws because they stuck out too much, and after they were cut, they were too sharp. So I used some rubber cups to cover it just for safety reasons.
You can get all these components online.
I have them listed in the description below if you want to have a look. So that's how this tabletop drawer bench was first made. I have been using it for over 10 years now and there's no problem about it.
There are two good things about this tabletop drawer bench. First, obviously it costs much less. Second, it saves space because whenever you don't need it, you can just stand it up against any wall as far as it is safe. This tabletop drawer bench has one problem. Unlike the traditional drawbench, which is bolted onto the floor and it is made of cast iron, so when you use it, it is really sturdy. You can put on all your effort to move the handle. For the tabletop drawbench, what you need to do is to use some clamps to hold on to a heavy table like this. If you have the space, you can bolt and screw all the components onto a very heavy-duty table and then screw the table onto the floor or attach it onto a wall. In that way, you will make your drawer bench really sturdy. I hope you find this video helpful, especially if you're at the beginning of setting up your studio and have a tight budget. Like I did. If you like this video, you might want to check out the one here. I will see you in the next one.