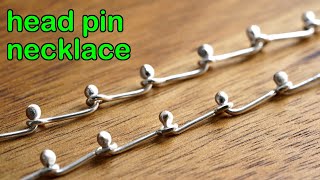
Learn to make a sterling silver head pin necklace by cutting 44 one-inch wires, forming loops, and melting the tips into beads at 1640°F to link them together. The video covers soldering, straightening, and finishing steps for an 18-inch chain.
Chapters
In this video, I'm going to show you how to make a head pin necklace. This is one of the simplest necklaces to make if you're at the beginning of learning jewelry making. Altogether, there are just 5 easy steps to make the chain, and it requires only the most basic and affordable jewelry making tools. First of all, Make some wire. The one I'm using here is the 1mm round wire. I make this myself using 100% recycled sterling silver at my studio. The link for the video showing how I did it is in the description below, so I'm not going to repeat the process here. If you don't want to make it from scratch, Buying it from your supplier will save you lots of hassle. It doesn't matter if the wire has been annealed or not because I'm gonna heat it up anyway. I cut 44 pieces out of my silver wire. Each of them measures 1 inch long. The way to calculate how many pieces of of silver wire I need is: from every 1 inch of my silver wire, I will make a link measuring 1 cm long. I'm making an 18-inch chain, that's about 45 cm long. I will have to leave 1 cm for the clasp, that's why I'm cutting 44 pieces of silver. I know my wires are not that straight. That's mainly because of how it was stored. The wire has been curled up in a roll. No need to worry about that now. This can be sorted easily later. If you like this video, do you mind clicking the like button? Thank you. Next. I'm going to use one piece of wire to make a loop. Put one end of the wire on a hard surface. Here I use a bench block, but if you don't have it, any hard surface will do. This helps to align the end of the wire with the pliers. Use the tip of the pliers to grip onto the end of the wire. And then bend the wire around one tip of the pliers. Push the loop as close to the wire as possible. Bend the wire backwards until the loop is positioned in the center of the wire like this. This is how the head pin looks up to this stage. No need to worry that the rest of the wire is not that straight at this point. Do this to all the rest of the wire. I am using round sterling silver to show you an example here. You can use other profiles of wire and use the same method to make this necklace in gold or platinum. In step 3, I'm going to close the loop with hard solder. If you prefer having the loop unsoldered, the wire at this thickness and length is strong enough to hold the shape. In that case, you can skip this part. But personally, I prefer closing the gap with solder for added durability. Rest the joint of the pin on top of the solder, so when it is heated up, the solder won't jump away as the water in the borax paste evaporates. Laying more than one pin out and soldering them like this can save some time. Now, each pin has been heated up. And they are very soft. Most of the pins look quite wonky at this stage, and I'm going to fix that. This is the most wonky one in my pile. Place it on the bench block with the loop sticking out of the edge. I put my other bench block on top. Roll it backwards and forwards while pressing it down at the same time. You can hear the noise becomes smoother as the pin becomes straighter. This is how it looks after that. This one is not as wonky as the previous one, so it should take less effort to get it straight. When you get this wire longer than a meter, it is quite often that your supplier will roll it up so it can be packed in a small envelope. Or box to ship, so it is common that you won't get it that straight. This is a simple way to straighten it with minimum effort. I do this to all of the pins. This is how they look up to this stage. Step 5: With all the pins ready, I'm going to permanently join them together. This is one pin. I mark the middle of it with a Sharpie so you can see it better. When doing this yourself, you don't need to mark it. Pass the pin through the loop of another link. This is half of a crucible. I'm not sure how I managed to crack it in half. You can see what it should be like if it is not in half. I use this half of a crucible because it has less residue on the surface. As far as it is heat resistant, You can use anything you prefer. Some of the tools I used in this video are listed in the description below if you're interested. When resting the pin on my half crucible, I align the black mark on the edge so the upper half is hanging in the air while the lower half is resting on the bottom of the crucible. Like this. I use the edge of the crucible as my guide. I melt this pin from the tip until it reaches the edge of my crucible. In this way, I can make sure I haven't melted too much. This is how it looks after that. Because half of the pin has melted into a bead shape, which is bigger than the hole on the loop. One pin has been permanently locked within the other one. Make sure you don't pick this up with your hand. It's still very hot. Use a pair of tweezers instead. Put the end of another pin through the loop of the previous one. Mark the center of this new pin. Rest it on the edge of the crucible. Melt half of the pin. Now I have 2 beads and 3 of these pins in a link. Hold the loop with one hand and the silver bead with the tip of a pair of chain nose pliers. Bend the bead towards the loop. About 90 degrees, not like the angle when making the box clasp. This doesn't need to be accurate. Do this to the bead on the other pin as well. I just use my fingers to bend it and eyeball the angle here. If you find the links a bit stiff, you know that you haven't bent the angle enough. After adjusting the angle, this is better, and it's good enough at this point. This chain will move even smoother after the fire residue and flux are removed later. Carry on putting the next pin on. This time I'm not going to mark it because you know what I'm doing now. I will speed this up by not waiting for this string of pins to cool down, and I'm not going to touch it with my hands directly. Rest the pin on the edge of the crucible. I pick a tiny lump of solid borax to touch the tip of the hot pin. Focus the flame on the top half of the pin. Once it starts to melt, I draw the flame downwards till the bead reaches the edge of my crucible. Put the next pin on and carrying on the process with the help of my tweezers. This can significantly speed up the process. But no matter what, don't touch it with your hand. It takes 1640°F to melt the sterling silver, which is 893°C. If possible, use a pair of heat-resistant tweezers to do this. Once all the pins are locked in, bend the beads on each link one by one, and this is the chain. Clean it in pickle and polish it. Now you just need to attach a clasp of your choice to the end of the chain. If you don't want a clasp at all, you can make it long enough to put it on as it is. In this case, to close the chain without a clasp, you simply feed the pin at the end of the chain to the loop at the other end, and then draw a bead with the torch to lock it in. You can also overlap the chain as a bracelet or necklace for the style you want. What would you like me to cover in any upcoming videos? Let me know in the comment below. If you like this video, you might want to check out the one here. I will see you in the next video.