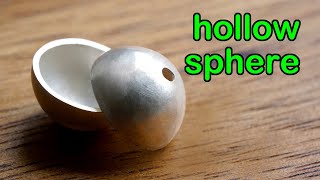
In this instructional video, the presenter demonstrates a complete workflow for creating a hollow sterling‑silver sphere that can be used for necklaces, bracelets, or earrings. The process is broken into six clear steps: (1) preparing two sheets of metal by annealing and rolling them to 0.5 mm thickness; (2) drawing, cutting, and drilling two half‑disc blanks; (3) doming each half using a series of dies and punches, followed by oxidation to darken the surface and precise sizing with a caliper; (4) sanding the domes to achieve the correct edge geometry while keeping a slightly rough surface for flux adhesion; (5) aligning the two halves with a wire guide, applying borax paste, and soldering the rim together on a ceramic soldering block; and (6) pickling the assembled sphere, cleaning it, and adding a temporary handle for safe filing. Throughout, the presenter offers tool recommendations, safety reminders (goggles, careful handling of drills and acids), and tips for adapting the method to other precious metals or test alloys. The video concludes with suggestions for adding texture or gemstones and turning the sphere into various jewelry pieces.
Chapters
In this video, I'll show you how to make a hollow sphere in silver. 6 steps altogether. With a lot of these, you can make them into a necklace, bracelet, or earrings. I'm using sterling silver here. You can use this method to make yours in gold or platinum. If you want to do a test before using any precious metal, It works on copper and brass as well. I need 2 pieces of silver, both 0.5mm thick. This one is the leftover from making the box clasp in the other video. I can't find another one in the same thickness. If I buy a new piece, I will have to wait for at least 24 hours So I found a random piece of silver here, thicker than 0.5mm, and I'm going to roll it to the thickness I want. In this way, I can have what I want in just a few minutes. This piece of silver has been annealed before, so I go directly to the rolling mill. Now both are 0.5mm thick. I get my divider to take a quarter inch and drew two circles on my silver. Each measures half an inch diameter. Cut them out with a jeweler's saw. I deliberately cut next to the lines I drew. So I can have a tiny bit of extra material on the edge of my disc. Having too much material on won't hurt. The lines are not smooth. No worries neither. I will get this sorted later. If you have a round disc cutter, you can get 2 cutouts perfectly in just a few seconds. But I don't have one myself, so I cut them out in the traditional way. If you like this video, do you mind clicking the like button? Thank you. Drill a hole in the center of each disc. I always wear a pair of safety goggles when using the pillar drill. I use the marks I made earlier with the scriber as a guide. You can drill this with just a flex shaft or micromotor. I happen to have a pillar drill in my place. It never hurts to be too cautious. I once had a piece of nail fly into my eye when I was only clipping my nails. You never know when it's your lucky day. This is how the disc looks at this stage. The hole measures 0.7mm. It will be enlarged in the next step. Anneal it before moving forward. I use a standard damping punch set here. Start with a die bigger than the disc and gradually move to smaller ones. I have used 7 dies and 5 punches altogether. As my silver is only 0.5mm, I only annealed it once when the silver was still flat. Always use a die bigger than the silver. In this way, I can avoid having the edges of the dies mark my silver. However, when it reaches the final hole, there is no choice. I have to use a hole slightly bigger than the diameter of the dome, so I can make my dome sink into the die and have it make deeper than the radius of my sphere. You can see the mark on the surface which was made by the final hole. But it is not deep. It can be removed easily. At this stage, the edges on the domes are a bit wavy. The distance between the two holes looks a bit longer than the diameter. I want the dome to turn darker for my next step, so I get the surface oxidized with my torch. The surfaces both inside and out, including the edges, are solid black now. Check the size with my caliper to see how much I can remove. Apparently, the distance between the holes is 0.4mm longer than the radius. This means I can remove 0.2mm on each edge to make the sphere round. At the same time, the wavy edges will turn smooth as well. As there is not much to take away, slightly sanding the dome in a circular motion will be enough. Drawing a number 8 on the sandpaper helps to produce a flat an even surface that stays oriented perpendicular to the holes as well. If this is too tiny for you to hold on to, you can poke a cocktail stick into the hole and use it as a handle. You can see the edge turns white at the area where the silver is removed. This helps me to see how much more I need to remove. To get a flat edge. Try not to use a very fine sandpaper. In this way, the dome rim will be a little rough for the flux to cling to during the soldering process. I keep checking my caliper during this entire process to avoid removing too much. Up to here, the distance between the two holes and the diameter of this sphere is only 0.02mm difference. That's enough for this stage. I don't want to take away any more material. I'm going to remove the fine stain with safety pickle so it will show better. When you do it yourself, you can skip this and jump to the next step. Now it shows better. You can see the hole on the silver has been enlarged after the doming process, and it has turned off round. I need to make both holes round again. The drill bit I use here measures 1.35mm diameter. It will help if the holes are perpendicular to the domes. Get a wire to fit inside of both domes. This will help the domes to align. Ideally, you use a copper wire, but I don't have that here, so I use the silver one instead. The problem of using silver wire is it could fuse onto the bead if I'm not careful. You won't have this problem if it's a copper wire. It doesn't need to be that straight, so I only bend it with my hands. As far as it can slide along the wire smoothly, it will work. I use a file to make a small groove toward the end of the wire. Lock a small piece of stainless steel wire on this groove. This will stop the sphere going past this point. String both domes on. Use a longer piece of stainless steel wire to lock both domes together. Check alignment. This will stop the domes moving during the soldering process. Brush some borax paste all around the gap. This is a ceramic honeycomb soldering block. The holes there are bigger than those on my standard one, so the silver stick will fit in with no problem. I have to cut small pieces of solder for this sphere, otherwise it will drop off because of gravity. I heat up the ball and melt the solder along the rim. This is how it looks after soldering. Remove the stainless steel wire before putting it into the pickle bath. When dipping the ball in, make sure one hole is facing straight up so the liquid will get into the ball to clean the surface inside. When rinsing this ball, face one hole towards the tap. In this way, the water will be able to get inside of the bore and flush away the acid. To clean the surface with a file, you can hold it with your fingers, but if you prefer to hold on to it better, especially when using a flex shaft or a micromotor, you can make a handle to hold on to. I'm using a paper clip wire here. You can use anything that holds the shape. Lock the bead roughly in the center of the wire. Bend both ends of the wire to lock it in. As far as the diameter is smaller than the hole, it will allow the bead to rotate freely. For safety reasons, This is very important because if it gets caught by any rotary machine, this will enable the bead to pull free from your fingers. So now when you clean it with a file or with sandpaper, it will become less slippery. From here you can add different textures onto the surface. Or even set some gemstones on the bead. Make it into a necklace, bracelet, earrings, you name it. If you like this video, you might want to check out the one here. I will see you in the next video.