How to Make a Safety Catch for a Tube Clasp
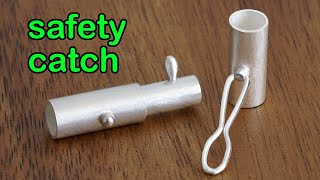
Learn how to add a safety catch to a tube clasp so it locks securely. The process involves soldering two small silver beads onto the clasp, drilling a precise 1 mm hinge hole, forming a catch from 0.9 mm wire, and positioning it with round-nose pliers to lock the clasp in place.
Chapters
This is the tube clasp I made in the last video. As you can see, it can easily slide open by a simple twist. In this video, I'm going to make a safety catch to lock it in place so it won't fall apart easily. For my safety catch, I make my hinge and knob round. To kind of match the shape of the knob on the existing clasp. Once you get the idea, you can make yours in other shapes. First, I'm going to make some marks. This tube clasp is made of two parts. I want the safety catch to be on this side of the clasp. So I start from the middle of this part. The cross I draw here is where the hinge of my safety catch will be. Here I use a right angle ruler to help me extend the line across to the other half of the clasp. When doing this, it's very important to have the knob locked in place. I draw a line to mark the middle of this side of the tube. I want the knob of my safety catch to be here. This is how it looks. The black lines help me to align the hinge and the knob. I'm going to solder a hinge here and a knob here. Now I can take this clasp apart and work on them separately. Step 2: solder the hinge and the knob. This is the crucible for my clean scrap. I need some material to make the hinge and knob. It doesn't need to be big. This will do. I don't need the entire piece. Cut two amounts of silver of roughly the same size. I want one to be slightly smaller than the other. Melt this bit of silver into a ball shape. Somehow I really like this half of a crucible. You will see a lot of it in my videos. I'm not sure where I have put the other half though. The surface inside of the crucible is covered with flux, so I don't need to flux my silver when melting it down. This is totally a personal preference. I try to pick the ball up right after the orange color has disappeared. In this way, the silver is solid enough so that it won't be marked by my tweezers. If I leave it too long, my silver will sink into the flux on the crucible and get stuck there. You won't have this problem if your surface is not covered with flux. This is how I got two beads. The tall one is going to be my hinge. The one with a lower dome will become the knob for the safety catch later. This is how my bead looks. The dome top was exposed to the air when it was melting down, so it has turned black. The bottom is flatter and it was protected by the flux. You can still see the silver color on the surface. The brown things on the silver are flux residue. I want the flat side to face upwards this time. Cut a little bit of solder, just enough to cover the surface of my bead. I put the solder directly on top and melt it down to cover the surface of my bead. I need to solder this little bead onto the tube clasp to stop the tube rolling around. I place it next to my half crucible. I have the mark that I made earlier facing upwards and put the bead on where the cross is. Soldering it this way will prevent myself putting too much solder on and save me time cleaning later. Try not to overheat the tube. I don't want to melt the hard solder on the other side. Do the same on the other half of the clasp. Make sure the mark is is facing up, so gravity will help hold the bead in place when soldering. With this bead, I have melted a very small piece of Easy Solder on the bottom, just like how I did with the first one. When soldering, I always like to have my soldering pick on hand. If by any chance I need to do some small adjustment, I'm ready. I forgot to lock the focus, that's why the camera is auto-focusing on whatever is in the front, in this case, my torch. By placing the solder like this, I have the solder nice and neat. If you like this video so far, Do you mind clicking the like button? Thank you. Step 3: drill a hole on the hinge. Before moving on, I clean off all the fire stain and flux residue on both sides of my clasp. This is only a small casserole dish on my electric oven. After trying many other ways to hold my safety pickle, I have found this one suits me the most. The safety pickle is made of food-grade material, so I have no problem touching it with my bare hand. This also makes it safe to rinse in a normal sink. With the knob and channel on one side and two newly soldered beads on the other, This is how my tube clasp looks up to this stage. I'm happy with how the two beads are aligned on the clasp. Next, I'm going to work on the side with a channel on. I will make this bead to be a hinge. This is a 0.7mm drill bit. When drilling the hole, I am resting my tube on the ball vise. This is just because it is how I feel comfortable to work. The layer of material I put on top of the ball vise is to prevent any unnecessary scratches on my tube. You don't need a ball vise for this project at all. Anything you would like to put the tube on will work perfectly fine. I want the hole to go in from one side of the bead and come out from the other. It needs to be perpendicular to the tube. Drill the hole halfway from one side and switch to do the same on the other side. In the end, I want both holes to meet in the middle of the bead. This can minimize the chance of the hole going off-center. I want the final size of this hole to be 1mm. Drilling it with a smaller one to begin with will give me a chance to make any adjustment when drilling the final one. But no matter what I'm doing, I need to make sure my finger is not on the other side of the bead. Well out of the way of the drill. Now the hole is through, I switch to a 1mm drill bit to make the hole bigger. I do the same, going halfway through one side of the bead and then the other half on the other side till the hole is through. This is how I got my 1mm hole. Perpendicular to the tube, and this is going to be the hinge for my safety catch. Step 4: Make the catch. I'm using a 0.9mm round wire for the catch. Thread the wire through the hinge. This is a wire I drew myself. That's why one end of the wire is not smooth. You won't have this problem if you get yours from a supplier. I don't want the rough end of my wire in the catch, so I need to take that into account and include extra length when cutting it and bending it later. Move the wire so the hinge is roughly in the center of the smooth part. Bend both ends of the wire towards the tube. I want my catch to end here. It needs to be away from the knob. Cut the rest of the wire off. Bend both ends a bit inwards so that they are touching each other. Brush some borax on and solder them together. Try not to move the fire towards the tube too much. Focus on the tip of the wire. Otherwise, I will be risking removing the bead I soldered on a few minutes ago. After cooling it down and drying it, this is how it looks. To make the catch work, twist the clasp in lock position, hold the catch in place with one hand, Right next to the knob, I squeeze the two sides of the wire towards each other with the tip of the round nose pliers. When doing this, try not to leave any mark on the surface of the clasp. Otherwise, just clean it later. By pushing the catch towards the tube, We lock it in place. This is the noise you want to hear when closing the catch. And this is how the catch looks up to this stage. It will look better after some tidying. Merge it into warm safety pickle. It has been 30 minutes since my liquid was heated up. So I pick it up with my bare hand. If you are allergic to the safety pickle or it's too hot to touch by hand, always pick things up with a pair of tweezers or chopsticks. For a final adjustment, I remove any sharp edges with a file and round up the tip a bit. You can finish the surface of the catch to match the necklace that you want to attach it to. Now with the safety catch on, this clasp is solid. To take the clasp apart, I will have to lift up the safety catch before twisting it open. All the tools I used in my video can be found in the description below. With links showing where to get them. Also, if there is anything you want me to show you in an upcoming video, let me know in the comments below. If you like this video, you might want to check out the one here. I will see you in the next video.
More from Haiyi











This ring took me 3 hours just for the stones #howitsmade #jewelry #craftsmanship