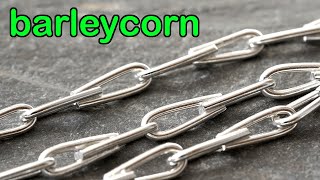
Haiyi Tan shows how to make a sterling silver chain necklace with basic tools. He wraps 1.1 mm wire around a ruler to form links, flattens them into flower shapes, then solders pairs of U-shaped pieces together. The finished chain gets polished and fitted with a lobster clasp.
Chapters
In this video, I'll show you how I make a barnacle chain necklace in sterling silver. Each link measures about 4mm wide. Step 1: The wire I use here measures about 1.1mm diameter. Here's a standard 6-inch long stainless steel ruler. I got from Amazon. Wrap the wire around it. Each round is going to make one link. I make this wire myself using recycled sterling silver. If you are interested, there is another video in my channel showing how I did that from scratch. The link is in the description below. Or for convenience, you can buy this wire from your supplier. 1.1mm is the standard size. This wire has not been annealed. I directly use it right after it was dragged through the draw plate. This has its pros and cons. The con is, because it is not soft at all, It requires some effort to wrap around the ruler. The pro is once it's released from the ruler, it looks like a flower. If the wire has been annealed, it won't form a flower like this. Step 2: Making individual links. The flower is not what I'm after, so I have to destroy it. Start from the middle, cut the drum ring off one by one until nothing is left. After cutting, this is the shape I have. It's like a cloth hanger without the hook. Cut it one more time in the middle on the longer side. If the wire you got has been annealed, it will be much softer. Now I have two U-shaped wires. Cut one more of this. That will make 2 lengths altogether. Annul them so they become more workable. I put the back of a crucible next to these wires to reflect heat. Plus, this will allow me to see better. Because my table is in front of the window, it's too bright without having the crucible to block the light. Leave them to cool down to room temperature before touching them. Now the wire is so soft that I can easily bend it with just my fingers. But if you prefer, use pliers. I just need to pinch the two ends together, so they are touching each other, but not twisted. This is what you want it to be. Thread the second wire through the first one. Pinch the ends closed just as before. Now you have them interlinked with each other. Next, move them as if you were about to pull them apart so that the ends hold each other by the tension in the wire. Like this. Leave them with a 3mm overlap. Up to this point, I'm using the tension at the end of the wire to hold them together. Next, I'm going to permanently fix them together by melting some solder on. I put them in front of a crucible because I want the crucible to reflect heat back onto the link I'm soldering. This will make it heat up to the temperature I want quicker. I brush some very diluted borax paste onto the gap into which I want the solder to float. Place the solder on the gap, heat it up, Job done. Permanently fixed. Here is my first link. Now I have to cut the rest of the wire and make more links like this. I brush all the metal dust away. So you can see it better. To make many of the same things in one go, it's actually much faster than making them one by one. With so many links to make, to avoid having some calluses on my fingers, I use the step nose pliers and the flat nose pliers to help me in this process. These are what I have so far. With all these linked up together, I twist each of them so the tension on the openings hold each link together. Individually solder each of these links. My table is in front of a window as I said earlier, and it is too bright outside. The sun is shining in. In order to see better, I have to block the light with my other hand. After cooling all of them down to room temperature, this is what I have got. Step 3: Joining all the links together. To join each of these links together, I need to make more of the U-shaped wires. I put one of the links I made earlier onto a wire, pinch it closed, and put it onto one side of a separated wire. On the other side of the same wire, I put another link on, then pinch both ends of the wire together. Stretch the two lengths out and use tension to lock them together. This is the place I need to solder, and they will be permanently joined together. Stretch the lengths out so the previous solder won't melt onto any unwanted places. There is not enough solder to fill the gap. I need to place more on the other side and do it again. This is much better. Here are 3 links. Now I need to repeat what I have just done and join all of my links together in the same way. After a few hours of audiobook, This is what I have got. I solder one jump ring onto the end and a lobster clasp onto the other. This is how it looks after all the fire stain is removed. Each link is similar to every other, but definitely not exactly the same. This is the human touch you won't find on any machine-made chains. The chain turns shinier after it's polished. I hope you enjoyed this video, and I will see you in the next one.