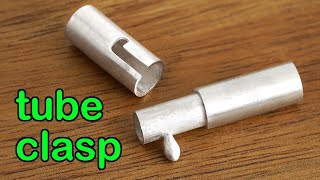
A silversmith walks through making a sliding-tube clasp in six steps: annealing and shrinking a 0.6 mm tube, cutting three sections to length, soldering them with borax and easy solder, machining a channel with a 0.7 mm drill bit, and soldering a 1.4 mm wire bolt inside. Includes a stuck mandrel moment and tips on temperature control to avoid melting thin walls.
Chapters
In this video, I'll show you how I make a tube clasp in 6 steps. All the skills involved are very basic. What you need is simply patience. Step 1: get a smaller tube to snug fit into another one. This is the sterling silver tube I made in the other video. The link is in the description below if you're interested, so I won't repeat how to make it here. I made another one using the same method. This one has a smaller diameter. I need to fit the small one inside of the big one, and I want it to be a snug fit. Before I can do anything, anneal the smaller tube. It's 1 o'clock in the afternoon in midsummer on a sunny day here. The change of color on the tube is not very obvious, but it's supposed to turn dark orange. Then I know this silver tube has turned soft. The thickness of the tube is 0.6mm. It's quite important not to overheat it. Otherwise, the silver at this thickness will melt easily with my big torch. As there is no flux residue on my tube, I go directly to shrink its diameter. The drawbench I am using here is made by myself using some leftover materials from different DIY projects. I showed that in my other video. You can find the link in the description below if you are interested. To keep the tube straight when shrinking it, I put a metal stick inside. Unfortunately, things don't always go to plan. I accidentally got the metal stick stuck inside the tube. And I can't pull it out with my hands. No choice. I have to cut the end of the tube and find a way to force it out from the other side. Poking it with a needle file doesn't work. Plus, these files are too brittle. I don't want to risk breaking it. I need something stronger. Here's my prong pusher. I'm getting nowhere, and if I keep doing it like this with a hammer, I could easily injure my arm. Right, this is my last hope. Thankfully, it works. Things like this happen all the time. You just have to find a solution as you go. Actually, I hesitated to include this in the video, but then I thought you might want to see when things go wrong and how to get it back on track. What do you think? Do you think I should include problems? That happen spontaneously, or do you prefer a straightforward A to B how to make it video? Let me know in the comments below. I want to know your thoughts. It's pretty straight now. I'm happy to move on. If you like this video so far, do you mind clicking the like button? Thank you. Step 2: Cut out 3 sections of tubes. Cut 2 sections out from the bigger tube. You can ignore the black marks on my silver. They are not relevant. Actually, I will remove them with some nail polish remover just to avoid confusion. File the end flat. And try to get both tubes at the same length. I use a right angle ruler to help me get the corner right. In this way, when they are put together, they will join nicely. Here's the smaller tube I shrunk earlier. It needs to be a little bit shorter than the bigger one. As one end is going to be hidden inside of the other, I actually include the rough edge in my tube, only fire one end flat. So the two big tubes measure 15mm long and the smaller one is 23mm. When they are next to each other, they look like this. To create more friction between the small tube and the bigger one, I bend the edge on the rough end a bit outwards. Step 3: solder the two tubes together. My brush doesn't fit inside of the tube, so I brush extra borax on the joint outside and let it flow in. As for the solder, I push it inside of the tube with my soldering pick. Put it next to where they join. If you have watched my other video showing how I make the tube, I use hard solder when making it. Here I use easy solder. The tubes are are only 0.5 to 0.6mm thick. Not overheating them is quite important. You want it hot enough to get the EC solder flowing, but not enough to melt either the hard solder or the tubes. In this way, you can see there is no excess solder where the two tubes are joined, and therefore the tube clasp can close properly. The inner tube is longer than needed, so I cut it a bit shorter to get it to fit into the other side of the tube better. It's nice to have too much material. This allows adjustments, not the other way round. File the end flat. Step 4: make a channel on the tube. This is the tube with nothing on yet. I need a line perpendicular to the end of the tube. This is where my channel is. At about half of this tube, I need another mark for the slot. Actually, I'm right-handed, so I put the mark on this side. This is how it looks up to this stage. Before cutting the channel, I need a wire to make the bolt. That wire is going to slide into this channel. The one I'm using measures 1.4mm diameter. With this wire, I know how wide I want to make my channel. There are many ways to cut the channel, and there is no right or wrong way. Whichever one you choose, I think it's purely about preference. Here I use a 0.7mm drill bit to open the hole. Then 2 types of cylinder crosscut burrs to open the channel. Finally, I use a barrette needle file to make some final adjustments. The entire list of all the tools I used in my video can be found in the description below. Keep checking the width of the channel with the wire that is going to make the bolt. I don't want to make the channel too wide so it will be loose when sliding in. If on the other hand, it's too narrow, it won't go in at all. Step 5: fitting the bolt in. Once it fits, I use a scriber to mark the location for the bolt wire at the end of the channel. Drill the hole with a 0.7mm drill bit first, and then enlarge it with a 1mm drill bit, followed with a round ball burr. Any mistake here will lead to the clasp not closing tightly, so bit by bit, I want to make sure the hole fits my wire exactly and the hole is in the right place. Now the channel is sorted and the hole for the wire is done. I want to round the end of the wire by melting a little bead on it. This is going to be the little knob on my tube clasp. I don't want the end to catch my skin. Carefully cut the wire length to fit it inside of the inner tube, so the end of the wire reaches the inner wall of the tube. Step 6. Solder the bolt in permanently. Double-check it fits before soldering the knob on. Again, I want to place the solder inside of the tube so that any excess solder will be hidden. To make sure there is no movement at all, I melt the solder on both places where the knob wire touches the tube. Touches the tube, top and bottom. Remove any fine state and flux residue with safety pickle. Because all the solder on this side of the clasp was placed inside of the tube, as you can see, outside is nice and clean. It's not fit, but it's not totally secure yet. With an easy twist, the clasp will fall apart. I don't want to make this video too long, so in the next one, I'm going to make a catch to lock it in place. If you like this video, you might want to check out the one here. I will see you in the next video.