How to Make Box Clasp in 4 Simple Steps
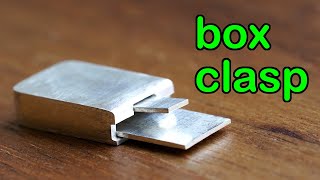
Haiyi Tan walks through making a silver box clasp in four steps: building the three-wall box, creating the lid, forming the tongue and catch, then assembly and polishing. You'll learn which tools to use and how to get that satisfying click when it closes.
Chapters
There are many ways to make a box clasp. In this video, I'm going to show you one of them. It is not complicated. There are only 4 components to make a basic box clasp work. First, I'm going to make the wall for the receiving box. This piece of silver measures 0.8mm thick. I use the sharp edge of my caliper to draw a parallel line to the side that is cut with a guillotine. I want the wall to be about 2.7mm high. Mark 3 lines on the silver strip: 12mm, 6.5mm, and another 12mm. This will make the 3 walls of the receiving box. I'm blackening the area where the marks are so you can see them better, but when you do it yourself, you don't need this. As far as you can see the lines, that's good enough. With a black background, I scratch the lines again with a scriber. So you can see what I have done with the caliper. Cut this strip out with a jeweler's saw. It will help if you don't cut on the line, but next to it, because let's face it, we are human. No matter how careful or skillful you are, this line is not going to be that straight. By leaving a little bit extra material on, I can remove it easily when making it straight later. Them. But if I cut inside of the line, the height of the wall is going to be lower than what I originally planned earlier. There is a protective layer on the other side of my silver, so I need to remove it before moving on. You can see the line I just cut is a bit wavy, but as far as the entire line on the other side is intact, I'm not worrying. Now make this edge dead straight. I'm using a cut 00 flat file. The teeth on the file face only one way. That's why I only file in one direction. Before folding the 3 walls, I use a 90-degree V-point engraver to engrave a straight line. Straight line along the marks I made earlier. I have in-depth online courses teaching how to polish different gravers if you're interested. They're under the course dropdown menu on my website at www.haiyitan.com. Courses about how to master engraving straight lines and curved lines for beginners are coming soon as well. Each of them aims at helping you to achieve the best results in the shortest time. You can also become a member of my channel. Your support enables me to continue making good content here on YouTube. When folding the walls, I rely on a 90-degree angle ruler to help me get the corner right. Keep checking until the two corners are 90 degrees. If you notice, when folding, I try not to bend it with my fingers to avoid making the walls curved. I prefer to have it against any flat surface I can find around me. Now both corners are at 90 degrees. I need to anneal this before moving on. I have it on a flat bench block. You can see there is a gap here. That means this is not flat. Hammer it flat with another bench block. Gently hitting it will be fine. This time, no light comes through between the bench block and the 3 walls. To strengthen the 2 corners, I melt some Easy Solder into the corners. I'm showing you how to make this in silver. You can use this method to make yours in gold or platinum. You can see from this angle there is a small silver line at each inner corner between the walls. That's the solder. If you like this video, do you mind clicking the like button? Thank you. Double-check to make sure the corners are at 90 degrees before moving on to the next part. With the walls ready, I'm going to make the top of the receiving box. Here's the leftover silver I used to make the tube in the previous video. The link for that video is in the description below if you're interested. This is 0.45mm thick. I need to make the edge straight by filing it with my flat file. Once it's done, the edge is really sharp. So try not to cut yourself. I want to make sure at least one corner on my silver is at a right angle because I'm going to use those two edges as a guide when drawing lines. The material needs to be a little bit bigger than the box, but roughly will be fine. Take the measurement for about half of the height of the walls. And draw another line on the silver like this. I will fold this later. Cut this out. I'm engraving on the line that needs to be folded. This will ensure a precise fold, and it will also guide where the solder flows. I want this at a right angle, Once it's done, double-check with the angle ruler. This is how it looks at this stage. You see, 3 sides of my flat file have cutting teeth on, only one side is smooth. This can be very handy. When I'm filing this narrower, I rest the smooth side of the file on my index finger. This little edge needs to cover no more than 1/3 of the section of the wall. Solder the top of the box on. Here I use Easy Solder. You can see from this angle, a little bit of solder has also flowed along the gap between the tiny edge and the top of the box. This will strengthen the 90-degree corner. To make the tongue, measure the width between the two walls of the receiving box. I mark it on the 0.45mm thick silver I used earlier. You can use spring steel to make the tongue, but I don't have that here, so I'm using the leftover silver from making the tube. The receiving box is about 13.6mm long. To get extra space, I take it to about 19mm. This will be the back of the tongue. Inside the box, the space between the back to the front is about 12mm, so I mark that on my silver. This is the length of the tongue. I've cut the strip out and draw some black lines on the silver so you can see the lines better. The last one is about 4mm apart from the previous one. Take 2mm and mark 2 lines on the silver like this. Cut the 2 rectangular shapes out of each side. This will be the simple catch for this box clasp. File the edges to make them straight. Now I engrave a groove on the first line I marked earlier. This will make the silver easier to fold precisely along the line, and it will ensure accurate and clean folds. Hold the silver next to the groove and fold it against a flat surface. When hardening the fold with a hammer, I leave a piece of silver between the fold. The tongue is still too wide for the bay, so I file both edges to get a snug fit. Check it regularly. It is quite important there is no movement side to side. Use a scriber to mark where the catch is on the narrow edge. Take the middle part away. First, mark the edges with a saw and then make it flush with a needle file. Check the fit. This crispy clicking noise is what I'm after. Notice that I'm only showing you how to make a simple version of this clasp. Once you get the idea, you can set a stone on the catch. Engrave on the surface, or do something else to make the clasp enhance the design of your jewelry. Now the tongue is ready. I'm going to close the box. Cut a piece of silver as far as it is bigger than the box and has one straight edge. That's good enough. It's going to be like this. The straight edge of the lid will align level with the edge of the opening. Before soldering the lid on, I file the extra material of the box so I can focus on the lid. If you prefer, you can clean the firestay off before filing. Solder the lid on using Easy Solder again. If your box clasp has more complex designs on it, you can consider using medium solder, but this one doesn't. That's why I'm using easy solder again. Clean the box with safety pickle. I drop it into the pickle sideways to ensure there is no air bubble trapped inside. So the fire stain inside the box can be cleaned as well. Once it's done, rinse it thoroughly with water and pat dry. Cut the extra off and file the edges flush with the box. You can finish the surface with sandpaper and then polish it to match your design. The amount of squeeze needed to release the tongue should be light. This is only the basic idea of a box clasp. You can also attach the back of the tongue to another box, or cut it in shape to go along with your design and attach it directly to the end of a chain. If you like this video, you might want to check out the one here. I will see you in the next video.
More from Haiyi











This ring took me 3 hours just for the stones #howitsmade #jewelry #craftsmanship