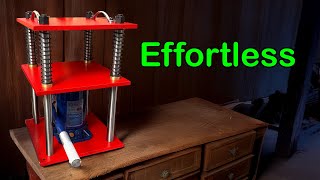
In this video the creator walks through the entire process of deciding, acquiring, and using a 20‑ton hydraulic press for jewelry work. He begins by explaining his months‑long decision‑making, weighing the need for a press and choosing a 20‑ton model over a 6‑ton version. He then unboxes the press, describing the multiple layers of heavy‑duty packaging, the weight (45 kg/99 lb), and the dimensions (42.5 cm tall, 30 cm deep). He shows how he temporarily stores the press on a plastic‑protected board in his garage and discusses base stability. The assembly segment covers the four main steel panels, silver columns, hydraulic cylinder, and the two knobs (pressure control and release), as well as the detachable handle and extra pull handles. He demonstrates operation by pumping the handle, explaining how the middle panel moves, the role of the springs, and how to release pressure. Using a disc cutter and a steel block, he punches a hole in a piece of recycled sterling silver, noting the need to anneal the metal, the effect of the unscrewed bottom seal, and the effort required. He encounters a stuck punch, resolves it with a hammer, and suggests using beeswax for easier removal. Throughout, he reflects on why he chose the higher‑capacity press, invites viewers to share their own capacity choices, and offers design improvement ideas (longer release‑handle, rounded edges). The video concludes with an overall positive assessment of the press’s power‑to‑effort ratio and a call‑to‑action for viewers.
Chapters
It took me a few months to decide if I needed a hydraulic press or not. If I do, which workload should I get? Also, which model should I get? And lots of other questions. Now I have got one that I am very happy with. If you are in the same situation as I was a few months ago, here is the video for you. In the first part of the video, I will show you what to expect when the package arrives. In the second part, I will show you how it looks once it's unpacked. In the third part, I'll show you how to use it. Finally, I share with you how I think this machine could have been made better. The one I have got is the 20-ton hydraulic press. This is the packing it came with. There are 4 heavy-duty strapping pallet packing belts on each direction of the steel box. The thick cardboard box is wrapped with a layer of thick plastic. Inside of this box, there is another heavy-duty cardboard box. The press was wrapped with 2 layers of plastic. This is the very inside layer of the plastic. These 2 smaller bags are for the handle. So if you don't count the brown tape, this press is wrapped with 6 layers of packing materials. As I haven't got a permanent place for this machine yet, I'm keeping it in the garage for the time being. The base is the packing box for my air compressor. I put a board on top of the box and then rest the press on top. Ideally, it will need to be mounted down on a table, But this is how it will look for the next few months. The reason I have put a layer of plastic between the press and the board is that I noticed there is a lot of engine oil on this machine. If it has direct contact with the board, I worry this board will soak up all the oil, become soft, and eventually collapse. That's why I have laid down a layer of plastic. One thing I have to point out is that this machine itself weighs 45 kilos without the box. That's about 99 pounds. Lifting up this machine is a 2-person job. Now, with the machine in place, let me show you what I have got here. This is how the machine looks directly out of the box. There are two knobs on the bottom of the pump. One has an orange cover. There is a screw behind the cap. I don't know what it is for yet. I'm sure some of you clever guys know what this is for. Please let me know in the comments below. The knob on the left-hand side is to control the pressure. So before you use this press, tighten this knob. If not, nothing will move. The handle comes unattached to the machine. To install it, it's very simple. You put the blue end into the hole next to the pump. To get this machine to press anything, you pump the handle up and down. You see, I'm only using 2 fingers to push the handle to show you how effortless this process is. Doing this simply lifts the middle panel up. The panel on the top and bottom don't move at all. As I'm pumping the middle panel upwards, You can see this machine is made of 4 main parts. The 3 panels are in red. They are made of steel. The 4 silver columns hold up the structure of the press. The blue cylinder is the hydraulic pump. The 4 springs between the 2 upper panels push the middle one back to its original position. Once the pressure is released. Once the 4 springs are completely squeezed, that's the maximum the middle panel can be pushed up. The gap measures just a little bit more than 2 inches. To get the middle panel back to its original position, I will have to release the pressure within the pump. That's when I need to twist this this knob here, anti-clockwise. This is how it looks once the pressure is released. The 4 big springs push the middle panel downwards. Actually, there are 2 handles on the top of this press. Because the packing box is a tight fit, I had to use these handles to pull the machine out of the packing box. Other than that, I haven't noticed any other function for them at this point. This machine is about 16 1/4 inches tall, which is about 42.5 cm. The depth measures about 11 3/4 inches, that is 30 cm. This machine is very heavy. It needs a very solid base to support it. Otherwise, it may not hold its weight. Here's the disc cutter. I got it online. The link is in the description below if you are interested. Because it's brand new, the entire cutter is fully covered with engine oil. To protect it from rusting. This is a piece of recycled sterling silver. Before putting it in the cutter, I'm annealing it to make it soft. Because the thickness of the cutter is thinner than the gap between the two red boards on the top of my machine, I'm using a steel block to lift the cutter up. In order to get the best result, I move the silver between the gap so the area I'm punching a hole through is in the middle of my piece of silver. Once it's aligned, I put the cutter on top of a steel block. Now, this is the fun part. It looks like I forgot to twist the screw on the bottom to seal the press. It does make a difference. This time, when I push the handle down, the middle red plate moves upwards. You can see that it takes me almost no effort at all. As the two top red boards are going closer, you can see why I need to lift the cutter up with a steel block. If I don't do that earlier, it won't allow the top board to push the cutter through, because the springs between the two red boards limit how close the middle board can be pushed up. After about 1 minute of pushing, the top board is finally touching the punch. This is when I actually need to push harder, but I can still manage it with only one hand. This is my first time using this press. Just in case I have missed something, releasing the press to check. Wong Hut. It looks like it's getting there. All I need to do is to carry on. Okay, let me try again. This noise tells me that the punch has cut the silver, and job done. Because the punch and the hole is a tight fit, getting the punch out takes some effort. To get it out more easily next time, I think I will put some beeswax on the punch. Here's the circle I got out from the punch. Perfectly round and the edge is very neat. To release the press, all I need to do is to twist the knob anti-clockwise and the 4 springs will push the middle plate back to its balanced place. I have never used this kind of punch before. My punch is stuck inside of the cutter because some of the silver sheet is still there. For now, I am getting it out with a hammer, but I am not sure if this is the right way. If anyone knows how to get it out properly, please let me know in the comments below. Now my punch has been forced out, and the piece of silver that was stuck inside earlier has finally dropped out. So here is the round disc and the piece of silver that it came from. I think because the piece of silver is not much bigger than the disc, It bends a little bit. That could be the reason why the punch stuck inside earlier. I'm not sure what to do with this wrong disc yet. Before getting this press, I did think about getting a 6-ton version, but in the end, I chose the 20-ton because I thought it's better to overkill than being stuck in a situation where I need something more powerful. The price gap between these two presses is not a big jump. If you happen to have one of these presses, I'm curious to know which capacity did you choose and how you have found yours. What do you use your press for? Let me know in the comments below. After trying the 20-ton hydraulic press, I'm pretty impressed with how little effort I need to put in to get so much power out of this small machine. If I could improve one thing, I would make the handle on this pressure release knob longer or bigger to give more leverage. Also, I would round up the edge on the handle a bit. It's too short. And the corners are quite sharp at the moment. If you're thinking about getting a hydraulic press, hopefully this video has helped, and I will see you in the next one.