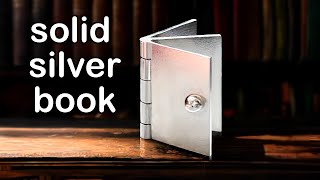
A silversmith walks through making a tiny wearable book pendant from sterling silver sheet. The process includes cutting three pieces, building a five-knuckle hinge from a 1.8 mm silver tube, soldering a bead as the hinge pin, and adding a wire latch so the book opens and closes.
Chapters
In this video, I'm making a miniature silver book pendant. The book has one front cover, one leaf, and a back cover. When the book is folded, you can put the latch on to keep it closed. This book can also be worn as a necklace, and you can engrave some personal message inside. Here's the leftover silver I have from making the box clasp in the other video. It's about 0.5mm thick. It should be enough for what I'm going to do. The end is not that straight. I need to flatten it with the parallel pliers. The width is about 7.6mm. The length of this section will make a nice size for a miniature book pendant. I colour this area with a Sharpie so you will see it better when I scratch a line on later. I file this edge smooth and scratch a parallel line on the other side. This is my reference when cutting with a saw. This piece of silver is going to be a leaf of my book. Indeed, I need 2 more pieces. I could have oriented the last one this way, but there are too many lines on the surface of this area already. I'm going to stick to the original plan. Next is to cut the two pieces out. All the lines I have scratched are for reference only, so when cutting, I won't stray too far away from the plan. Everything I cut at this stage doesn't need to be that straight. I'm only a normal human being. I won't be able to do so anyway. But they will be that straight later. My silver is very thin. I try not to bend it when cutting the shapes out. Many years ago, when I was still new to the saw, I used to keep putting my fingers in front of the blade. You don't need me to tell you what happened next. I did it so many times that these days, whenever I accidentally place my index finger in front of the saw blade when cutting metal like this. The pain immediately flashes through my mind and it always reminds me to place all fingers safely behind the blade. Now I have all my pieces cut out. I try to get every single edge and angle straight. When the 3 pieces stuck together, They will look like this. I notice not all the pieces are flat, so I anneal them to make them soft and hammer them flat. You can use a planishing press to do it, but I don't have that machine here. I use 2 bench blocks instead. After that, this is how they look like when I stack them together. Each of them are more or less the same size, but not exactly yet. That's good enough for now. I will make them all the same later. The total thickness is about 1.4mm at this stage. Next, I need to make a hinge that is made from 5 knuckles and a pin. This will join all the 3 pieces together. Here is a silver tube. I'll show how to make one in the other video. Check it out if you are interested. The link is in the description below. The one I have here measures about 1.8mm diameter. I'm going to use this tube to make the knuckles of my hinge. I need to cut 5 equal lengths out of this tube and have them evenly soldered on the 3 pieces of silver I cut earlier. On this piece of silver, I roughly divide the length into 5 sections. Each of them are more or less the same. Mark it with my scriber. I can see them, but they don't show up very well on the camera. Let me color this edge with a Sharpie. So you can see it better. The marks are there already. I just scratch them again to show you where they are. This is where my 5 pieces of tube need to be. Before scratching any mark on my tube, I color it first. Doing that on one side will be fine. Put it next to the silver. Copy the first length onto my tube. When cutting it off, I try to make the edge square. File the section flat. Cut out the other 4 pieces of tube and do the same. Now all of them are ready, and I need to solder them onto the 3 pieces of silver one by one. I need the middle piece to have one tube on in the middle. I put a piece of off-cut silver under to raise it off my soldering board. So the tube will be soldered in the center of the edge and not off to one side. Solder 2 tubes on the top piece. Finally, I want the last 2 tubes attached to the bottom piece on each edge. You see the top and bottom of these 2 tubes are not flush with with the rectangular shape. That's intentional. This is how they will be when put together. Obviously, the tubes are not aligned at this point. I need to make some small adjustments so I can feed the silver wire through to hold them together. First, the flux residue on the surface needs to go. A warm pickle bath will get this sorted in 30 minutes. This is how everything looks now. There is too much solder on the surface. It stops the 3 pieces of silver folding up properly. So I try to remove the solder with sandpaper. But the tubes still don't line up. I have to clean it more aggressively. I use a burr here. As you can see, I can put the wire through, but the bolt can't close properly because there is still too much solder on the surface. I'm heading in the right direction, just more cleaning to do. For some final adjustments, I use small files. This is more like it. As I want this book to stay closed when it is folded, I need a latch. This is where my hinge is going to be. I need to make a small dent here. So when I solder the hinge on, it will sit precisely on this exact spot. Here's a very small piece of offcut silver I found in my crucible. I'm going to melt it into a small bead. This size will make a nice hinge. I place it in the dent I made earlier and solder it in place. You can see it from this angle. It has been soldered on the exact spot. To turn it into a hinge, I need to drill a hole through. When drilling, it's very important to drill from both directions and let the two holes meet in the middle of the bead. This will ensure the channel through is at the right angle. Next, I need to solder a small size of bead on the front cover. The dent here is to make sure this little bead will sit in the exact place I want it to be. Like this. Here's a close-up of how it looks. This is the wire I made when making the bar setting video. If you're interested in that video, The link is in the description below. After bending the wire to make a latch, I connect the two ends of my wire with a tiny bit of solder. At the same time, I try not to melt everything that I have joined previously. I solder a small jump ring onto one end of the wire earlier. And this is how it looks. Now my book has a little latch. Before permanently fixing the pin on the tube, I need to take everything apart and remove all the fine stain and flux residue. After being in the pickle bath for 30 minutes, my silver is clean again. This is how it looks after it's polished. Now I can put everything together. Before putting the pin through, the book holds together nicely, but without the pin, once opened, it falls apart. After soldering the pin on and clean up, I file the bottom of the book so everything is aligned. Here's my book made of solid sterling silver. It has pages that can be opened and a latch to keep it closed. The little jump ring on top is for attaching it onto a necklace. So it can be worn as a pendant. Somehow, looking at the latch on the front, it looks like an evil eye to me. Actually, I might consider engraving something on the pages, but for now I'm going to leave it just as it is. And keep the possibilities open. What do you think? Let me know in the comments below. I will see you in the next video.