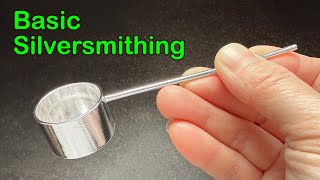
Haiyi Tan makes a coffee scoop from recycled sterling silver, forming the walls with a doming punch, soldering the bottom disc on, and attaching a wire handle. The whole process takes careful annealing to prevent cracking and a pickle bath to remove fire stain before polishing.
Chapters
In this video, I'm making a simple coffee scoop. The scoop is made of 3 very basic parts: the wall of the scoop, the bottom of the scoop, and then the handle. First of all, I need to make the wall of the scoop. The sterling silver I use here is recycled at my studio. This piece of silver is what I have after rolling the ingot flat. Part of this piece was cut off for another project. That's why it has a straight cut at one end. The other rounded end is how the ingot looks naturally coming off the rolling mill. Here I use a right-angle ruler to help me get both ends straight. I have a link in the description below showing some of the tools I use in this video if you are interested. When it comes to jewelry making, there is no right or wrong way of using one tool rather than the other. It is only a matter of personal preference. Here I could have used a flat file to make this edge straight, but I choose to use the jeweler's saw instead. After cutting off excess materials at both ends, I use a flat file to make one of the long edges straight. To maximize the size of my rectangular shape, I use a divider to draw a parallel line along the side I have just made straight. First, cut off the rough edge. And then use a file to make all the edges straight. You can see that to begin with, I have difficulty filing the edge as the file gets snagged. On the rough material. But after a few attempts, my file glides much more easily across the edge. This is how I can tell the edge is getting smoother. I do this on all the edges. You can see that the two short edges are much smoother than the longer ones. That's because they are going to join together. This means that the smaller the gap between them is, the stronger my soldering joint will become. Making them both dead straight will ensure a tight fit for soldering. Compared to the two short edges, you can see it from this angle that my two long edges are not that straight yet. There are still lots of small spikes hanging on there. I'm not too worried at this stage because I will have a better chance to resolve that later. Now I move on to form a cylinder shape with this piece of silver. The punch I use here is from my doming punch set. I put it sideways and use the handle and the swage forming block to help me form the cylinder. I move from the biggest groove gradually to smaller ones. As I don't want the diameter of the cylinder to become too small, I only use the 3 biggest punches from my doming punch set. In order to not damage my punches, I use a wall-high mallet for hammering. In between hammering, I anneal my silver to remove internal stresses and make it easier to work. Once it shows a hint of orange color, I know my silver is ready. After cooling it down in the open air, I carry on closing the gap between the two edges. By the way, whenever hammering, I always wear a pair of heavy-duty ear defenders. I have a video talking about 10 basic health hazards when making jewelry. If you are self-taught, I think it's worth having a look. It never hurts being too careful. The link is in the description below if you are interested. Being patient is very important when working with precious metal. This is more or less how I want it to be. When the gap is closed, the profile is round. Repeat the previous process, anneal it, and hammer it a few more times till the gap is closed. Next, I solder the gap closed using hard solder. When doing this, it's very important to only melt the solder, not the cylinder. Otherwise, I would be back to square one again. This is what I have got after soldering the gap. I don't bother to remove the fire stain and borax residue at this point. Instead, I'm filing the two edges flat using the cut 00 file. This kind of file came with no handle after arriving from the supplier. I have a video showing how I put a handle on. The link is again in the description below if you want to check it out. In the second step, I'm going to make the bottom of the scoop. This is a piece of silver that I rolled from an ingot. I'm going to attach this on to one end of the cylinder shape I just made. To avoid drawing too much heat away, I'm cutting out a piece that is just a little bit bigger than the bottom of my cylinder. I'm not aiming for it to be a precise cut at this point. As far as it is a little bit bigger than the bottom, it will do the job. This is how it needs to be. Next, I'm going to attach the bottom piece onto one end of the cylinder to form the bottom. Again, I just want to melt the solder, not the silver nor the hard solder I just put on earlier. I'm using Easy Solder here. To reflect the heat better, I stand up the two crucibles I have around the soldering station. The bottoms of these crucibles are flat, so they will reflect the heat when I solder. This will help me to reach the melting point of my Easy Solder faster. Try to evenly heat up the entire piece. If one side of the silver is overheated, it will risk melting that section of the silver. That's what I need to avoid. As I don't need the scoop to be soft, I pour some rainwater onto the hot silver directly. This will also save me time waiting for it to cool down naturally. Here's how it looks after. To remove the fire stain and flux residue, I submerge my scoop into the warm pickle bath for about 30 minutes. Here I'm heating up a glass casserole dish directly on the electric hob. I set the hob to maximum power and let it be for 2 minutes. The idea is to heat up the safety pickle solution without making it boiling hot. So how long I heat up the pickle solution here totally depends on the amount of mixture I have and also the power of my oven. I once forgot to turn the hob off and left the kitchen. It made a total mess in my place. These days, I always set the alarm and would never leave it unattended. This is how it looks after the pickle bath. My silver has turned quite white. If the piece of silver I soldered on the bottom was quite thin, I could have used a pair of scissors to cut it off. But in my case, the silver is quite thick, so I'm using my saw to cut the excess edge off. I'm cutting it quite close to the cylinder wall but trying to leave about half of an mm of silver. This will allow me to adjust it later. For the thin edge I just cut off, it goes to the crucible for recycling. To make the bottom flush fit with the wall, I use a flat file to take off the edge. When doing this, I always follow the contour of the surface, with the file. This is how it looks after I finish filing. In the last step, I'm going to give this scoop a handle. This is a silver wire I make from recycled sterling silver. I have another video showing how I make it from scratch. Check it out if you are interested. The link is in the description below. So this is going to be the handle of my coffee scoop. To maximize the contact between the handle and the scoop, I drill a hole in the scoop so I can put a little bit of the handle through. And this is how it looks after the handle is sewn on. Because I don't want the handle to be too long, I cut off the unwanted section. This is my coffee scoop after the final step. Stain was removed. The entire scoop is polished and clean. Do you drink coffee? If you do, what do you use to measure the coffee beans or powder? Let me know in the comments below, and I will see you in the next video.