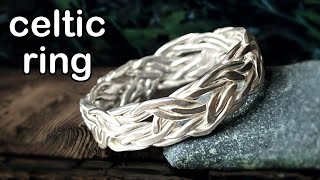
In this instructional video, the creator fulfills a long‑standing request to craft a Celtic‑pattern silver ring for a friend. Starting with a 0.8 mm silver wire found in a drawer, the maker reduces the wire diameter to about 0.7 mm by pulling it through progressively smaller holes on a round jaw plate and repeatedly annealing to relieve internal stress. The wire is then divided into three equal strands, plaited together, and flattened using a rolling mill combined with the jaw plate, with intermittent annealing to keep the metal workable. After achieving a uniform, flat strip, the piece is cut to length (approximately 55 mm needed for a US size‑6 ring), the ends are soldered in place, and the strip is bent into a ring using a ring bender. Final filing, soldering, flux removal, and polishing reveal a finished Celtic‑pattern silver ring. Off‑cuts are collected for later recycling in a crucible. Throughout, the narrator shares practical tips, tool choices, and personal motivations, concluding with hopes that the recipient will appreciate the gift.
Chapters
I've been asked to make this Celtic ring by a friend of mine for a few years. Today I finally sit down to fulfill this request. Here's a random silver wire I found in my drawer. It measures 0.8mm. This will be too thick for what I need to do. To bring the size down, I have it gone through a few holes on my round drawer plate. The tabletop drawer bench I use here was made with a few leftover pieces that I found lying around my place. I have two videos showing how I made it. The links are in the description below if you're interested. This size is much better, but in order to remove internal stresses and make it easier to work with, I need to anneal the wire. Now my wire measures about 0.7mm diameter. I roughly divide this wire into 3 equal lengths. Solder the 3 ends together. This is how it looks. I could have used my bench vise to hold the ends of these wires, but that's in my garage and it's too cold outside. I don't want to leave this room. So I use the small ball vise to do the job. Basically, I'm plaiting these 3 wires together and try to make the pattern even at the same time. This is how it looks up to this stage. To get it more even, I put it through a few holes on my round jaw plate. From big to small, you can see the wire becomes more even gradually. To flatten it, I have fed it through the rolling mill a few times. [MUSIC] And then back to the round jaw plate. This is how it looks in the end. It has turned much narrower. Next, I need 2 more of the same plats. As the wire I have found is much longer than the previous one, it should be long enough to cut it in half to make 2 lengths out of it. I didn't cut it exactly at the half spot, but it should be long enough to make the ring. Before moving on, I anneal everything one more time so they will be easier to bend. Instead of soldering all the ends together, I simply hold them together with the ball vise. As each wire is made of 3 individual wires, they are slightly harder to bend than the previous stage. In between, I have to use a pair of pliers to push them in place. This is what I get. Here's a bigger version of the round jaw plate. The holes range from 5mm all the way up to 8mm diameter. Pulling my wire through these holes and rolling it through the rolling mill. Gradually, I have made my wire flatter and more uniform. Whenever the wire turns hard, I have to anneal it to make it more workable. Cut off the uneven parts. At both ends. This is what I have got after all that hard work. As for the offcuts, they will go into the crucible to be recycled later. I have just a little bit more than 7cm long. To make my ring in US size 6, I only need 55mm long of this pattern. To prevent the wires at both ends changing their location, I fix their positions by melting some solder in place. There are many different ways to make this to a ring shape. Here I choose to use a ring bender. Before closing the ring, I file both ends flat. So they can join nicely. Now this is ready for soldering. As there is quite a lot of solder in position at both ends, I'm not going to put more on. This is how the ring looks after all the fire residue and flux have been removed. After it's polished, here's the Celtic pattern ring I just made. Fingers crossed my friend will be pleased with the result. Hopefully you like this ring too, and I will see you in the next video.