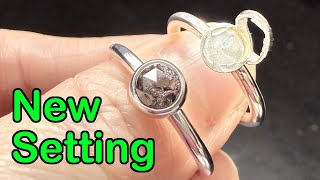
Jeweler Haiyi Tan resizes a diamond ring from size 5 to 7¾ by cutting out the stone, building a new band from recycled wire, and fabricating a fresh bezel cup. The bezel setting has to be destroyed completely to free the diamond, then soldered back together with hard solder for strength.
Chapters
This ring features a half-polished diamond. If you look close, some of the facets are polished and the others are not. This is actually quite interesting because you can see the rough form of this diamond and you can compare that to the few shiny facets that have been polished. This ring is currently in US size 5. The owner of this ring wants to resize it to size 7¾. I could have cut somewhere on the band and solder a small section of wire onto it to make the circumference bigger, but I don't want to have too many soldering joints on this smooth band because it could potentially make the band weaker, so I have decided to take the diamond out and make a brand new ring for it. In this way, the band will be made of one solid wire, and there will be just one joint. First of all, I have to take the diamond out. To remove a bezel-set diamond from its seat, I cut the bezel wall from the side. I need to make a cut all around the bezel so I can lift the wall up and release the diamond. That's why I think bezel setting is one of the most secure setting styles, because in order to get the diamond out, you will have to completely destroy the material around it. In order to lift the material around the diamond, My saw blade needs to cut through the metal and reach the diamond behind it. Having the teeth on my saw blade reaching the diamond is how I know it has cut through. My Swiss-made saw blade is made of high-quality steel. But every time I finish cutting one bezel wall like this, I have to change the saw blade for a brand new one, because once the teeth reach the diamond, they are ground off by the hardest natural substance in the world. With the cut going through most of the wall, I push the bezel upwards. The fact that my nails are quite hard does help a lot when doing this. I can tell the diamond is moving. Maybe I should have cut a bit more. Never mind, I got it out. From this angle, I can see some shiny polished facets and some are unpolished. About half of the surface are polished actually, and the other half are in rough form. This is what I just cut through. My wire is made from 100% recycled material. After making the ingot, I first roll it using my rolling mill and then use a draw plate to make it to the size I need. After cutting the length to the size I want, I start bending it. Actually, there are many ways to bend my wire into a ring. What I'm doing here is just one of them. I first bend it with a pair of half-round pliers. Later, I use the bench pack to help me bend it so both ends of the wire meet up. Finally, I do some small adjustments so they meet up nicely before soldering. To permanently join them together, I use hard solder to fill up the gap. My soldering station is in front of a south-facing window, and it is in a sunny afternoon when I'm doing this. It is too bright, so I place a small crucible next to the ring to block out some sunshine. This will help me see better. Here's how the wire looks right after soldering. To make it perfectly round, I stretch it using a ring stretcher. After the first round of stretching, I have got my ring up to size 5.5. Whenever I feel the ring doesn't expand anymore, it needs to be annealed to remove its internal stresses. And make it easier to work. With the band ready, I make a wall to surround the diamond. Before soldering a backing on, I flatten the section of the wall with a flat file. This little circle is about 5mm diameter, so the fact that I have small hands does give me an advantage when holding small things like this. When filing, the metal always sticks onto the file to begin with, and it will go easier once the edge has become smoother. The way to check if the bottom of this wall is flat or not is to place it on a flat surface like this. If no light comes through between the wall and the surface, I know it's ready for soldering. Before placing the wall on, I have previously melted some Easy Solder onto the surface. So you see, once the solder becomes molten again, the wall sinks onto the bottom piece. This is how it looks after the flux residue and fire stain have been removed. Next, I cut the excess material off the edge using my 22-year-old jeweler's saw. If you have watched my previous video, this saw frame has been with me since day one, back in 2003. This is definitely one of the best jewelry making tools I have ever bought. When removing the excess material with the saw, I try to cut as close to the wall as possible, but I am not aiming at a flush cut. With most of the material on the edge gone, I move on to use a flat file to make the bottom flush with the bezel wall. The edge of the metal is actually quite sharp, but I think after all these years, the skin on my fingertips has become quite thick. The cut next to the nail on my middle finger is not from jewelry making. It was caused by a screwdriver, as you will have seen if you have watched my latest short. This is how the bezel cup turns out to be. In the end. This is a borax cone. I add water to the dish and then grind it to create a thin flux paste. With the band held by the cross-lock tweezers, I solder it onto the back of the bezel cup using Easy Solder again. So basically, I only use two types of solder: easy and hard. In fact, I don't have any medium solder at my studio. This is how the ring looks after it's cleaned. Cleaned. It's ready to hold the diamond I released earlier. The bezel setting tool I'm using here was made by myself back in 2003 when I first started making jewelry. I show how to make such a bezel setting tool along with other types of bezel setting tools in my other videos. You could have a look if you are interested. I have put the links in the description below. This is how the ring looks after it is polished. I showed how I polish rings like this in my previous videos on my channel, so I won't repeat it again here. Now, This ring is in US size 7¾, just exactly as the owner wants. This is how the finished ring looks next to the bezel it originally came from. A completely destroyed bezel cup compared to a functioning one. Hope you find this video useful, and I will see you in the next one.