Sand Casting: A Simple Guide to Incredible Results
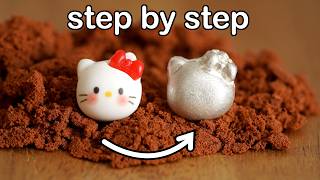
A UK jeweler and GIA gemologist shows how to cast silver jewelry at home using the Delft Clay Casting Kit and scrap silver. You embed a plastic object in oiled sand, pour melted silver into the mold, and extract a finished piece after cooling. The whole process reuses materials and needs minimal space.
Chapters
If you're interested in using sand casting to make something you like into jewelry, this video shows you a very simple guide to an incredible result. Hi, I'm a jeweler, optical diamond setter, and GIA graduate gemologist based in the UK. I have been making jewelry using real gemstones and precious metals since 2003. It has taken me over 20 years to get to this point. In my channel, I help jewelry enthusiasts to start their jewelry making and hand engraving projects with very limited space at home.
This is a random small plastic object I found in my daughter's room. It came off from a hair accessory. I'm going to use this as an example in this video, but really you can cast all kinds of things using this very simple sand casting method. I'm using the Delft Clay Casting Kit in this video. The link is in the description below if you are interested. It comes with a set of aluminum rings. Like this, and a bag of Delft clay. I'm going to explain these two in detail and how to use them. First, I have put some clay from the package into a tray. The idea of this is to keep all the clay within the tray at this stage. Here I simply use a baking tray. Once you have used it with the clay, don't use it for food anymore. What I'm going to do at this point is to chop up all the clay with a stainless steel ruler. This makes the clay more workable. If budget allows, you can use a food scraper. I will explain why the food scraper is better for this in a minute. But for this step, a ruler does the job just fine. This red stuff clay-looking material is actually some super fine, oiled mixed sand, but its particles are so incredibly fine, they compact like modeling clay, feeling smooth and holding intricate shapes, unlike coarse sand. These characters make it possible to be used for casting metals. I have another video in my channel showing how to mix the clay yourself. Once it's ready, I'm going to fill this ring up with the clay I just prepared. There are two aluminum rings here. One is shallower than the other. It has a raised rim on the edge. This is the one I need to fill first. Before filling up the ring, one very important thing is to make sure the surface I'm going to work on is clean and flat. You see the raised rim on this ring. I place this side down on the table I just cleaned. Now I put as much clay into the ring as possible. Here I'm using a random hammer I found in my place. This one is for any DIY project around. You don't need a special hammer for this project. As far as the hammer has a flat surface, it will work. If the surface of the hammer face is domed, or has a texture on, don't use it for this project. What I'm doing here is to compact the clay with my hammer. Once the clay is done, put more on the top. Repeat this until the clay level is above the edge of the aluminum ring. Next, I move the excess clay with my ruler. Here, I try to avoid bending my ruler when doing this. Otherwise, the clay will have a dome on the surface. However, if you use a food scraper, you will have less chance to bend the edge, so it will be easier to make the surface flat when removing excess clay. You can see there are some tiny holes in my clay, and there are more around the edge than in the center. That really doesn't matter. I will explain this in detail in a minute. Before moving on to the next step, I clean the surface a bit, trying to be not too messy. This is some very fine corn flour I took from my kitchen. I use an acrylic fan paintbrush to dip a little bit of the flour and dust it on the clay surface. I used to use baby powder but was told it's not safe, so I've switched to fine corn flour. It works just fine. Sorry for the cracking noise in the background. Those are my two ducks. They always make noise whenever the camera is on. Now my first ring is ready. Here's the little cat I have earlier. With the details of the cat facing downwards, I press it into the clay. As you can see, I'm only using the center area of the clay, so as far as the clay in the surrounding area can hold the shape, it doesn't really matter if there is any hole in it or not. As for the center section, once it's pressed inwards, the surface will be smooth anyway. That's why I said earlier that I wasn't worried about tiny holes in the center area and bigger holes all around the edge. Once my object is in, I dust the back of the cat In this way, it will not stick onto the clay on the other ring later. Here's the second aluminum ring. It has a vertical mark right on the edge. When putting it onto the other ring, I need to make sure it aligns with the mark on that ring. This will work. Whenever I put the ring down, It's quite important to make sure the surface is clean. Now I fill the second ring with clay, just the same as I did with the first one. I need some new clay from the package. When it's not in use, I normally seal the plastic bag to avoid it drying in the air. As the new clay is very soft, I don't need to chop it up at all. Just put it on top of the existing one. Again, it's the tiny area that's touching the back of my object that matters. For the rest of the area, as far as it is not too loose and holding the shape, it will work. There's a bit more in my tray. I just put it up on top of my aluminum ring. Once the clay is above the level of the ring, I can start hammering the top. This will compact the clay, so it will hold the shape nicely. Again, I remove the excess clay with my ruler. I try not to bend the ruler when doing this. Now it's ready to separate the two rings. And this is how it looks inside. Carefully, I remove my little cat. The idea is to not move the clay when doing this. Because the edge sticks out quite a lot, I use my nail to lift it up a little bit out of the clay. You can use a pair of tweezers if your object has somewhere for you to hold on to. Once it's loosened a little bit, It can easily fall out of the clay if I flip the aluminum ring upside down. This is a brass stick. It measures 3mm diameter. Next, I push a hole in the middle of the cat shape. You can see that I try to push it quite slowly so the cat shape will remain unchanged. You can see it from the other side. This is my pouring channel. If you don't have something like this around, you can use a drill bit. If you need to use a different size, Choose one that's bigger than 3mm rather than anything smaller. A bigger pouring channel always works better than a smaller one. Next, I'm going to make a funnel. When doing this, it's important to use a craft knife with a long tip like this because the long tip can dig into the clay deeper than a shorter one. This will make the pouring channel shorter, so the molten silver will need to travel a shorter distance before reaching the actual mold. What I'm doing here is to make a deep cylinder shape to connect the funnel with the pouring channel. It's very important to make sure there is no loose clay on the surface at all. You can simply achieve this by lightly patting the surface with your tool or your finger. Once the surface is all clean, I drill 3 holes with a drill bit. The one I use here measures 2.5mm. As long as the holes are not too close to my cat shape or to each other, it will work. These are air escape holes. This is a cocktail stick. I want to make sure the tip is clean before using it to join the air escape holes with my empty mold. I push the tip of my stick on the edge of the empty mold and push it outwards towards the air escape hole. This is to make sure any of the loose clay will not go into my empty mold. If there are any tiny bits of loose clay in any of these air escape holes, as long as the hole is not completely blocked, it won't matter. This is how it looks so far. To compact the clay on the surface of my empty mold, I use the back of the cat shape to lightly press the surface. Now both rings are ready. When putting both rings back together, I need to make sure the two vertical marks align just as they were before. This is super important. This is how the entire setting looks at this point. My mold is ready for casting.
By the way, if you like this video, do you mind clicking the subscribe button? It will really help my channel to grow and encourage me to make more videos like this.
It's totally free for you. Leaving a like and a comment also really helps support the channel. Thank you. This is my melting station. I like to raise the surface up by placing two crucibles upside down like this. Because the clay is not airtight, by placing the casting ring like this, I'm not blocking any air that needs to escape from the clay at the bottom of the aluminum ring. This is some clean scrap silver I got from other projects. If you are using other materials, this method works as well. I have other videos explaining how to melt the scrap. The link is in the description below. I am not going to go into details here. This melting process can take 3 to 8 minutes. It depends on the amount of metal you are melting and the room temperature in your place. Once my silver melts, I pour the molten silver into the funnel. When pouring, I try to get the lip of my crucible close to the mold and keep my flame on the molten silver to keep it in its liquid form. You can see here that I have accidentally poured the molten silver into one of the air escape holes. As far as I'm not blocking all of the 3 holes, it'll be fine. The flame is burning the bonding oil in the clay. When this happens, It smells, so I always do this next to an open door. Leave it there for a minute or so before removing it. This will allow the molten silver inside to settle a little bit before it comes out. When the flame is almost gone, I use my handle to remove the mold to the open air to cool. At this stage, I will definitely not touch the aluminum rings with my hands. When I open the mold, some smoke is coming out. Even though this is in the open air, I always stand upwind of it. To make sure the smoke doesn't come towards me. From this angle, you can see that one air escape hole is blocked by the molten silver I poured earlier. However, there is a little bit of silver going into each channel I drew with the cocktail stick. This means that all my three air escape holes have served their purpose. To get my casting out, all I need to do is to use the back of my tweezers to press the cat down to the floor. I try to remove as much burnt clay as possible. Before dipping it into some rainwater. To remove the rest of the clay, I have to brush it with a toothbrush. For this entire process, I'm using rainwater. With all the clay removed, Now you can see how the molten silver has traveled. Even though I have accidentally poured some silver into one of the holes, this casting is a success. Looking at the surface, it has picked up all the details on the original cat. Coming back to the clay in the aluminum rings, All I need to do is to remove any of the burnt clay, and the rest can be reused in my next casting project. Because I use cornflour, the bit that touched the molten silver and on the heated edge of the aluminum rings has cooked to a very thin layer of white film. If I see that, I will remove it when I'm cleaning the burnt clay off. If the corn flour is not cooked, it won't affect the casting result if it is mixed into the clay when reusing it later. This is all the half-contaminated clay, and this is the burnt one. They go to the bin. The texture of the burnt clay is very gritty, so if you accidentally reuse any of this when making the mold, you increase the chance of having a rough surface on your casting. Now all the clean clay can go back to my tray for the next project. It's always a good practice to remove any of the loose clay on the surface of the tools so they're ready to use for the next project. Before putting this clay away, I like to chop it up to loosen it. Also, once I have finished casting, I like to sort out the clean clay before moving on to the cast piece. Because the clay uses a liquid binder to hold it together, having it exposed in the open air for too long could affect the quality of the clay. So once this is sorted, I will have peace of mind to deal with the casting piece with no rushing at all. To sort the clay, I don't mix the recycled one with the brand new one. I seal them in two separate bags. In any new casting project, I use the recycled one first, and then if there is not enough, I top it up with brand new clay, just as I did earlier. To clean the silver, I put it in some pickle for 20-30 minutes. There are other videos in my channel explaining how to clean oxidized silver in such a situation, so I'm not going into any detail in this video. This is how it looks after the pickle bath. To release the cat, I cut all the excess parts off, and here's my silver cat. Next to the original one. All the details on the original cat face are printed, so the cast cat face has a smooth surface, but the bow and ears do have details, and they show on the cast version pretty well.
You can really cast a lot of things using this simple process at home. Most of the tools I use in this video are listed in the description below. If you like this video, you might also like the one here.
It shows you how to make a box clasp from scratch. I will see you in the next video.
More from Haiyi











This ring took me 3 hours just for the stones #howitsmade #jewelry #craftsmanship