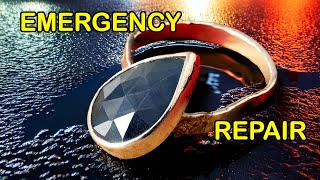
Haiyi Tan restores a sapphire ring damaged in an accident by extracting the undamaged stone, discarding the deformed metal band, and fabricating a new bezel setting and band from scratch. He uses a jeweler's saw to free the sapphire, hard-solders a custom metal strip into a new setting, forms a fresh band on a rolling mill, and reassembles everything into a finished ring.
Chapters
A sapphire ring I made 5 years ago was caught in a recent accident. It's been sent back to me this morning. This is how it looks now. The sapphire seems fine. There is no sign of any damage on the stone. The setting is still attaching to the band, but the band has completely changed shape. Also, there are some very sharp marks on the surface of the band as well. It's very uncomfortable to have it on the finger. My job is to restore it. Due to the state of the band, there is no point reusing it, but I will have to rescue the sapphire. Here I try to bend the setting back with the hope that it would be easier for me to hold on to when cutting the bezel wall, but it seems the bend is much harder than I can handle without the help of any tool, and I don't want to put too much force on the setting just in case any crack might have been caused during the previous accident. Any unnecessary pressure could have the potential to cause further damage. I am trying to cut the wall as it is, but it seems there is no way that I can hold the ring firmly while cutting it with my saw. I have to cut the band off the setting completely. Now I can hold it better when cutting around the metal with my saw, and I have to cut as far around the sapphire as possible. When using the saw, it is very important not to hurt myself. I have to always bear in mind that if my blade does slip, my finger is not directly behind the metal. The saw blade is extremely sharp. Trust me, I have hurt myself by accident so many times that whenever I saw the saw blade in front of my finger, my brain could flush back immediately the pain I had before. So I'm using the setting as a shield here. Once the blade cuts through the outer cast, it will not go through the stone, so my finger is relatively safe. I try to remember to never put my finger right behind the metal I'm cutting through because it is in an awkward position. I try not to cut all around the entire wall. Once the surrounding metal can be lifted up by my fingers, I stop. And I have to say that having hard nails does help a lot when pushing the metal up here. Now the sapphire is free. Before moving on, I clean the sapphire with a Q-tip. You can see here I have separated the ring into 3 parts. The band, the setting, and the sapphire. Next, I'm going to make a brand new setting to host the sapphire. I try to make the wall a tight fit. The scriber is out of my reach at this point, so I use whatever sharp point I have to hand to make the mark. In this case, the soldering pick is in front of me. I'm not picky. I want the two ends of this strip to meet up nicely. Flattening both ends with a file will help. Here I'm using the tension of the metal to push both ends closed. The shape the silver has formed at this point doesn't matter. At this stage, I want to focus on joining both ends permanently. This is hard solder. To allow you to see better, I move the soldering board to face you. With both ends joined permanently, I adjust the shape to fit the sapphire. There is no special skill when doing this. The only thing I'm using here is patience. After a minute or so, here I have the perfect fit. Before soldering a backing on, the section of this wall needs to be flat, so I'm using a flat file to take off the rough surface. It's not easy to hold on to this shape. If I hold it too tight, the shape will be squeezed, but if it is not tight enough, the teeth on my file will simply take it off my fingers. Also, I need to make sure it is not filing my nails off. As you can see, I keep dropping it. I need to find the balance. With one of the sections flat, I solder the raindrop shape onto a flat surface. This is going to be the back of the setting. Let it cool down to room temperature before it's safe to touch again. Before moving on, I always check the soldering area inside out with a loupe to make sure it has been done properly. To make the backing flush fit with the bezel wall, I need to cut the excess material off. To begin with, I found my saw blade hardly moves forward forward when I tried to cut through the metal. Then I remembered that earlier I used it to cut through the wall around the sapphire. So when the blade reached the sapphire, the very fine teeth on the blade were ground away by the stone. That's why it hardly cuts anymore. I have to get a new saw blade. The saw frame I have is the most basic version. I got it when I first learned jewelry making in 2003. I have a video talking about it in more detail if you are interested. The link is in the description below. Now with a new saw blade, I can cut much faster. I am sure you can tell the difference before changing the saw blade and after. After removing the fire stain and flux residue, I file the edge flush with the bezel wall. I have had this file for more than 3 years now. It's not cutting as aggressively as it did. I think it's time to get a new one very soon. I find jewelry making like meditation for me, but I don't want to waste my time simply because my tool is not doing the job properly. With the setting ready, I move on to form the band. The ring needs to be US size 5¾. This wire will be just the right size. To get the profile of the wire right, I use the rolling mill to help me form the shape. This wire has turned out to be longer than I need. After cutting the excess material, I bend it so both ends meet up nicely. This pair of pliers has been with me since day one, and they are still working perfectly fine. They were made by a British tool company that is no longer in business. I still remember seeing the tool shop celebrating its 100-year anniversary. It was quite sad to see it close down. Once more, I am using the tension from the wire to have the two ends meet up tightly. To test if they join smoothly, I use my finger to touch the joint. If it doesn't catch my skin, it passes the test. I use hard solder again to join the ends together. Resting the ring on top of the solder can prevent it jumping away when the water evaporates from the flux paste. I set it aside to cool down to room temperature before touching it again. This is how the ring looks after it's formed to a perfectly round shape. As both the band and the setting are ready, Next, I solder the setting on top of the band. There is no fancy setup here. It's only my tweezers resting on a few crucibles and holding the band at the same time. I heat up both the setting and the band till the solder melts and joins both parts together. Make sure to only touch the ring with tweezers before it cools down to room temperature. This is how it looks. After soldering. And this is how it looks after the flux residue and fire stain have been removed. The sapphire fits into its seat perfectly. This is how the ring looks after the sapphire is set. Now this ring is ready to go back to its owner. Haiyi Tan.