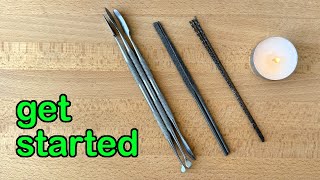
In this beginner‑focused tutorial, the presenter walks through the four essential, low‑cost tools needed to start wax carving and demonstrates their use by carving a small fox head. The video explains each tool’s purpose, design differences, typical price, and maintenance requirements. The tools covered are: (1) a wax‑specific saw blade (used with a jeweler’s saw frame) for cutting rough shapes out of wax blocks; (2) a set of wax files (both a six‑piece pack for sub‑inch work and a larger dual‑end file for pieces over an inch) for aggressive material removal and shaping; (3) a stainless‑steel carving tool set (12 pieces, 24 tip shapes) for refining and smoothing surfaces; and (4) a heat source—either tea‑light candles or a spirit lamp—to add wax for building up features or to repair over‑carved areas. The presenter also mentions related videos for setting up a saw frame and higher‑end tool sets, provides cost estimates (ranging from $5 to $12 per pack), and notes that the tools require little to no maintenance if kept dry. The tutorial concludes by encouraging beginners to start with these four tools and expand their collection as skills improve.
Chapters
If you are thinking about starting wax carving and you are a total beginner, here are the 4 basic tools you will need to start. With only these 4 very simple tools, I carved this little fox head from this small piece of wax. I will show you what each tool is for, how much they are, and also what, if anything, you need to do to maintain them. The very first one is the wax saw blade. The one on my left-hand side is the saw blade for cutting precious metal. The one on my right-hand side is the one specially designed for cutting wax. At a glance, the wax saw blade looks thicker. If we look closer, The teeth on the normal saw blade are nicely arranged in one line, all facing one direction. The blade is quite flat. I can easily hold it without getting hurt. On the wax blade, all the teeth are sticking out, seemingly at random, a bit like thorns on a rose stem. To avoid getting my fingers hurt, I have to be careful not to put too much pressure on the blade. If I use a normal blade to cut the carving wax, my blade gets stuck easily and can't move forwards. But when I cut my wax with this one, the blade turns in any direction I want. Obviously, to use the saw blade, you will need a jeweler saw frame. If you have never used this before, I have another video showing how to set it up step by step. It's very simple. Once you know how, you will be able to do it without thinking. The link for that video is in the description below. So I'm not going to repeat all that here. Carving wax comes in blocks like this. With this saw blade, you'll be able to cut out the rough shape of the item you are going to carve from the original block. This cuts through the wax like butter. A pack of this costs about $5. It has 12 saw blades. Maybe I haven't made enough wax models yet. I have never managed to break a wax saw blade. This pack of saw blades was bought more than 15 years ago, and there are still so many left. The second tool you will need is a wax file. If you are working on anything smaller than an inch or 2.5cm, you will need a pack of files like this. If you look close, you will see lots of big teeth sticking up on the surface of the file. They are great for removing any unwanted wax aggressively. A set of these files cost only $16. The files come in 6 different shapes. For this flat file, the section is like a rectangle. A half-round file. One side is curved and the other side is flat. A square file. The section is— guess what— a square shape. A tapered triangle file. The section is in the shape of a triangle. A round file. This has the section of a circle. And finally, this is a tapered flat file. These files are great for getting into all kinds of small spaces. On the other hand, if the object you want to carve measures more than 1 inch, you will need one bigger file instead. Such a wax file is very simple. It has two ends. Teeth on one end are coarse. And the other end is normally medium. For both ends, one side is curved and the other side is flat. This allows you to adjust both curved and flat surfaces. Unlike those big files for metal, this one for wax doesn't need to be mounted on a wooden handle. When in use, you just hold one end of the file and use the other end to work on your wax. Both the big wax file and this pack of 6 files cost less than $15. I have never done anything to maintain these files since day one, so I consider no maintenance is required. Because the teeth on any of these files are so big, they do leave a very rough finish on the wax. So the next tool you will need is a set of carving tools. They are also called wax carvers. If you have a tight budget and want to try wax carving, a set of carving tools like this would be ideal. It has 12 different pieces. Each piece has 2 different ends, so altogether there are 24 different shapes. These carvers are made of stainless steel. When using these carving tools, you remove the wax bit by bit. The process is not as fast as when you are using the saw or the file. This is the stage that you will take your time to smooth and refine the surface you have roughly sculpted with the wax files. If you have a bigger budget and would like to take wax carving seriously, The Wolf Wax Carving Sets are a must-have tool. I have another video showing them. Because the tips of these tools are all made of metal, as long as you keep them away from moisture, they won't need any maintenance at all. This pack of 12 carving tools costs less than $10 at today's price. The last tool you will need is the tea light candle. I bought them as a pack of 48 for $12. Each of them lasts about 8 hours. It costs a quarter each. This is for adding wax onto your model. As a beginner, there are two situations in which you will need this. The first is when you want to add some wax to build up the shape. Let me use my little fox head as an example. If I put this finished fox next to the piece of wax it was originally cut from, You can see the nose is sticking out beyond the height of the block. So instead of using a thicker piece of wax to carve this fox head, I use a thin one and build the nose up by adding some wax on. The second is when you want to repair your model. This happens to beginners more often than experienced wax carvers. When you accidentally carve away too much material, you want to melt some wax back so you can try again. The alternative option for the tea light candle is the spirit lamp like this. The purple liquid I have inside is methylated spirit. This lamp is designed for use with isopropyl alcohol and denatured ethyl alcohol as well. You can turn the flame up and down by adjusting the wick. They normally come with a few replacement ones as well. After your first few projects, you'll be more familiar with the materials you're working with and also have some preference about tools. Later on, as your skill advances, based on your needs, you can gradually add more tools to your collection. But these are the very first 4 tools you will need to have if you are interested in trying wax carving. Hopefully this helps, and I will see you in the next video.