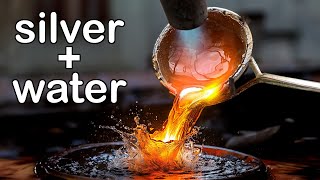
A silversmith melts 80-90 grams of sterling silver scrap with borax and pours it into a tall jar of water to create organic, petal-like shapes captured in slow motion. The molten metal solidifies into pieces with varied colors and textures, then gets cleaned in a pickle bath for 30 minutes.
Chapters
In this video, I'm going to use water to cast sterling silver. I will capture how the hot molten silver drops into the cold water in slow motion as well. I have some clean silver scrap here. They are offcuts from different things I made recently. It's about 80 to 90 grams altogether. This is an old coffee jar. It's about 19cm or 7.5 inches deep. I have removed the label so you can see what's happening better. I need the water all the way to the top of this jar. Here is a bucket of borax powder. It came in a 1kg tub. I use it to help my silver flow better. When melting. It will also help to purify the silver. A little bit on top will be fine. I use the pinch whip tong handles to hold the ceramic crucible. As I'm right-handed, I want to make sure the lip is facing the left so I can pull the molten silver later. Like this. To begin with, I don't want the flame blowing too strong because I don't want it to blow the borax powder away. Instead, I need to melt them on top of my scrap silver. You see lots of movement on the surface here. That's the borax powder. It gets heated up and then it's expanding. It then turns into a glass-like substance and sticks onto the silver surface. Some very thin silver will also melt at this stage. You can see them turning shiny within a minute. Once those thin tiny scraps melt, it's going to take slightly longer to melt the entire ball of silver. This is the time when I turn the fire up by letting more gas out. You see it's turning shinier, but they have not melted yet. The little handheld blowtorch I normally use is too small for melting this amount of silver. I'm using propane gas here. To melt my silver. This is also cheaper as well. A 6 kilo bottle is only about $36 in today's price. A bottle like that lasts a good few years in my situation. The melting temperature for sterling silver is about 1500 to 1600 Fahrenheit, which is about 800 to 850 Celsius. 90°C. How long it takes really depends on the room temperature when I'm doing this. It takes longer in the winter, and obviously it's quicker on a hot summer day. It's mid-autumn when I'm filming this, and it took me roughly 6 minutes from room temperature to the melting point. In case you are curious, I built this soldering station myself using 4 30x30 soldering boards. They are held together with some stainless steel corner brackets and screws. That might sound stodgy, but it's actually very solid. It helps to create a dark corner in daytime. Also, it retains the heat better. You see it starts to move like liquid. I like to give it a shake to help it melt evenly. Now, this looks ready to me. By the way, I have never done this before, so I don't know what to expect. Wish me luck. Here's my jar of tap water. I have it right next to my soldering station, ready to receive the molten silver. I need to be very careful as I don't want to knock my camera off or hurt myself when holding a bowl of molten silver. For the last little bit, I'll show you in slow motion. These are what I have. The glass jar is cool to touch. All the silver has got an interesting color coated on the surface. To see them better, I need to get them out. Very interesting shapes. I like the flat ones. They look like flower petals to me. I think I'm going to melt the rest again and see the entire process in slow motion. I'm keeping this too. I don't want to pour all of them in one go. I want to do it bit by bit to see what's going on. So I wait till most of the bubbles are gone before pouring more. Now I can see all the silver has turned solid when they reach halfway down the bottle. Here's what I got this time. Most of the shapes are very organic. Only the shape of this deep dome is very even. It was formed by the last drop of silver I poured into the water. It fits my pinky. Very interesting. The colors on the surface reminds me of the skin on popcorn. These are the flat ones I got from the other two attempts. When I try to get the camera angle right. I'm going to leave all this in the pickle for 30 minutes. Hopefully this will remove all the flux residue and oxidization on the surface. Meanwhile, I'm not very sure about the long ones, so I will put them back to the crucible for recycling. This brown substance its flux residue. You can also see some tiny silver fragments on my paper towel. I can only pick the big ones. To recycle the rest, I am going to leave this to dry and give this entire paper towel to my refiner to handle this in a professional way. After a solid 30 minutes in the warm pickle, and a thorough rinse in the tap water. These are all the flat pieces I cast earlier in the water. The shapes are very organic. There are shiny patches here and there. They are scattered on the surface unevenly, and the thickness is also uneven. There are hardly any sharp edges as well. This is the one that dropped into the water the last. I think the dome was created when another bit of silver dropped into the middle before it solidified. It pushed the center down and created this interesting dome. But what I didn't expect is the shape is so even, unlike all the others. Generally speaking, They remind me of flower petals created by nature. If I attach a bell on each side of the edges and connect them together, it would make a nice necklace. Or I could drill a hole at the edge and attach them to a chain. I'm not sure. There are so many possibilities. It's hard to decide. I guess before I can make up my mind, I'm going to enjoy just the look of them for now. Actually, what do you think I should do with them? Let me know in the comment below. I will see you in the next video.