Create Your No Code AI Clone (HeyGen + n8n Full Guide)
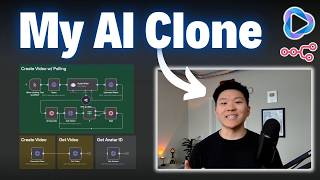
Dr. Violet Howard shows how to build a HeyGen AI avatar and voice clone, then connect it to n8n to auto-generate videos. The example pulls Morning Brew news via Apify, converts it to a script, and sends it to your avatar each morning. You get a downloadable n8n template to start immediately.
Chapters
Hey guys, in this video I'm going to be showing you how to set up your own HeyGen avatar so you can automate content creation. And guess what? I'm an AI clone of Nate. Sorry guys, I had to do that to you. Had to see if you were impressed by the quality of the video or not. But what I'm gonna do is show you how to set up this workflow that's super, super simple so that you can automate that type of content creation with your own avatar, with your own voice, and it's gonna be super cool and not too hard at all. So by the end of this video, you'll have this entire system set up for you. I'll also give you this exact template so you can basically just plug and play your own avatar. But what we're gonna do is get into HeyGen, walk through everything step by step so you see how I created my avatar, how I created my voice, and then how I plugged that into N8N. And that really just like opens the door to 10x, 20x-ing your content because now instead of sitting in front of a camera, you can basically just feed in scripts into this N8N automation and you're gonna get content basically on autopilot. And the idea is that this is really gonna open up your eyes to different use cases where you could have every day, you know, you're scraping some sort of news like we were doing down here. You could be scraping Instagram content, you could be scraping whatever it is and just feeding those scripts into your avatar. So super cool. Let's get into the video. All right, so we're just gonna jump right into it and I'm gonna walk you guys through every single step. So I'm at HeyGen. You can get to HeyGen using the link in the description, and I'm just gonna go ahead and create an account real quick. All right, now that we've signed in, I'm just gonna start off using the free plan and just have to do some fun little onboarding real quick. Okay, so now that we're in HeyGen, we have a ton of different options. And what we're gonna be focusing on today is creating our own avatar, our own voice, and then using that over an API in N8N. So we can completely automate all of this content creation. But as you can see, there's some new features, like they have the Talking Baby podcast that's been kind of blowing up on social media. You can also have this new feature called Avatar 4, where you just put in a photo and a script and it's going to do the whole thing. So it's gonna be quicker than creating your own avatar. But these two are not available over API yet. When they are, you can bet that I'm gonna make a video about it. But right now we're gonna be focusing on creating our own avatar. So I'm gonna click on this button. I'm gonna skip past this video. And now it's basically telling us that we need to submit 2 to 5 minutes of footage with a camera where we are looking directly into the camera. We're talking, we're doing natural generic gestures with our hands and stuff like that. And this is what it's going to use to create our avatar. And it's going to use this to mimic all of the videos that we want to create. And a little tip here is to make your avatar lively and expressive, exaggerate your emotions when speaking. Feel free to talk about any topic in the language of your choice. Be yourself, look at the camera. And so I'm going to click next. And what I'm gonna do is just go ahead and record footage of me talking for about 2 minutes. Okay, so just finished that up. As you guys can see, I only had to do about 30 seconds. So I just kind of smiled and used hand gestures and talked about what it is I do, all that kind of stuff. It was random, but I'm gonna hit next. And but I also had to go record a quick little permission message. So I said this into the camera, as you can see. And now we're pretty much done. What happens is it's going to use this to create an avatar. It says that we don't have 2 minutes of footage, but it prompted me to only record about 30 seconds. So We're going to go ahead and submit this, and I'll check back in when we have our avatar. Okay, so it says that our avatar is ready. I'm just going to go ahead and name this Nate Hurk and confirm that we are good to go here. And it's basically going to load this up. When we submitted that footage, it's also going to clone our voice. But if you already have a voice clone you really like of yourself on something like ElevenLabs, you can also go ahead and pull that in. All right, so I'm a little nervous, but let's click into this avatar and see what it looks like. We'll check out this. Hey, Nate Hurkelman, your hyper-realistic avatar is ready. Try creating videos with it. Also, click the feedback button to share what you think. Okay, that's really not too bad. So now we can access this avatar over API, which is going to be pretty cool. And we can obviously say, hey, here's exactly the script you need to read off and we'll be good to go. All right, so before we hop into NN, I just wanted to talk about high level how this works. So what we're doing is we're going to access HeyGen's API and we're going to access the one to create a video with an avatar. And when we're doing this, we basically need to tell HeyGen, okay, which avatar do we want to use, which is this one that we just created, and also which voice do we want to use, which is the one that it just cloned of us. All right, so just opened up a new workflow in NNN, and what I'm going to do is I'm just going to open up an HTTP request because this is how we can actually communicate with HeyGen's server and get a video back. So in order to configure this node the way we need to, we want to look at HeyGen's API documentation for the API reference, and I just navigated down here to the create avatar video endpoint. And what's really nice about HeyGen's API documentation is that they have our curl command over here, which we love. So I'm going to go ahead and click on request example. And now I can just go ahead and copy this curl request, go back into N8N and import this curl. And once I import that, it's basically going to configure this exactly how we need it. And now we just have to configure a few things based on, you know, what we want the avatar to say and which avatar we want to access. And so the first thing that we need to do is we need to put in our API key because otherwise HeyGen is not going to give us permission to access the avatar we just built. So I'm going to go back into HeyGen. I am going to go ahead and find my API key, which maybe it will be here in my settings, subscriptions and API, HeyGen API, and then API token right there. So I'm just going to go ahead and click copy. And now that I've copied that to my clipboard, I'm going to go in here and basically put it right here. But what I want to do is because I want to save this header for forever, I am going to add this as a header authentication up here. So if you don't understand exactly what I'm talking about, definitely go and check out the API video that I made right up here. But what I'm going to do is authentication. I'm going to click on generic. I'm going to go to a header auth because you can see right here, that's what it was going to have us set up was a header auth. And I'm just going to go ahead and create a new one. We're first of all just going to name this HeyGen because that's what we're accessing. And now we just need to paste our API key right in here. And then for the name, if we go back into the documentation, you can see right here that the name for this header is supposed to be x-api-key. So I'm just gonna copy that, throw it back in here, and then when we hit save, we are now basically authenticated into HeyGen. And then I can go ahead and remove this API key section right there. So now our credential's saved. Okay, so now if we scroll down to the body that we're sending over, I'm just gonna make this an expression and open up full screen so we can look at it. This is basically just like different settings that we have. And honestly, this body is pretty confusing. There's a lot going on. So all I'm gonna do real quick is just paste in a different request that I set up. And this one's a lot more straightforward where we're basically saying, what's the avatar, what's the voice, and what is the avatar going to be saying? So as you can see, what we need to do is we need to go find our avatar ID and our voice ID. So there are a couple ways that we can find these IDs. The easiest and most straightforward one is to come into HeyGen, go to your avatars, click on the avatar you want, and then you come here and click copy avatar ID. And then to find your voice, same thing, you'd come into the voice and then right here you click on, oops, sorry, you'd click on get voice ID. And so that works. You could just plug it into your, you know, plug it into the body request in the right spot and you'd be good to go. But also, if you want to be able to sort of like dynamically pull in these different voices and stuff like that, what you could do is when you go to the documentation, you can see on the left there's list all avatars and list all voices. So just to show you guys how that would work is once again, we'd come in here and we have our curl request. I'd copy that and come back into this workflow and I'd open up a new HTTP request. And all I'd have to do is import this curl once again. And now everything's set up. And you can see that because we've already saved our authentication, we can go in here and go back to header auth. And all we have to do is go choose our ElevenLabs credential that we had just set up together. Or sorry, not ElevenLabs, HeyGen. So that's the one we just used. And now if I hit test up, this is basically going to access our HeyGen account and it's going to pull back all the avatars. And there's going to be a ton. So this might take a while because this is, as you can see, there's a ton of data. It's not just our avatar, even though here's the one we just made for ourselves. This is also going to be all the other avatars that we can already access that are pre-built on HeyGen servers. So as you can see, there's a ton. So now that I have my avatar ID, I will just go ahead and copy this right here. As you can see, that's Nate Herkelman. I would just come back into our generate video node and I'm just going to replace this right here with our avatar ID. And then to get our avatar voice, I would do the exact same thing except for I'd come here to the list all voices endpoint. I would copy this curl command, open up another HTTP request and import that in. And then I'm just going to choose my HeyGen credential once again. And then when I test this step, it's going to be pulling back all of the voices that are in our HeyGen account. And then we'll choose our voice ID. As you can see right here is Nate Herkelman, and we would paste that in. So I'm just going to grab this. I'm going to put that into the right spot in our body request for which voice do we want to access. So I'll throw that in right there. And now all we have to do is set up the actual text. All right, cool. So I'm gonna come in here and just to test this out and see how it works, I'm gonna manually type in this text field and just throw in some information that I want it to say. Okay, so I filled in some text and all we're gonna do now is hit Test Step. And what this does is it's basically sending a request over to HeyGen servers and saying, cool, we've started working on that video. And what we get back is a video ID. So now that we have the video ID, we need to go back into the HeyGen documentation And there's another endpoint for retrieving a video status and the details where we're basically going to give it that video ID and then it will be able to give us the actual status of the video. So you guessed it, I'm going to go ahead and copy this curl command. I'm going to add another HTTP request right after this one and we're going to import that curl. Once again, we don't have to put our API key there because we've already saved it up here. And then all we need to do is feed over the actual video ID. So I'm going to connect these two things so we can access it. And we can see in order to access that video ID, we need to send it over as a query parameter. So I'm just gonna check on query parameters. It's gonna be called video_id, and then we're just gonna drag in this variable. So now every time whenever we generate a video, this node is always just gonna be pulling in that exact video that we already generated. So I'm gonna call this one Get Video, and we'll hit Test Step, and we will see if we get a video. The status is complete, and let's open this up real quick and take a look. Hey guys, in this video I'm going to be showing you how to set up your own HeyGen avatar so you can automate content creation. And guess what? I'm an AI clone of Nate. Okay, honestly, like, that, that looks pretty good, right? Like, the movements and everything. I almost thought that it was me talking. I mean, it was. So that was just a 7-second clip, right? But that's how this works, and that's how you can send over these requests to make videos in N8N, and you can do this automatically. So let's talk about a way you could actually, like, automate this process. Okay, so the problem with this is when we make a request to HeyGen to start up that video, it's not going to be ready instantly. So we're going to have to do like a wait step right here and then probably polling just to make sure it's done before we move on. So what we're going to do is first of all, just copy and paste these two down here, wherever those went down here. Um, and then I have these two nodes, which I want to show like just an example use case of how this could work. So what we're going to do is let's say this was like a scheduled trigger. So every morning this would go off at like 7:00 AM. What I have right here is it's hitting Apify to scrape the Morning Brew. So if you guys know what Morning Brew is, every morning it comes out with like an issue about like a brief on what's going on, right? So as you can see, it's scraping the Morning Brew. It's basically getting back all of the text content that's in the Morning Brew, and then we're feeding this into a script writer. That's basically its job is to take that Morning Brew and just turn it into a short script. As you can see right there, it's a lot shorter. And then we could feed this dynamic script every morning into our HeyGen avatar. So that's what I'm going to do right here in the body. Instead of this text that we manually typed in earlier, I'm just going to drag in this variable. And now every morning the avatar is going to be reading off like a quick brief about today's news. So what I'm going to do is just test the step. And by the way, if you want to watch a full video about Apify, I'll tag it right up here. And of course you can pin this data just so we don't have to make another call to OpenRouter servers and Apify server. Anyways, what we're going to do is test the step. So it's grabbing that script, it created it, it's creating a video right now as we speak. But if we click into the get video, we can see that the status is waiting and it's not yet done. And if we were to go ahead and just test this again, we can see that now the status is processing. So what happens is when you first make that request, the status is waiting, and then when you check in later, it's gonna say processing until it's finally done. So what we're gonna do is we're gonna first of all just add a wait node right here, which is just going to wait for, let's say, 30 seconds. So now we're waiting for 30 seconds before we check in to see if it's done. Okay, so we just waited 30 seconds and now you can see that the video is done. So the status equals complete. So what we're going to do is we are going to basically check in and say, okay, if the status equals completed, we're going to continue on. But if it doesn't equal completed, we're basically just going to loop back and continue to check until it's done. And I'll show you guys a live example of that. But first, let's check in on this video and see how it came out. Side hustles are booming with 44% of Americans juggling extra gigs, mostly to cover living costs. Though most make under $500 a month, the classic dropshipping t-shirt biz faces new hurdles after Trump slapped tariffs on Chinese imports, squeezing already thin margins. Meanwhile, celebrities keep cashing in on booze brands even as the non-alcoholic market heats up. Okay, I mean, that's pretty insane, right? Like, that could easily be every day. You could just pump out a few shorts if that's what you want to do, um, because you're just getting this scrape of daily news and then you're just getting that type of content right away. And if you think about it, it could really like 20x your content game because then all you have to do is feed it scripts rather than sit in front of a camera and actually talk. But anyways, let's continue with this polling method. So we're gonna do an if, which is gonna be our conditional check to say, do we move on or do we not? And essentially in natural language that we're checking for if the video is done. So I'm gonna drag in this status field right here and I'm gonna say if status equals completed, and keep in mind this has to be word for word exactly And keep in mind, this has to be letter for letter a match of what it equals right now. And if it does equal complete, it's gonna go down the true branch and nothing's gonna happen, or, you know, whatever else we need to happen, auto-posting, whatever. But if it equals false, what we're gonna do is we're gonna add another wait step. Let's just say this time we'll wait— actually, yeah, 5 seconds is fine. We're gonna wait for 5 seconds, and then we're basically just gonna go ahead and reactivate this node that's checking in on the content. So what we're gonna do is run this thing again, and I'm just gonna turn this down to like 10 seconds so we can basically see what happens when the video's not ready yet. And real quick, instead of the dynamic, um, I'm just gonna put my own script in here just so we can see a different type of story. All right, so I put my own script in there and you guys will see once this video's done, but we're gonna hit test step. It's gonna generate the video, it's gonna wait 10 seconds, it's gonna check in on the video. Hopefully the video's not done yet, so it's gonna loop down and then you'd see it's just gonna continue to loop until the video's done. So we'll just watch this happen. There you go. The video's not completed. So we're going to wait for 5 more seconds, we're going to check back in, and we can see again it's not completed. So this is called polling, and this is how you can basically just guarantee that the process doesn't move on until the video is actually finished. And what this can do is give you a good time estimate of what you should set the initial wait to. You can see this one had to go check 5 times, so I would probably add like 20 seconds to the initial wait. And now that it's done, let's go ahead and take a look at this final video. Today I went to the store and guess what, they were out of eggs. I was so mad that I wanted to throw an egg, but I couldn't because they had no eggs. Okay. All right. So that is a step-by-step of how to first of all create your avatar. You get your avatar ID, your voice ID, and you can make that request in N8N to automate what the avatar's gonna say. Hopefully this has sparked some ideas of what you can do to 10x your content game, scraping news, you know, looking at TikTok trends, reading off different stories, automating different Shorts. This is gonna be super cool. And you can access this template that we covered right here in the video in my Free School community. All you have to do is go to the link in the description and join the Free School community. Once you get in there, this is what it's going to look like. All you have to do is click on YouTube Resources and find the post associated with this video. Or if you can't find it, you can just search for the title of the video right up here. And then when you click into that video, there'll be a JSON file right here to download. And when you download that JSON file, you'll just have to open up a new workflow in N8N, click Import from File, and then you'll have that entire thing right here, it'll look like this. And then all you have to do is plug in your own avatar ID, your own voice ID, and the text that you want your avatar to read out. And if you enjoyed this video and you enjoyed this teaching style, then definitely check out my paid community. The link for that's also down in the description. Got a great community of over 1,800 members who are building stuff with N8N every day. They're sharing stuff about their N8N and their AI automation journey, and it's just a really cool space to learn and collaborate. On top of that, we also have a full classroom section on a course called Agent Zero, which is like the foundations. and then a course called 10 Hours to 10 Seconds where you learn how to identify, design, and build time-saving automations. And then we also have 5 live calls per week, which all of these are recorded if you can't make them, but we have like guest speakers, we have Q&As, coffee chats, and tech support calls as well. So I'd love to see you guys in those calls, but that's gonna be it for this video. Really appreciate you making it to the end of this one, and if you enjoyed or you appreciated it, learned something new, definitely give it a like. It helps me out a ton, and I'll see you guys in the next one. Thanks everyone.










