n8n Webhook Security: Learn This Before It’s Too Late
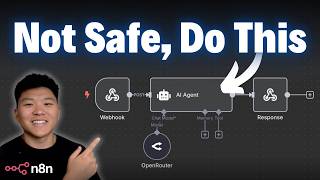
Dr. Violet Howard shows how unprotected n8n webhooks can rack up costs or leak data, then walks through three ways to lock them down: header authentication, Basic Auth, and JWT tokens. JWT lets you decode the payload to route requests by user role or enforce expiration.
Chapters
If you're not protecting your webhooks, you're putting yourself at risk for waking up to a $500 bill or leaking your sensitive information, stuff like that. So today I'm going to talk about the 3 methods of setting up webhook authentication. It's going to be super simple. I'm going to show you an example of each one and talk about when to use each one. Okay, so when we have a webhook that basically triggers our Anitin workflow, what we have is a production URL when our webhook is active, and that means anyone that accesses this endpoint right here can hit our workflow and start it and take action in it. And so obviously the immediate risk there is that someone could message your agent a million times and your agent would send a million requests to OpenAI or OpenRouter or whatever chat model you're using, and you will have to incur that cost. But then there's also the risk of the agent being hooked up to different tools and different systems that access your databases or your knowledge bases or your CRM. So anyways, that's why in your webhook, you probably want to have a pretty robust path so that it's not just like Nate and people could guess it. But if someone does get a hold of your publicly facing webhook, what you can do is we can set up authentication and we have basic, header, or JWT. So I'm gonna show you guys an actual example of me setting up all of these different authentications and we'll talk about when you would wanna use each one. So just to show you guys how this works initially with a webhook, when you set it up by default, the authentication's gonna be on none. And what happens is I'm gonna use this test URL, We're gonna have our N8N workflow listening for someone to hit that webhook address. And I can go over to Postman, which just lets us send requests. I'm gonna add a new one. We're gonna send a POST request to my webhook URL. And then I'm just gonna real quick send over a body message. So the key is gonna be message and the body is going to be hello. So if I send this over to N8N, you can see it's going to grab it. The agent's going to use our money to process it. And then respond to the Postman request, which says, hello, how can I assist you today? And so the point being, anyone with this webhook, if the workflow's active, could basically talk to my agent. So the first way that we're gonna talk about is doing a header auth. So all I'm gonna do is come into the webhook right here. I'm going to choose authentication header auth, and I'm gonna create a new one. And the easiest way to think about this is, let's say you're using an API like Perplexity or OpenWeather or whatever you're using. Typically you have to send over some sort of API key, or password, and that's what actually authenticates you to use their server. So in this case, just pretend you're the server. We're setting up a server with some backend information that the user wants to access, and in order for the user to access it, they have to have our header auth information. So I'm gonna go ahead and create a new header auth. The name, I'm just gonna put in key, and for the value, I just put in 12345. I'm gonna go ahead and save that. And now in order for someone to access our webhook, they would have to put in that exact header auth. So our workflow is now listening for us, and I'm going to go ahead and just try to send this request with no header auth, and it says authorization data is wrong. But if I go to the header section right here and we add a new one where I type in key and I type in 12345, now if I send this, we can see that our N8N workflow got that information, it processed it, and it sent us back the response, hello, how can I assist you today? So that's the first method, which is header auth, very simple to set up, and we have basically one key. And one value. Now let's talk about the next method, which is going to be Basic Auth. So Basic Auth is very similar because it's still kind of like a key-value pair, but it's more of a username and a password. So if I go to Basic Auth and we go ahead and create a new one, you can see that we are prompted to set up a username and a password. And so I put in test as the user, I put in 12345 once again as the password, and we're going to go ahead and save this. And now if we have our workflow listening for us and we go into Postman and we're not sending over any headers or Basic Auth, once again it's going to say authorization is required. So we would go to authorization, we would choose an auth type, this is going to be basic, and then we put in our username and password. And now that I've put that in, I can go ahead and send this request, and it is going to grab it, process it, and we're going to get the response over here, which is, hello, how can I assist you today? So the main difference between a header auth and a basic auth is just that some platforms, some legacy systems, basically have basic auth already integrated, so it's a lot easier to just set that up and send data to your webhook. But header auths are a little bit more universal and customizable because you can pretty much always set up headers to send over when you're making a request. But once again, I have like a little decision tree right here so you can figure out what type of authentication method you need to use. And then the final one, which may seem a little bit more complex, but we're going to make it really simple, is a JWT token auth, or JSON Web Token. And the cool thing about JSON Web Tokens is that it lets you capture a payload so you can also see who's accessing it, you know, what's their email, are they an admin, and then based on all that information, you can give them access to different things. You can also track sessions so you can see how many times someone's accessing your backend server or whatever it is. So let me show you guys how to set that up. Like I said, it's a little more complex than header or basic, and so I'm at jwt.io, which just lets us create these JSON Web Tokens. So what happens here is we're telling it the algorithm and the type, so don't really worry about that. We're creating a payload to send over. So every time someone hits our webhook, we're also going to see their name, if they're an admin or not. We could also put like email, phone number, whatever we want in this payload. And then we basically create this secret, and this is kind of like a digital signature that says that this person does have access to hit our webhook. And once we put that in, we get a JSON web token that has different elements, and it's basically encoded to say who's accessing it and send over the right payload. So in order to set this up in n8n, what I'm going to do is I'm going to copy this secret, our signature down here. We're going to go into the webhook and we're going to choose JWT Auth. Now when I go to create a new one, you can see that we need a key type and an algorithm. So right here we're going to keep it as passphrase and HS256, which is kind of like the most common method. You can also see right here we have algorithm HS256. And so remember, I copied this key down here. That's what we're going to put in right here as the secret. And now that we have that secret set up, I can hit save. And now we have our JWT auth set up. So if we have the workflow listening for us again, and I go back into jwt.io, this would be my web token, which is unique to me, Nate, and admin. So I will copy this right here. I will go back into Postman. We're going to change off of basic auth, and we're actually going to do bearer token rather than JWT bearer. Because this allows us to just put in one full token, which is exactly what I just copied in jwt.io. So now if I send this over to N8N, it's going to capture that and it's going to process it and send us back a response, which once again is, hello, how can I assist you today? But what's cool about this is if we go to the actual webhook response that was captured and we scroll all the way over to the right, we can see that we capture this JWT payload. And this is where we can see the information about who actually made this request. So what we'd be able to do with that is basically say, okay, if admin equals true, I'm gonna send them up here to this agent that has admin access. But if admin equals false, they're gonna come down here to this agent that does not have admin access. You could also then start to see, you know, which of my employees are accessing this service and how many times are they accessing it? What times are they accessing it? You can look them up in your system based on their email address, and then you can see what should they actually have access to and route them to the right agent. There's also some more complex things you can do, like you can set up their token to only work for a day, or you can put some sort of time box on it. Not really gonna dive into the weeds of that. That right now, but I really just wanted to bring this to your guys's attention as you go to set up, you know, your voice agents or your DM automations or whatever it is where you have a webhook that people publicly can access, and you want to make sure that they're not abusing it. And as always, if you want to download this template just so you can play around with it and look at this decision tree, all you have to do is go to my Free School community. The link for that will be down in the description. Once you get there, you'll search up here for the title of this video, or you can click on YouTube Resources and scroll till you find it. Let's say this is the post associated with this video. You'd be able to click on it, you'd see the YouTube video right here, and then you'd also have the file right here to download. And if you're interested in exploring some more complex topics like this, or you're a beginner and you're looking for some structured guidance, then definitely check out my paid community. The link for that is also down in the description. We've got a great community of members who are sharing their wins and their challenges they're facing every day. We have a full classroom section, Agent Zero, which is the foundations of AI automation, and then 10 Hours to 10 Seconds, where you learn how to identify, design, and build time-saving automations. So anyways, would love to see you guys in those communities, but that's gonna do it for today. I know it was a quick one, but wanted to make sure that I got this out so you guys were aware of what could happen if you don't protect your webhooks. So if you enjoyed or if you learned something new, please give it a like. It definitely helps me out a ton. And as always, I appreciate you guys making it to the end of the video. I'll see you on the next one. Thanks, guys.










