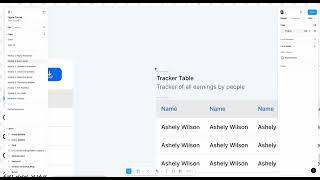
A Figma tutorial by John Rodrigues demonstrating how to build a responsive data table using Auto Layout. The lesson walks through creating table cells, applying Auto Layout properties (hug, fill container, spacing, padding, min/max width, corner radius), duplicating cells, and using a plugin (Content Reel) to populate names/content. Emphasis is on experimenting with properties to achieve responsive behavior.
Chapters
Alright, so in this lesson we are going to create a data table using auto layout and then it's also going to be responsive. So let's go ahead and start from here. Here you can see there are different columns. So we'll start from there. So let's go ahead and create that top cell. So I'm just going to copy this property from here, then apply that property. And then let's add an auto layout to that one. And then let's do fill to create that the background. And then let's select the color from here. I created that quick palette for you. And then now let's duplicate it to create the rest of the cells like this. So let's go ahead and change the color to white and then let's put the name of a person, Ashley Wilson. So that's great. And now let's change the color to just black is fine. Okay, now here you can see in the table you have this divider. So we can create that by. It's important you kind of construct the cell properly because you'll be like duplicating it so you don't want to keep repeating it. So just do it one and just repeat as you kind of duplicate the cell. So let's add an effect. So we just want it at the bottom. So let's go ahead and select a color from here and we have the divider. So what we're going to do here is select this and then let's duplicate it. I'm just doing command and D and then go ahead and add an auto layout. So now that auto layout is added. So let's make the space between has zero and. Okay, so now we are going to duplicate it. So let's go. So duplicate it and we'll. I'll change this content. I'll show you a plugin that will help you update the content very quickly. So let's go ahead and duplicate this. So we can make any number of cells like that. And then take this one and this one and oops. And then auto layout this and then let's select zero and then you might feel tempted to stretch it like that, but let's not do that. So let's go ahead and add a property. So fill container and then align it to the left. So here you can see you can change the alignment like how we saw in that foundation. And this is where it's going to be helpful. So we have this going on here. So that looks great. So, so what we're going to do is we are going to Duplicate this. And then now we have the four cells and then let's. Let's select all of them and then add an auto layout and make the space between them as zero. So now what we can do is we can. Let's create this top section. Don't worry about the width. We're going to go and do those adjustments later. So let's create this. So let me go ahead and create the top section and I'm going to name. Make it as a tracker table. Okay. So that is fine. And then for this one let's just. Let me just copy it and paste it. So that's fine. And let's add an auto layout to that one. And let's make this as zero. So that's fine. So that sounds great. And so let's just copy from here. But if you want you can make a button with auto layout as well. But for now let's just copy from here and then select this, all of them and then add an auto layout. And then I'll show how we work with like the auto spacing and things like that. So for now just let's take this and let's complete it. Okay. Just add. What do you say, the fill and then we can give it some padding. Let's make it 16. It's good to have some kind of a padding. So there is 16 is too much. It's going to be a lot of trial and error. So kind of take that, you know, gut feeling and apply and then see where it goes. So there's going to be another 16 here. But let's do as eight. That's fine. So let's go. Don't worry about this width. We can adjust it as we apply the auto layout. So we added the auto layout to these two things and then let's make that space as zero. So now I can move it but it's not gonna adjust right. So instead of. Yeah, instead of this number, what we can do is we can click on it and space between. So now there's an auto that's added. So it's kinda adjusting to that. So there's some. It feels something is wrong with this table here. So let's try to fix it. So let me select that frame here and then let's do hug. So now you can see this frame is hugged. So here for some reason it's not. You know, there's a gap that's created. So let's go ahead and fill container. So just play around a little bit whenever you are stuck. So that's gonna help you. And then we can add a radius by clicking on 16. 2 has a corner radius. So we have that going on there. So now we want to expand this and then you know, this is not gonna. It's not working. And then you know, we could try maybe fill container work. Hey, it's not working. Why is that not working? Because we need to apply that property to individual not hug. Oops. Let's. Okay, let's apply fill container. Fill container. Fill container. So that's perfect. So here you can see we have lost that alignment. So we can go ahead and select all of them. And then. Yeah, so we can do this. So you might experience very different problems as you kind of design it. Just, you know, it's all about this section. You know, there's no, no other place there might like other tricks you can do. But most of the time it's here for the auto layout. So you know, just keep, keep experimenting and whenever you get stuck try different strategies here. So that's great. So let's go ahead and do that for this one as well. So we are just making all the properties are properly applied on the individual level. Alright. So we have all of that going on here. So let's go ahead and see if it's working. Hey, that's working. That's awesome. And then we can add a minimum width to it so it's not going below that. Add a min width, maybe 550 and then we can also add max width if we want to. But this is fine for now. So, so that's how we create that data table using auto layout. And then you know, experiment with this auto, try adding maybe a different spacing, maybe let's say 32 and then you know, the spacing changed. And then if I want to like, you know, add that auto gap here instead of you kind of hard coding it so you can click on the center and then if you click X on your keyboard it adds that auto spacing. So and it kind of, you know, pushes the content on the site. So it's all based on the CSS things and stuff like that. But you know, Figma kind of simplified this for us and this is super helpful way to kind of, you know, build your data tables and stuff like that. You can always like do different adjustments and then like margins and all those setup. And then let me go and show you Content real plugin. So, so if you go to this content real plugin and then you can update content from here. So let's say I want to change all these names to something. Here. Okay, let's just select few and let's go ahead and select on names and then it will update it here like this. So you can use plugin like this to, you know, populate the content. And then at the end you will have your data tables with the content so that person who is looking at it, they have context what they are looking at. So you can update all the names and content here from using this plugin and that will help you create this data table. So yeah, that's about it. And then feel free to experiment, you know, break things. It need not to be perfect, but just get comfortable and build that muscle with auto layout there's going to be a lot of flaws for sure, but don't worry about it, just like keep practicing and you'll get good at it. So yeah, so that's how you can create the data table. And this is just an example. But as we kinda take this learning and apply this in a project, it will start making more sense as well. So I'll see you in another module.