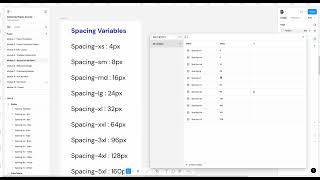
John Rodrigues walks through setting up spacing variables in Figma with a naming system from spacing-xs to spacing-6xl. He creates number variables for common pixel values, applies them to buttons and auto-layout, then shows how to build a compact mode that divides spacing globally so you can switch density with one click.
Chapters
Okay, so now in this lesson we are going to learn about spacing variables, which is another interesting topic because, you know, nowadays design are adaptive and they keep changing and there are like different densities as well. So you might have seen like the Gmail right redesign, they have the, you know, compact view and dense view and everything. Those can be achieved using spacing variables. It's nothing. But whenever you see like let's say there are like two buttons here, right? And then there is a space between that. So instead of manually putting that number here, you'll be able to use the variables as the spacing variables. And we are going to learn how to create that to create the spacing variable. So we learned about the color variables. So spacing variable is a number. So we'll be able to create this. And this is a naming convention I am using. So spacing extra small, spacing small medium large Excel 3xL 4xL 5xL 6xL the naming convention different companies uses differently. So this is what naming convention that has worked for me. And you know, it's quite simple to understand as well. It need not to be complicated some, some design system you can see it gets very complicated. But all what you're doing here is just documenting the values. So now let's go ahead and go to the variables. And then now let's create a new, new collection. And then we're going to create variable. So you can see we created color. Now let's understand create a number variable. So we have the number variable. So now let's name it as spacing spacing extra small. And then now here you just have to enter a number that is simple as that. Unlike color tokens, you don't have to map anything here, just number. And then let's duplicate this and duplicate and then Excel and then extra small and then medium and then you can Change the number 8 pixels and then 16. So now we learned how to create a spacing variable. So you can rename this from here spacing variable and then demo because we cannot delete it. So just duplicate it here and then you can continue making all this variable. So we created couple of them and then tool 24 pixels. So we created this and at the end it should look like this. Pressing tokens, variables, however you want to name it. So at the end it's going to look like this. So now that we have here, now let's learn how to apply the spacing variable. So now let's create the button again and let's create a similar button download now and then auto Layout and then fill. Now here you can see we have like different values here and everything, right? So we can. Let's go ahead and add the spacing here. Right, spacing to 16 and you can change it to 32 and you can keep changing it from here. Okay, and then let's add this margin here and then spacing. Okay, so now we added this here. And then let's. So here you can see once your variable is applied, it looks like this here. If you want to break it, you click on this detach variable, this symbol. It appears only on hover. So click on it and you will be able to detach it. Now let's add a corner radius of 16 that also can be a variable which we're going to explore in the next lesson. So, so let's change the color from our library. Let's go to surface and then click on the surface and let's change this color to negative. Okay, so now we have a button and now all the spacing is applied. So we can also like, you know, add in an icon. Let's take icon from here. Content, real, filled, regular. This is a plugin. You can get the plugin from here. And then let's make, let's take one of the icon, maybe this one, and then add it in here. Okay, the icon went there, but let's bring it back here, Not there. Where were we here? Okay, we are here. Such a small icon. So let's make it larger. Okay, so now this gap you can see you can also add a spacing variable there. And let's type on spacing. And here you can see you'll be able to change the variables from there as well. So that's how you can leverage the spacing variable. If you are using like the eight point grid system, you'll be able to, you know, just document that so you don't have to remember the multiples of eight all the time. So if you go eight, like 4, 8, 16, 24, 32, these are all multiples of eight. Whenever you are designing, it's good to follow this eight point grid system. And then if you want to change the values, you can even change from apply variable and then spacing to 64. So that's how you'll be able to apply spacing variables. And you know, let's go here. And then you know, this is like, you can change value this to like default. And then I'm going to show you a little bit of the modes. But we're going to have another lesson where we'll dive deeper into the modes. But here is, we can say this has a compact one and then we can just like reduce everything by half this one. So you can add a, you know, mathematical operations there. So 16 divided by two, 24 divided by two and then divided by two. Let's go ahead and change this. So what I'm doing here is just creating another mode in which the spacing is half of the initial value. So we have everything reduced by 50%. So now we applied, we have our, you know, the spacing applied from the beginning. Now we can go ahead and change the color, sorry the spacing token to compact and it's going to be like half the size. So you'll be able to change like the spacing from there which is like super helpful while designing. And many companies nowadays used to show different views, compact and everything density based view. So if you want to delete if what you have created here, you can go ahead and delete, delete mode and it will delete the entire mode. So delete the entire mode. So that's about the spacing variables. And I will see you in another lesson where we are going to create radius variables.