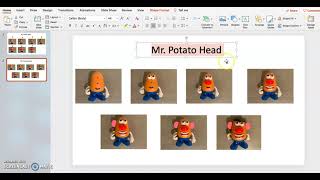
Gina from The Autism Helper shows how to build step-by-step visuals in PowerPoint using photos of a toy assembly like Mr. Potato Head. She covers the full workflow from photographing to adding text labels, plus how to simplify the activity for different skill levels by hiding steps, using stars instead of numbers, or spreading them across slides.
Chapters
Hi everyone, this is Gina from The Autism Helper. I wanted to show you a really quick way to make a structured play visual for your kiddos in your classroom. This took me, I think, about 4 minutes maybe tops, and it's only because I wanted the numbers to be bigger, and so I went back and changed everything. But basically, what do you— what you want to do is just take pictures of the, the toy in different steps of how you would add on each individual piece, and then go ahead and download them to your computer. If you have a Mac, you can AirDrop them very quickly. And then I also love using PowerPoint because the formatting is way more easier to me than WordPerfect. So basically what you wanna do, if you wanna make a Mr. Potato Head, is have a blank screen and then you wanna go to Insert Pictures From File. I have mine all in an actual just folder so that way they're nice and organized. And there you go. I just Shift and Command and copied all of them so I can insert them all at once. And then here they come. And obviously way too big for what I need. However, you can make them as big as you want. I just went for 2.0, 2 inches, and then Enter, and then it automatically resizes them. You can easily— they're all pointed— you can easily drag them down, you know, whichever way you'd like them to be in line. Just like this. I think I have an odd number on the top. Let's see, see how easy it is to format in PowerPoint. Much easier. You can shift them over, you can highlight them all at once. Doesn't have to be super fancy. And then here you go, here's your steps. Text box, Mr. Potato Head. Always want to follow up with some words and languages and labels that your kiddos can see the words that go along. And there you go. And then if you want to have little numbers above, you can. If you want to put stars above there, you can. It's whatever is best for your student. You know, you can make it— if your kiddo is younger, maybe you can put the little stars up there. That might be something motivating for them to check off as they complete each step. Or just completing the Mr. Potato Head in itself might be rewarding. And maybe you only do a few steps at a time. You might only get to number 2, right? Because you're starting off with a new activity. They may feel like they don't like the Mr. Potato Head. It's very challenging for them to push the pieces in with you. So you might only get here, and you could cover up the rest with, um, Post-its. Or if you want to actually only put in a few steps first, you can do that and have these steps on different pages. That way you only have like number 1 and 2 on one page. So for example, you could take these two— oh my goodness— copy, paste. Copy, paste, and then you can put them in a bigger design. Maybe that's as far as you get that day, and then on each different page you can have them in a ring and you can complete just a few steps at a time. So that is a tutorial on how to make some structured play activities when you're building up to working with toys. To us, it's really fun to play Mr. Potato Head, but to a kid with skill deficits, this might be a really challenging activity. So take your time.