How to Make The Autism Helper Curriculum Interactive
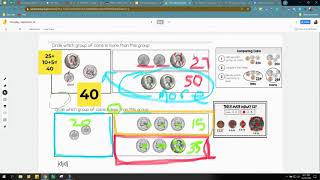
A special education teacher from Illinois shows how to make Autism Helper curriculum interactive for remote learning using Google Jamboard. She walks through copying curriculum pages with a snipping tool, pasting them into Jamboard frames, and embedding the links into a daily Google Slides classroom posted to Google Classroom so students can access lessons and edit in real time.
Chapters
I'm a special education teacher in Naperville, Illinois, and today I want to share with you how I have used Google Jamboard in order to make the curriculum that I purchased from theautismhelper.com become interactive during remote learning. First of all, I want to thank Sasha and all the folks at theautismhelper.com for providing this wonderful curriculum and all the other valuable resources that they have on the site. It's just incredible. So getting back to how I have taken this curriculum and made it interactive to my students, I use something called Google Jamboard, which is a Google app. And basically what it is, is it's a digital whiteboard. So think of a whiteboard at your school where you have different color markers and you're able to erase it, you're able to be interactive with your students. Well, Google Jamboard is is a digital whiteboard and you could create the document. It's super easy. You share it with your students and you and the students are able to basically use, uh, the whiteboard, uh, together. You can write on it, draw it, erase it, and do lots of other cool things with it. So the two things that you really need in order to make it interactive, um, is Google Jamboard app and a snipping tool. Okay, so Holly Bueb on the autismhelper.com, she has written a very nice article about the G Suite, the Google Suite of apps that are available through the Google Suite that you might not even know are aware. So go ahead and check out Holly Bueb's article on the autismhelper.com, and she does cover Google Jamboard as well as other ones. So the way that I have done it to make it interactive is first of all, I just went on to my Google Drive and I actually found Google Jamboard that I didn't even really know existed. And then I used my computer's snipping tool. So I'm going to take you through that step on how I could take the curriculum and put it on to portions of it onto a Google Jamboard for my students. For a lesson. Okay, optional down here is Google Classroom and Google Slides. I've created a Google Virtual Classroom and posted it on Google Classroom. My district in particular uses Google Classroom, so that's what we use to post assignments. I could show you that later at the end and how I do it. So if you use Google Classroom, you can stick around at the end and I'll go through that. So getting back to the Google Jamboard, the way that you find it, right here, if you go up to, I opened up my Drive, and you click on New, and it's over here on More, and you click on More, and there it is right there, Google Jamboard. Never really knew that it existed. Another way that you could do it is if you click a new tab up here and then you'll see your Google Apps if your computer is set up like this and you just scroll down and there's Google Jamboard. So what I'm going to do is I'm just going to click on Google Jamboard and just like with your Google Docs or Google, any of the other Google documents, it's very easy. You just Click on the plus sign to make a new one, and I'm gonna say New Jam, and there it is. This is the whiteboard. This is the whiteboard that your students will see and view, and over here are all the little tools that they will use and, and you as the teacher will use to make it interactive. So step 1, when I make this whiteboard, I Something to keep in mind is you can create different little whiteboards up here. We call these frames. So for instance, I create a whole lesson each day and I make a Jamboard. So I'll entitle it like, um, October 20th Jamboard. And then What I do is, in order to share it to my students, I click Share. Right now it's private to me. For me, I have to click on here to make it so that anyone with the link can access the document. And I want them to be an editor because I want them to be able to edit and write on the Jamboard. I'm going to click Done. And after I show you how I put the Autism Helper curriculum on here, then I'll show you up here how you can share it. So basically what I do is I have my curriculum already open. This one is the Functional Math Level Daily Curriculum Level 3, and today I want them to work work on, say, page 4 from this one. And each Jamboard frame, I'm just gonna put maybe one problem for them to do. So down here on my taskbar, I do use Windows, but I have pinned the snipping tools. There's two different types that they have, Microsoft made available. The way you do this is you go to your Window, and for me, I just look on Windows Accessories, and there is the Snipping Tool. Then you snip, you click on that, and then you're able to pin it down here onto your taskbar. I've already got it downloaded, but if I were to put it here for the first time, I would have that option to put it down on the the taskbar. The other one that's a newer version, it's called Snip Sketch, which I have put down here also. They both pretty much do the same thing. But anyhow, getting back to the Jamboard, I open this up, the curriculum. I click on one of my snipping tools. I want to make a new one, and let's say I just want the word problem. I click And I select this. And very important here, I'm gonna say Ctrl+C for copy. Ctrl+C. Then I go over to my Jamboard. And they don't have an option here where I can do, like, paste, so I have to do Ctrl+V. Like, Ctrl+V like Victor. And here's the word problem. So you can make it bigger and you can add other things. Like, I like to put in a portion of the anchor chart that's provided within the curriculum. So for instance, there's an anchor chart for each unit. So for addition word problems, I'll take one of my snipping tools, I'll make a new one. Click on that. Ctrl+C. Go back to my Jamboard. Ctrl+V. And right there they have it on the bottom. So these are all the steps that they need to make the addition word problem. And then over here I want to show you other little tools. Now, when you share the Jamboard with your student, they're able to either use a pen. They have different colors. They have the highlighter, marker, brush. You can have different colors. So right here, we want to circle important numbers. We can erase it. This is the selecting tool, which I can show you on another lesson I have. We can insert pictures if we want, or I'm sorry, this one is the sticky note. We can insert a different color sticky note wherever we want. If we just go ahead and type on it, save it, and we can do whatever we want with it. Kids sometimes like to write their equations, or they will go ahead and write their numbers right on there. We can add an image. So if you want to dress up your page, you can do a Google image search and then type in whatever you want, and then you just copy and paste it into there. There's shapes you can use right here. We have arrows and so forth. We can even use a text box. Please, and whatever you want to write there. This is cool. This is our laser tool. So when I want to draw my attention to the kids, I'll be like, okay, look up here. Let's start by underlining our question. I use the laser tool a lot to draw my attention to what they're doing. Then what I'll do is I'll click on my select tool and I'll go to my next frame. And then I go back to the curriculum, and then whatever I need next, let's say I need my coins, and I'll click on New, and then again, I go through the whole process. Ctrl+C, and then make sure your Select tool is selected when you come over here to do Ctrl+V and you don't have it on something else. That's one little tip. I learned, and then I go from there. I want to show you a Google Jamboard in a minute that I've used with the kids. So in order to share it with them, you just click on your share button, and then you type in the names of your student that you want to share it with. So let's say I'm going to share it with just a fellow teacher, I could just click send and it would go directly to their email. They would click on the link and then when they click on the link, we will all, all the students who click on that link, we will all be joined together on this Jamboard. And what I do is I usually say, okay, we're gonna start on frame 1. We don't move until frame 2. Until we're done with this one. So then I'll say, "Okay, move to frame 2." They click on that, and then we go through the lesson. So that is how you create your Jamboard and share it with your students and use your snippy tool. So I want to show you one that I've created before in the past. This is one right here. I usually start up with a warm-up. I've copied different coins. We'll do that. We'll do our calendar activity. Then this is the curriculum from theautismhelper.com, the math curriculum that I've used. Here's the word problem. This is one with the coins that we were working on less and more. And as you can see, it's sort of all highlighted and, and drawn on and written on. Some kids choose the Post-it note to put their answers on, or they will just directly write on there. Here's the clock. Again, kids will use the Post-it note or writing on it with the writing tool. This one's sort of neat. I copied the number line from the curriculum, and I use my snipping tool for each little fraction so that we've been able to move it around, and then they use that to put the fractions in the correct order. So that is just a sampling of how I use Google Jamboard to make it interactive for the kids. Great tool. It's really kept them engaged because then they're able to actually do things with their hands and write just as if you were in the classroom versus just staring at a screen watching a teacher. So, um, again, these are the two things you need: Google Jamboard and the snipping tool in order to make it interactive. If you have Google Classroom and you want to create a virtual classroom, or if you have a virtual classroom I'll show you how I have taken the Jamboards and posted it onto my virtual classroom. So back in August when I found out that we for sure were going remote learning, what I did was I went to Google Slides and basically same way, go to Google Drive, and then you want to click on New, and instead of the Jamboard, you're going to click on a new Google Slide right here. Google Slide. And then I created this as my virtual classroom. This is for a whole nother topic. If you want to know how to create a virtual classroom, you can just go ahead and Google it. How to make a virtual classroom. There's tons of resources, resources out there on how to do this. So basically what I do is each day I update this virtual classroom and I post a new one each day on my Google Classroom so that my kids have access. So on the bottom here, you'll see on the bottom right the Jamboard logo. So each day I go through my agenda slides, and most days I'm using Jamboard to go through my Autism Helper curriculum. And it's been working out very well and very easy because they know— the kids know what to expect each day. They, they go to Google Classroom, they go to my virtual classroom, we talk through our agenda. They click on to the Jamboard, and I'll show you how to put the link on there in a minute, but they click right here, and it brings us to the Jamboard that I have set up for each day. So I create a new Jamboard each day, and I'll show you how I get it on to the virtual classroom. So when I'm in the Jamboard, what I want to do is I want to click on the share, and I just copy the link, and I go back to my virtual classroom. I just click on my Jamboard logo. I go up to insert, link, And then I will hit Ctrl+V to paste the link right in here. I click Apply. Okay, and then that is how my kids go each day, how they get to their Jamboard. So in order to post this to my Google Classroom, all I do for my Virtual classroom is, again, I click my share button, I copy the link, and then I go to my Google Classroom. I have a bunch of different classrooms here, so I'll click on my math one. And each day I click on a new one, I add my link, and I post it there, Ctrl+V, add my link, and then I'm telling them, okay, Tuesday, October 20th, virtual classroom, and then I want to post it to all of my students so that they can see it. So each day they go to their Google Classroom, they click on my— on their virtual classroom right here, brings it to this. We talk through our agenda, they click on their Jamboard, and there they are. So again, You need Google Jamboard, you need a snipping tool of some sort, and optional, if you use Google Classroom and your virtual classroom, you could post your Jamboard on there. So again, huge thank you to theautismhelper.com for creating this wonderful curriculum, and it has been great to, to make it interactive. Since we all can't be in the classroom, unfortunately. But this has worked out really well for remote learning. And if you do have any questions, if you need some clarity on what, what I've covered today, feel free to email me. It's jen_miller@ipsd.org. Thank you for watching, and I hope that, that, that this helps you. Thank you.










