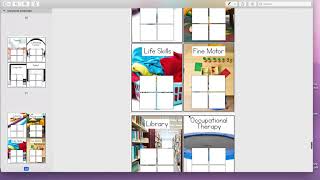
In this product‑preview video, Sasha from The Autism Helper walks viewers through a set of Real Photo Visual Schedules designed for classroom use, especially for students on the autism spectrum. She explains the various template layouts (single‑row, multi‑row, morning/afternoon) and how they can be displayed on walls, desks, binders, or clipboards. Sasha highlights the advantage of using real‑photograph cues over traditional clipart or Boardmaker images, noting that real photos are more concrete and age‑appropriate for older learners. She details the color‑coded center schedules, the process of matching schedule pieces to larger center labels, and the placement of check‑in spots around the classroom. The video also introduces mini‑center schedules that can be personalized for each student, showing how to sequence multiple activities (e.g., journal, group work, reading) within a center. Throughout, she offers practical tips on printing, customizing missing photos, and adapting the system to individual classroom environments.
Chapters
Hi, this is Sasha from The Autism Helper, and this is a product preview of my Real Photos Visual Schedules. So if you are new to using visual schedules, there's some pretty detailed instructions on how to set these up, how to teach them, etc., and then some specific instructions here for the center color-coded schedules, which I'll show in a minute. So first up, there's a few different templates on how to display the schedule. So something simple in a row, a smaller one that you could post on a wall or on a desk, and morning and afternoon options. If you have more schedule pieces, having 2 or 3 rows is nice, and then you could put this in a binder, on a clipboard, on the wall. So however you use this is up to you. Here are the schedule pieces. They're all real photo options. I tried to include as many as I could think of that would be appropriate for classroom. If there are some that are missing, I'm happy to make those for you. Um, the reason that real photos are nice is because it can be a little bit more concrete but also can be a little bit more age-appropriate for older learners as opposed to clipart. Remember, clipart, Boardmaker, things like that, it's just a cue to go to a certain spot. So the cue can be a real photo or a drawn photo like a clipart or Boardmaker image. Um, the real photos I think for our junior high and high school students just look a little bit more age-appropriate, so it's nice to transition to that. And then you could also take real photos within your own classroom and tie those in. These are just generic objects, obviously. For the different centers. So here are the schedule pieces that will go right on the schedule. I'd obviously recommend printing a few pages of this because you'll need extras for each student. Students will match each of the schedule pieces to the bigger labels. So these labels will be going in the center. So since these are not exact matches— this obviously does not look like your playground or your life skills center— you can post these pictures around your classroom. So for instance, if This music class is outside of the class. I would post this in the doorway. So when you're leaving for music, students would match the exact picture right here and check in. So let's say you have an independent work center. This picture would go exactly next to independent work. Students would come check in in the same way you'd use like a clipart image. So I like that this is in the background. It's still an exact match, but the whole picture is not there. So it's a nice little cue. For kids that are matching color to color, I tried to do things that just have very different colors or visually look very different to help with that. There's 4 check-in spots. If you have more than 4 students at a center, just print 2 of them and put them right next to each other. The one cool thing that I added in here are these mini center schedules. There's a bunch of pieces for 5 different colored centers. It just has a color. You could put these right in the daily schedule here, and so a red center— Schedule picture would go here, you'd go to red center, or you can use these mini center schedules and have this be Jacob's mini center schedule, have green, red, blue, whatever. Here we have mini, the center mini schedules. So this you would post at the center. So wherever you want red center to be, post this right there. Students come check in just like they did on the other spots, and then there's a list of what they're doing today. And you have 30 different pictures, 20 different pictures of activities that could be done at the center. So first we're gonna do a journal, then we're doing a group activity, and then reading a book. I think this is essential in our centers because we expect our kids to do multiple activities, but we're not showing them always in a way they understand. So this is a nice way to tie that and build onto your schedule system.