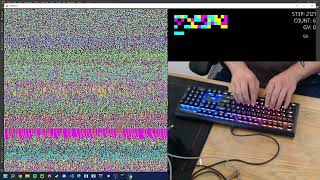
In this tutorial Edward MacLean demonstrates the end‑to‑end workflow of the CHAOS/Charon system for turning a literary passage into a cellular‑automaton image. He begins by selecting a passage (Simone Weil’s Waiting for God), then opens the two Python scripts—chaosNavigations.py and charonSynthesis.py—inside PyCharm. He walks through configuring the navigation phase: choosing cell size, number of colors (2‑9, preferring 3‑5), typing speed, and optionally enabling the analytics window. He shows how to start a new rule, type the passage, and save the result as a “journal” using a hyphen‑separated name. Next, he opens the journals folder, points the synthesis script at the saved journal, sets the matching color count, and runs the synthesis to generate an image file. The bulk of the tutorial covers customization: creating and editing color lists (including converting 0‑255 RGB values to 0‑1 floats), toggling horizontal reflection, and adjusting image dimensions via separate scale and shrink numerators/denominators for width and height. He demonstrates how each change produces a new image with a systematic naming scheme that encodes the parameters. Finally, he offers practical tips (e.g., waiting for the process to finish before opening files) and encourages viewers to experiment with the tool.
Chapters
Hello! Today I'm going to be going over the synthesis technique in the CHAOS program. The first thing you're going to want to do is get the passage you're translating. So today I'm going to be translating this passage by Simone Weil in her book Waiting for God. Once you have your passage, you can put that aside for the moment when we get into the program. So to get into the program, you want to start by opening up PyCharm. If your code doesn't automatically open, you can find it usually under the name chaos. And once you're in chaos, you are looking for two windows or two files. Those files will be in the Charon folder. That's chaosNavigations and charonSynthesis. If those are already in your, uh, bar up here, and you don't need to open them up again. Basically, for the synthesis, you translate your passage in Chaos Navigations, and then you save it, and then you go into Charon Synthesis, and you take the passage you saved and develop it into your pattern. So, we're gonna go into Chaos Navigations, Now to start this, there's two ways. You can right-click and press Run, the little play button. It'll say Run Chaos Navigations. Or there's this play button in the top right. If you use the one in the top right though, you have to make sure that the name of the program you want to run is next to it to the left. So we're running Chaos Navigations, see it right there, so we can hit Run and it'll open up this window. So in Chaos, there's 3 things you have to do before you start, and then 2 options. So the first thing you have to do is choose the cell size. There's small, medium, large, and extra large. The larger the cell size, the faster the pattern will develop on your screen. Um, So on slower computers, you might want to go for a medium or a large. Right now I'm going to choose small. The next thing you want is to choose the number of colors. You can choose anywhere between 2 and 9. For synthesis purposes, I think, or I prefer 3 to 5 colors because I find depending on your typing speed you get the most interesting patterns. 2 is usually a little too bland, and then 6 to 9, the typing really doesn't have a pronounced effect. So we're gonna go with 4 colors right now. So in order to choose a number of colors, you mouse over until you see the word "color" appear, and then you just type in the number of colors you want. Alright, and then to choose the speed, it's the same thing. You mouse over, speed will appear, then you choose the speed. I'm going to go with the speed of 3 right now. And so I could start it and start translating right away, but for demonstration purposes, I'm going to turn on the analytics window, analytics window, so that you kind of get a better idea of how the patterns on screen are actually created by your typing. Alright, and keep in mind, if you turn on the analytics window, it will run faster because it basically cuts the amount of colored pixels the program has to generate in half. And then this you can completely ignore for synthesis purposes. These are used for the GloVe method. So double-check: small, colors, speed, analytics. Once you start running the program, you will see the current rule you're using here, and this is the pattern getting developed. Uh, once this reaches the bottom of the screen, your typing, or the rule changes, will start having an effect. And if you want to start with a specific rule, you press Shift and Enter at the same time, and it'll open up this little white bar in the top left. Right now I'm just going to do today's date and time, so that's 8/24/2022, and it is 1:40. Click Shift+Enter, you see that changes the rule, and it changed the pattern. And now you can start typing your passage. And it will change— each keystroke will change a position in the rule and affect the pattern on screen. So, "The beauty of the world is the mouth of a labyrinth. The unwary individual who on entering takes a few steps is soon unable to find the opening." Worn out with nothing to eat or drink, the dark, separated from his dear ones, from everything he loves and is accustomed to, he walks on without knowing anything or hoping anything, incapable even of discovering whether he is really going forward or merely turning round on the same spot. But this affliction is as nothing compared with the danger threatening him. For if he does not lose courage, if he goes on walking, it is absolutely certain that he will finally arrive at the center of the labyrinth. And there God is waiting to eat him. Later he will go out again, but he will be changed. He will have become different after being eaten and digested by God. Afterward, he will stay near the entrance so that he can gently push all those who come near into the opening. So once you've typed your passage, it's time to save it. You do that by clicking Shift and Enter at the same time again, and the white bar shows up in the top left. It's a little hard to see, so just make sure it's up there. You can hit spacebar a couple of times to double-check. And so in order to save, you're going to start by typing "name" then space, and then this will be the name of the journal. And journal is the kind of— that's basically what it's called when it saves. They're called journals. So I'm going to type this, or name this waiting for God. And the name, uh, words in the name have to be separated by hyphens. If you use the spaces, it won't save properly. And then I'm going to do a for just to remind us how many colors we used. All right, so once you have your name all typed out— name, space, the name of your journal, words or characters in the name of the journal separated by hyphens— you can click Shift+Enter again, and that'll save. Just to be safe, there's a second way to save, which is opening that Shift+Enter window again, and then in that you type write That's it. No name or nothing. It'll keep the name that you used before. Hit Shift+Enter, and you're clear. So once you've done that, you can click— hit Escape or X out. It'll close this window, and you can close out of this window as well. So once you've translated your passage and saved it, you're going to want to open up the journals folder inside the Charon folder, and then you should see in there the journal you just saved, journal underscore, and then the name we chose, Waiting for God For. So if you see that, you can then go to Charon Synthesis. So in Charon Synthesis, in order to tell the program which journal you want to develop, you type that in here. The journal name has to be green or inside quotations. It can be single or double, doesn't matter, and type the name exactly. So it's going— every journal is going to start with journal underscore and then whatever you named it. So journal underscore waiting hyphen for hyphen God hyphen for. So once that— once you have that set up You have to tell Synthesis how many colors you used. We used 4, as indicated right there. So we're going to change that to 4. Alright, so once you have the name of your journal and the number of colors chosen, you can, you can run this program. Right-click, press Run, then you'll see down here, this will kind of indicate the progress you're seeing. And you'll have your image fully developed once you see "process finished" with exit code 0, and your new image will appear inside of the synthesis folder in the Charon folder. So you can right-click this Go to Open In. In Windows, it'll say Explorer. On Mac, it'll say Finder. You can click that, and there's your image. So this is the translation of our passage. This is the most basic development of it. It's in a square. The length is determined by how long you let the chaos navigations run, and then the width is just equal to that. So if you scroll in, you can see some of these cellular automaton rules in greater definition. Alright, so If we wanted to start customizing this, there are 3 basic things you can do. So the first thing you can do is you can change the colors, and in order to do that, we have these color lists right here. You can make as many as you want. Starts with 4: 0, 1, 2, and 3. And the number of colors in the list is how many colors or should correlate with the number of colors in your pattern. So if we have 4 colors, we're gonna want a list that is 4 colors long, and each color is separated by commas, and the whole list has to be in brackets. So, and I have some pre-made colors here, so why don't we try white, cyan, magenta, and green. Alright, and so this is the list we want, it's colorList , and to see which color list you're using, down here in the synthesize program, we're using colorList . Alright. So we run this, right-click, down to Run, click Run. You'll see it is doing its thing. And so you'll see that a new image appeared. The name changes with the colors you choose. Now it won't have the actual name of the colors in the, uh, name of the picture. It will have their RGB values. So you'll just kind of have to— well, you'll see it once you actually look at the images, right? So now if we open it up, we'll see this is a new one we chose, which is the cyan, white, magenta, and green. We'll scroll in. Alright. So actually, I'm going to change that to black. And I'll run this again. So open that up, see what we've got. There we go. Alright, so this is our new pattern. And you'll see we now have cyan, Magenta, black, and green. Those are our 4 colors. And all of the patterns that were in there are now shaded differently. Alright, so that's the first way you can change this. You can change the, uh, change the image developed. So the second way you can change the image— oh, so sorry, let me go back to the colors. So I have some pre-made colors here with their RGB values. If there's a color that you want that you don't see here, what you can do is you can go to this link. So copy and paste that link without the hashtag. You open that up. And it'll bring you to this website. And so on this website, um, what's the simplest— here we go. Alright, so on this website you can click on each of the circles. The circle with the white arrow is the main one, and that corresponds with this one here. So let's say that I want a kind of, I don't know, Let's say I want some sort of orange-red, right? So I will drag this circle with the white arrow to orange-red, and then down here this will show me the RGB values. You'll see here, so it's 255, 124, and 33. But if you look in our program, all these numbers are from 0 to 1, so all you have to do is divide each of these numbers by 255. So if we're going for our orange-red, we'll create a new color called orange-red. Uh, words have to be separated by underscores here, so orange-red equals parentheses Then inside of the parentheses, we're going to give it the RGB values we see here. So the red value is going to be 255. So, so 255 divided by 255 equals 1. So the red value is going to be 1. And then 124, so 124 divided by 255 is going to be 0.48. You can round up to 0.5, so we're going to be 1.5. And then, ooh, 33. So 33 divided by 255 is equal to 0.12. So we'll do 0.1. You'll see I already had that here. There we go. So there's our new orange-red, and now we can put that into our color list. So let's say instead of green, I want our new orange-red. So now I can run this again with our new color we just made. There it is, there's our new pattern with the orange in place of the green. See, it gives a, uh, gives an interesting hue to it. Alright, so now that we've gone over how we can change all the colors, the next thing you can change— well, the next thing you can do is you can choose whether or not you want the pattern to reflect across the top. So the reflection is a binary. If reflect equals 0, there's no reflection. 1, it will reflect across the top. So I'm gonna reflect it just to show you. And so the reflection doesn't show up in the name, uh, so you won't see a new image appear, it'll just replace the old image you had. So this is our reflected image, you'll see the pattern is copied. Across this point right here, the exact point where it happens. Alright, so now you have the image reflected, you can work on the dimensions of it. So these affect the length, these affect the width. And basically how they work is the length and the width have a shrink and a scale, uh, number. And so you can think of it where if this is our image, this is the length, this is the width. So the length is going to be equal to the scale number, so that's going to be 1, over the shrink number, so this is going to be 1. So, and the width is going to be equal to the scale, w, width, 1 over 1. So if we wanted it to be wider, we would increase the scale So let's say we wanted the— what the fuck? All right, so let's say we wanted to quadruple the width. So if we change the scale_w to 4, and then we run this, essentially what that's going to do is it's going to change the numerator in our width value —gonna change the numerator of our width value to 4, so the width is now gonna be equal to the original width times 4 over 1, which will be 4 times the original width. Alright, and so it's finished, and changing the dimensions will change the name. You can see the length numerator denominator, width numerator denominator, so length 1, 1, width 4, 1. This is the one we just changed. We can open this up in Explorer. I'm going to delete some of our old ones. Just remove the clutter. So this is the one we just made. There you go. You see this is what the cellular automaton rules look like when the width is changed. Um, and you'll see that the pattern is actually very different And that's because this generates the new image each time. It doesn't just scale it. But essentially, if you see this area right here is identical to this area right here, right? So it just got spaced apart because the width got changed so much. So actually, why don't we change the width scale to something like, let's try 2 and then 3. And so while this is running, uh, once you've started running it, you can actually change the code and it won't affect the running until you start it up again. So the 2 just came out. I'm going to start running the 3, and we can look at the 2 while that develops. So there it is. This is our width doubled. So you see, this is the original width. This is it doubled. This is it quadrupled. And you can kind of get a sense for what changing the width actually does to the pattern. Alright, so now we're just waiting for our 3 So, one thing to be careful of: if you see the image half appear in this window but you haven't seen the process finished with exit code 0 in the program yet, don't click on it. It'll, uh, it just won't open. It won't work. Alright, so now that our 3 developed, we can look at that. You can see Yeah, you can really see what happens as the width is increasing in these things. So I think 3 is the most interesting, so we're gonna go with that. Alright, so I'm going to delete the other widths. Alright, so now we have the width of 3, and now we're gonna adjust the height of it. So let's say we wanted to— we thought it was too tall, right? We want to cut it in half, you know, or two-thirds, right? We want two-thirds of the height. So what we're going to do, if we want two If we want it to be 2/3 as tall, right, we need to go to our numerator, which is our scale, make that a 2, and then our denominator, which is the shrink, make that a 3. Then we're going to run that again. Finished. Open that up. So this is our new pattern. It's a little shorter. So whereas changing the width, the pattern was generally the same, changing the height, it will actually, you know, the rule will be the same, but you can kind of get a sense If you were kind of looking at this section, right, the blues are— there are less steps for each particular cellular automaton rule, so the patterns are a little more, uh, kind of lower resolution, you know, but if there are a lot And if it's as busy as it is in this particular one, you kind of get a better sense for each individual pattern. So let's try— I think I want to try 1/2. Go through 1/2. Alright. So you'll see this is our original length 1, 1. This is 1/2. And this is our 2/3. And that is pretty much it. You know, now you can see the pattern we have with all the colors. And my favorite is this one half, so I'm going to get rid of all the rest. We'll save that. Yeah, so the last thing is, uh, as far as reflect dimensions and color changes go for the patterns, you can change them in any order you want. So if I wanted to, let's say I, you know, settled on— settled on this pattern, really like how this came out, the dimensions, the kind of fidelity of the cellular automaton rules, but I realize, oh, you know what, I don't like these colors so much, you know, so let's change it to Like a white, a green, um, light gray, and, uh, cyan. And then we can run it. And there you go! There is the— it's a little intense— there is the new pattern with those colors. And if we go back and forth, you'll see it's the same exact pattern, just the color palette changed a bit. Alright, well, thank you for watching. I hope you enjoy your explorations into this and spread some chaos.