Accounting Just Got Easier! | New Transaction Hub + Revamped Auto-Batching!
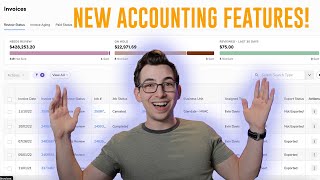
Richard Kohberger walks through ServiceTitan's new Transaction Hub for invoices, customer payments, and bank deposits, plus revamped auto-batching settings. You can now save custom table views, bulk email or print invoices, track payment status from failed to successful, and create bank deposits directly from payments. The system recommends daily batching for invoices and bills, with manual grouping to match your actual bank deposits.
What's going on, everybody? It's Richard Kohberger here, the blue collar nerd. And in this video, I'm going to be going over some accounting related changes in Service Titan that are part of the phase one of an initiative that we've been referring to internally as accounting reimagined. So accounting has been getting a ton of attention here behind the scenes and there are some big accounting related changes that should make your life a whole lot easier long term. And those changes are being rolled out in phases. So this is phase one. But there is of course more to come. So the features within this first phase are going to help make your accounting numbers a lot more clear. They're also going to make a lot of accounting related workflows a lot more efficient. Things like reviewing invoices and collecting payments and charging interest on overdue invoices and in some cases completely eliminate tedious workflows like with the new completely revamped and much improved auto batching feature. All right, so let's jump in. So I am here on the accounting tab, everything probably looks pretty familiar so far. But what's new here that we're going to be focusing on are these three tabs right here. Invoices, customer payments and bank deposits. Collectively, these three tabs make up what we are referring to as the transaction hub. So we'll start at the top with invoices. So the first thing you'll probably notice on this page is this lovely, colorful section right here. So this gives us an overview of the amount of money and the number of invoices in certain statuses. So invoices that need review, invoices that are on hold, and invoices that are reviewed within the last 30 days. And from this you can probably infer that invoices do have new statuses that you can assign to them. And I can click on any one of these to go into that bucket to see a filtered view. Okay, now I'm just looking at all of the invoices that are on hold and then I can click back over to here. Okay, now I'm looking at all the invoices that need review. Now you'll also notice that we have a filters button here. You'll see that there's two filters already applied. That's the review status it's filtering for only needs review because that's the bucket that we're in right now. And also down here at the bottom, you can see that by default it is including invoices with no balance. But as you can see, we Have a ton of filter options here, which is of course super handy, especially if you have multiple people in your company that review different types of invoices. I'm not going to go through everything, but we can filter for sent status. Did we send this invoice out already or not? Job status. If we only wanted to see jobs that are in the completed status, paid status, export status, the job type. Tags. Tags are always a very handy filter to have for those of you who like to get real crazy and custom with your stuff. All kinds of super handy filters so that you can see only what you're trying to see. Next to that, there's this View all dropdown where we can view all or view selected. What that does basically, is if we had some invoices checked off here, we could instead of viewing all, just say view selected. And that gets everything else out of the way. Then over here on the other side to the right, we have a search box and it has this dropdown next to it. So we can change what it is that we're searching for. So are we searching based on invoice number, customer name, customer number, et cetera. And then next to that, this button is where we change and reorder the columns that were seeing in this table. So I could click that and I could check off more columns if I wanted to see. Okay, it's important to me what technician was assigned to this invoice or what the job number was. For example, you could also remove certain columns if they weren't important to you and you can reorder them. Maybe the job number is really important to me. And so I want to see that right there next to review status as the. What is that? The third column? Sorry, the fourth column. And now there it is. Now you can see it. And by the way, these filters and columns, whatever you set up here, this is saved per user, so different users can have different views and they won't have to redo it every time. Now, on every row, we have this Actions column here with the kebab menu. And if we click on that, we have some options. We can email the invoice from here, we can print the invoice, we can print the invoice and mark it as sent, or we can collect a payment. Now we also have this Actions dropdown here. So if we select some things and then hit the Actions dropdown, you can see that we're able to do some things in bulk. So we can just check multiple things off and email all of those invoices, print all of them print and mark as sent, add them to a batch. Although I don't recommend batching from here or batching at all. There's new auto batch settings which I'll show you later in this video that I think will serve you much better than manually doing it. We can charge interest like a late fee, basically. And by the way, I want to point out that this charge interest feature here is revamped. So if you've used the old charge interest feature in the past and didn't like it for whatever reason, do still check this out because it is new and different. Change the review status or assign these invoices to another employee. So for example, maybe somebody else needs to review these. I'm going to assign them to Evan here I can hit apply. And now under this assigned to column, you can see that those are now assigned to Evan Davis. And now Evan, he can have a filtered view where over here under the filters, he can filter the assigned to to just him. Boom. And then Evan will see only all of these invoices that have been assigned to him. In case you're wondering, no, this assignment feature is not tied into the task management feature just yet, but that is certainly a possibility in the future. Now, when you are in here reviewing invoices, I want to show you a quick tip. So we have this invoice number column with the invoice number and if we click on that, it's going to open up the actual invoice and we could review that and then we'd have to click back to get back to the invoices screen. I don't recommend doing it that way. Instead, if you click just on the row itself somewhere that's not a blue link, then you'll get this fly out with all of the invoice details. It has all, all of the information that you would see on the invoice. So you can see there's all of the information at the top of the paid status, the invoice total, whether or not it's sent, all of the customer information. And then we have these sections down here for the tasks and the materials. We have this handy button to expand them all at once so you can review it. Say, yep, that looks good. Quickly go from boom, status needs review to reviewed. And then if you've already got your list filter done, you can just click next and move on to the next one. Much more efficient. That's the way I recommend doing it. Okay, now back here at the top of the page, you can see that we're currently on the review status tab of the invoices page, but there are two others, so let's move on to invoice aging. So this tab looks at payment terms, which is a feature you may or may not have set up already. And we have these different buckets up here showing us how much money and how many invoices we have and how overdue past their due date they are. So this fake demo company that I'm in right now, they're not doing so hot. They have $440,000 in the 90 plus days overdue category. Of course, the more overdue an invoice gets, the less likely it is that you're ever going to see that money. So that's pretty bad. Hopefully yours doesn't look like that, but same deal here we can click into these different buckets and that will automatically filter our table for us. And we have our custom filters and everything that we had on the last page. This might be a handy page where you really want to make sure that all of these have been sent so you can email invoices from here. This might also be a page where you're wanting to collect payments. Maybe you're looking at all these overdue invoices and you're calling these customers and you're collecting these payments. Again, all of that can be done from that kebab menu here under actions. This tab is really handy if you're a company that has payment terms. If you're a company that's always cod, then this might be a less utilized page, but it could still be handy. Being COD doesn't necessarily mean that all the money actually got collected on delivery. So maybe you do want to have payment terms set up and be able to check this page, but you don't have to do that. You could also just use this next tab, which is the paid status. Here we have our three buckets for unpaid invoices, partially paid invoices, and paid invoices. So if you wanted to just have somebody go in and collect payments on all unpaid invoices, this is where you would go to do that. Okay, moving on to the next page here, under invoices, we have customer payments. Same idea here, except now we're looking at payments instead of invoices. So the first tab is the payment status tab, where we have buckets for any failed payments in the last 30 days, any pending payments, and successful payments in the last 30 days. So failed is obviously payments that failed, they didn't go through. And of course you would want to come in here and check that there aren't any. And if there are some, get those payments collected, which you can do right here from this screen. You see we have the collect payments button here at the top. We can collect a single payment or multiple payments. Pending is a transaction that's still in the works. Like, we don't know if it's failed or successful yet. Typically, things shouldn't sit there too long. Like no more than one day to three days, tops. And of course, we do still have some custom filters here, so we can adjust these to whatever we need. We have new actions under our actions dropdown. So we can add this payment to a deposit. We can remove it from a deposit. This is referring to bank deposits, by the way, which is this next page here. We'll get to that in just a minute. You can mark things as resolved for, like, failed payments if you want to mark them as resolved. Like, yep, we got this taken care of. And you also have the option to update review status. Okay, now the next tab at the top here is applied status. Here you can see payments that are unapplied, not applied to any invoices, partially applied, or fully applied within the last 30 days. Some of these things, by the way, are specifically saying the last 30 days, just because otherwise this number would just get exponentially bigger forever. All right, after that, we have a tab for refund status where we have buckets for not refunded, partially refunded, and fully refunded payments. And then after that, we have a tab for ungrouped payments. Now, ungrouped payments are payments that have not yet been applied to a bank deposit. So you now have the ability to track what payments you have actually deposited into the bank in Service Titan. So let's say these two payments right here, these are checks. And I'm about to go take them to the bank. Then I would check them off. I would go up here to actions and add to deposit. I can name the deposit. I'll just call this 1216 deposit. Deposit date is 1216. And I'll click add to deposit. See deposit successfully created. And those two just disappeared from ungrouped payments. Because now they are grouped. They're in a deposit. Which brings us to this next page, the bank deposits page, where we have two buckets open and deposited. So right there you can see there's my 1216 deposit that I just made. I can click on it here if I wanted to review it. I see a summary here. So the total is $7,000. The deposit date. How many payments are in here now? There are two action buttons on this page. Don't let that confuse you. From this actions button down here by the table, that's where I can remove things from this deposit or update the review status. So I can now change this to reviewed. And from this actions button here at the top, that's where I can edit this deposit. I can mark this deposit as deposited, like, okay, we've done it, it's in the bank, it's cleared. I could also go ahead and mark the whole thing as reviewed from here as well. And I could create a batch. If I do that, you'll see it's successful there. That's just putting the payments associated with this deposit in a batch. Now they might be in a batch already. Deposits can only be part of one batch. So if one of these was in a deposit and I tried to do that, that would cause a problem. Just a heads up there. Anyways, the next thing to do is to mark this as deposited, which I could either do here from this review screen right there under that Actions dropdown, or I could go back, I could check it off here and go to this actions dropdown, update the deposit status from open to deposited Apply. And now after a refresh of the page I see that I now have $7,000 marked as deposited here in the last 30 days. Okay, so that's a basic overview of the Transaction Hub. The Transaction Hub is now the place, the best place that is specifically curated for reviewing invoices and payments. So it's no longer recommended to do that from here from the batch export transactions page. This is no longer where you would want to go to review. These new Transaction Hub pages are much better designed for that purpose. The AR management screen by the way is still useful, especially if you do a lot of commercial work or you're a company with net terms, maybe pest control companies that are doing really large volumes of jobs in short amounts of time. The AR management screen allows you to send statements. So basically just a roll up of multiple invoices. And it will also send multiple invoices to a single customer as one email versus if you were emailing out of the invoices screen, it would be sending one invoice per email. Now let's go check out the new auto batch settings. So to get to the auto batching settings we're going to go to the settings cog in the upper right hand corner. And then under accounting you should see auto batching and this is where you will change your various auto batching settings. So I would recommend coming in Here. And reading all of these, just make sure you understand everything because that's going to give you some good insight as to what's recommended and what could be useful, depending on your circumstances. But for most people, most of the time, I would recommend for your invoices that you have those auto batched daily. That's going to make life pretty easy. Every day you're going to have an automatic batch and that batch is going to have the dates that the batch was created in the name. So it's nice and easy to find. Now, you'll note over here we have a checkbox for group by business unit that would create separate batches every single day for every business unit. For most people, I would recommend leaving that unchecked. A reason to leave it checked might be if you were running multiple businesses out of one service titan account and you're using separate business units to do that, that might be a reason to group by business unit. Now, payments, you'll see that we do have the option to automatically batch payments as well. But if we read this text, it says as a best practice, we recommend manually grouping payments so that they can match your bank deposits. And if you do choose to auto batch, then we recommend that you verify that bank deposits match your bank before exporting. And bills, just like invoices, we recommend as a best practice automatically batching those on a daily basis. We also have options for credits, bill payments, inventory adjustments and inventory transfers. And just to show you what kind of options we have here, if I click the drop down again, I do typically recommend daily, but you could also automatically create batches per transaction. You could do weekly, you could do monthly, or of course you could choose to manually create your batches. Now at the top here, you might notice this switch that says group transactions with the same cadence. If I were to toggle that on, then let's say, okay, my invoices here are set to the daily cadence, and my bills here are set to a daily cadence. With that switch on, my invoices and my bills will be grouped together under one single batch. Even though they're different transaction types, invoices and bills, they have the same cadence. And so they're grouped together, but with that off, the invoices are in their own batch and the bills are in their own batch. But anyways, that's the basics of it. Check out the description box down below for even more resources on this. And again, this is just a phase one of a lot of great accounting changes that we have coming down the pipeline. So keep an eye out for those, please be sure to hit like if you liked the video and found it valuable, be sure to subscribe to Service Titan's YouTube channel. If you haven't done that already, hit that bell icon so that YouTube notifies you. Anytime we upload a new video, remember that your engagement through likes, comments and subscriber numbers are the ways in which my success is measured. Appreciate it. Peace. Sam.
More from Bill



Capturing the 80%: How SmartAC’s Gen-2 Targets Non-Membership Homeowners | Podcast Ep. 296
Build better customer data with every booking in ServiceTitan | TAD Tune-Up Series

The Biggest Change for Roofers Coming From Other Roofing Software to #ServiceTitan?

