I built a $100k YouTube Studio in my home (here’s how)
Brian Moncada walks through building a $100k home studio and shares how business owners can film YouTube ads efficiently. He covers equipment picks, studio setup, filming techniques, and organizing production workflows to scale ad campaigns without breaking the bank.
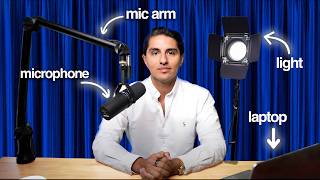
This is the easiest way to film YouTube ads as a business owner. In this video I'm going to show you exactly what equipment you need to film effective YouTube ads without breaking the bank. I'm also going to show you how to set up your own at home studio so you don't need to have an expensive content team on payroll just to film ads each and every week. I'm also going to show you how to use a step by step filming guide that we give to all of our clients to film their YouTube ads in 20 to 30 minutes max. And how to upload your ads and organize everything for easy and fast editing. Plus how to track your ads properly and build a creative production pipeline so you can consistently scale profitably past 1,000, 2,000, 5,000 or even $10,000 a day in YouTube ad spend. So let's jump right into it. What equipment you need to film effective YouTube ads without breaking the bank. There's two types of ways we recommend our clients to film their ads. Okay, the first, quick and dirty. Okay, this is very simple, very cheap, low hanging fruit. You don't need a bunch of things to do to film these ads like this. That's why it's called the quick and dirty. Now the first way is by using a PowerPoint with a white background and black text. Okay, this is very, very simple. You can obviously use your imagination here. You pull up Google Slides or PowerPoint whatever it is that you use. If you still use PowerPoint, I don't know what you're doing. Google Slides easy, right? You can just have, have a white background with some black text and just put your copy on that text. Now obviously I'm assuming you have the script already written. If you don't, I'll put a video right here you can watch. That gives you my $60 million YouTube ad script that we've used to write ads for all the industry leaders that we've worked with on our website that you can check out@adspend.com very simple. You can read that script, use it, download it and then put that copy onto a PowerPoint Google Slide. Whatever you use with simple black text, Quick and dirty. The next is a loom video screen share. So obviously I'm kind of doing that right now. Now, it's not all just loom video. I have a camera obviously. But if you just put up a loom video and used your MacBook Pro as your essentially like, you know, webcam as your video, that's quick and dirty, doesn't take any equipment. It's just using your MacBook and the MacBook basically, camera and screen share, Lume Video. It's free, Right. Next would be iPhone Video Pro, Prompt Smart Pro as a teleprompter app. Again, there's nothing stopping you from whipping out your iPhone, turning it from this to this, and then filming an ad just like this using an app or teleprompter like Prompt Smart Pro, which we recommend for our clients who are filming on their iPhone. And I'll show you some examples in a second. All of these are. No real editing, if any. Okay. It's just like subtitles again. That's why it's called Quick and Dirty. Okay. So you really just need subtitles. Here's a few examples of what this looks like, so I'll play this one first. Okay, so here's how it works. You buy a ticket for the Vault, which is a conference I host once a year. It's the big one. It's going to be at Miami diplomat this year, August 30th. It's a four day event. And at the Vault, if you buy one ticket, we will. So you can see here right off the bat, this is one that we actually did for Patrick Bet David when he was doing the Vault conference about almost two years ago now in the Miami Diplomat. And he's on his iPhone, he's in the Vault studio, and he's just literally reading very simple script. There's very little editing, there's some B roll, minimal subtitles, and a banner right there talking about the special that they can get when they buy a ticket today. Right? Very simple, quick and dirty, Right? Nothing crazy. Now we have this one, right? So I pull up this one. If you want to go from $500,000 a year to a million per year and beyond with your damage restoration company, then consider this. Most damage restoration companies get their leads from places you can see again on the iPhone. And this one was actually filmed vertically, which was a big mistake. But this one actually did really well. So, funny enough, even though it was not filmed with the proper platform dimensions, ideally landscape mode, it still did really well. This is one of our clients, Jamie Randall. He helps restoration companies scale with his agency. Now, the cool part about this is, as you can see, he's literally filming this on his iPhone. The audio quality isn't even the best if I go to the body part of it. As restoration companies dominate their services, he's literally sitting down in a new construction build, just reading the script word for word on his Prompt Smart Pro app on his iPhone. Quick and Dirty, simple, nothing crazy. Yes, there's some B roll, but really it's just iPhone subtitles, nothing crazy. Now, that's the very easiest way you can film the ads without needing anything whatsoever. Next is the clean and polished. Okay, this is good camera, good lighting, studio microphone, AKA what I'm doing in this video right now. Now, you also have fancy edits with motion graphics, quick cuts, and B roll. So you can Jamie's and, you know, Patrick by David's that we did for them. Those are a little bit more edited. We obviously wanted to add some extra bells and whistles, but even if they didn't have any of the edits, they would still work pretty decently because, well, you know, the script does the majority of the work, obviously. So now here are two examples of what the clean and polished ads look like. This video is for you and your daughter and the time you have left with her because life is busy, she's growing up, and you know, deep inside that if you don't speak into her life and you create those deep bonds with your daughter now. So what's the difference between these quick and dirty ones and this first example of the clean and polished? Well, you can tell there's different camera angles, right? She's got one direct to camera. She's perfectly in focus. She's got another camera angle right here, which is showing a different side shot of her. And it's got the music in the background, it's got the motion graphics, it's got the B roll. It's quick cuts in the first five to ten seconds. Very clean and polished. Take a look at the next example. Would you be happy if you stayed where you are in life and job forever? If the answer is yes, then this video is not for you. But if you want to finally achieve the time, location, and financial freedom you know you deserve, then this new career may be the answer to same thing, right? Two camera angles, studio lighting, good audio, good video quality, captions and motion graphics popping up on the side with the script as well as B roll. And he's got a different camera angle as well, which he cut to right there. So another example of clean and polished. Again, both of these styles can work, but the style that you should use for your business depends on your ideal clients and ultimately your creative strategy. This is one of the first things we do with all of our clients that come to work with us because typically they're used to running ads on Facebook, for example, where they have just images or very short, like 30 to 60 seconds, you know, videos and those just really don't perform the best on YouTube. So when we work with clients, we show them exactly how to do the quick and dirty or how to use clean and polished, depending on who their target audience is. For Jamie, for example, he's walking around in, you know, that construction build, but he's targeting damage restoration companies that are used to seeing people in that context. They're used to wanting to get to know and work with people that are just like them. So if he was in a studio, right. It was. It wouldn't really resonate that well. Again, this all depends on your creative strategy, which is why it's important to work with the team that actually knows what they're doing. Now, let's say you have some money you want to splash, right? So you want to splash some money and you want to be able to film videos effortlessly and easily. But you don't necessarily want to have the quick and dirty quality. You want to have actually studio quality, and you want to do it very easily without hiring a content team. That's exactly what I do. I had, last year, I had a videographer, I had two different editors, and we actually ended up having a content team, creative team in house at our company when it was like almost like $15,000 a month. And I actually ended up basically replacing all of them with my own at home studio setup to film videos just like I am right now, whenever I need to, as well as ads at the click of a button. And I'm going to show you how to do that in 20 to 30 minutes max. This is the best part about having a studio at your house. You don't need a videographer. You, you don't need an expensive content team, and you can do it very easily and very efficiently. So I'm going to walk you through what my studio looks like right now. Okay. So I'm actually going to start with the background first. So my office is pretty simple. Let me just see if I can zoom out real quick. We have the actual desk setup, chair, camera, and lighting right there. But then in the background we have obviously a nice, good view with lots of good greenery. But there's two key things I want you to see. Okay. The first is this light right here. All right. This is a light that I think is like 20 bucks on Amazon, maybe 50 bucks. But add some contrast in the back of the video when I'm filming my VSLs or my ads or my YouTube organic content. So I have one light right there. And the cool part about this light is I Actually have this remote that I can use to change the light. You see, I can turn it more yellow. I can turn it more white. Right. I like to keep it on the yellow though. It's a really, really good contrast. It's kind of freaking out there. There you go. So it comes with a cool remote like this. You can change the actual color and make it lighter, make it brighter, etc. All right, so brighter, lighter, brighter. There we go. So that's that. That's like 50 bucks on Amazon. I'll have the entire equipment list below this video. So you guys can watch that and read that. Now I have this also custom made adspend logo emblem. This plugs into the wall right here, right next to my Wall street bull and all my books. And this also adds a really good contrast and background lighting in the video. Background lighting is super key. I've learned from your at home studio or whenever you're filming to give it nice contrast. So I have a yellow one and then I have a sort of more traditional white sign right there. And this looks really good in the camera, which I'll show you in a second. But now we can get into the rest of the studio. So obviously you'll have your desk, you'll have your chair. Let's focus on the actual camera first. Okay, so the camera is a Sony ZV E10. Sony ZV E10. Okay. And again, the equipment list will be below this video. I have a Sigma 16 millimeter lens. All right. Sigma 16 millimeter lens. And then I have an elgato prompter. Let me just zoom out here so it's easier to see. Elgato prompter. Okay, so this is probably the most important thing. These two, these three things, the camera, the lens, and the Elgato prompter. Now the cool part about the Elgato prompter is it also acts as a monitor. So if I go to this, that I show you, I can move my screen right here from my laptop right here, which is pretty sick. So then I zoom out again and I'll just show you. I move it to the right and then there it is. Now I click on this and I move it to the left and there it is. This is really good for zoom calls too. I'm going to put myself right here. So now when I'm on zoom calls, right? When I'm on, when I'm on zoom calls, I can look at my people that I'm talking to, right? I'm closing deals. I can talk to talk to them directly. When I'm Talking to my team. I can talk to them directly. Now, this is obviously streaming from my MacBook. I don't have my camera plugged in. So let's go into the rest of the equipment setup. So those are the three most important things. The camera, the lens, the Elgato prompter. Obviously, you can see why this is so important, because it's just. Just the best prompter that there is. The teleprompter that there is. I also have this dummy battery. It plugs into the camera right here. All right. And then turn the camera on. Camera turns on, and then boom, you have the admin studio. Okay, so if I now go to zoom again and I change the camera, let's go to show video. Let's go to cam link 4K. There you go. This is why the Elgato prompter is the best. Right. So now I have my camera quality coming through. You can see the quality is actually a lot better than what it looked like on my zoom from my MacBook laptop. So that's what the lighting is for. As you can see in the background right here. And over here, the lighting gives it a good contrast. And there's also natural lighting from the back right there. So even if you don't have a window that's like, over here, you can still add these two lights. That'll be really helpful. All right. So that's why I use the Elgato prompter, because obviously, it's just way better quality. That's why I use that camera and I use that lens. So it has a nice open shot, but you can still see me right in the middle. And notice how I'm aligned in the video. Okay. I'm also aligned in the middle. It's facing this way. So I'm in the best shot possible. Notice my head isn't too high above it. Right. Notice my head is in two below it. It's right in the middle. So line up your camera and set up exactly like that. Okay, so now let's get into the rest of the setup. So obviously, I have my MacBook right here. This is the Shure. Shure, I think is what it's called. Microphone. I'll put the equipment list below. I have an XLR cable, male to female cable, that goes through this microphone arm, which I also bought with a bundle of this Elgato Pro. So the Elgato Pro, the Elgato prompter, I should say, comes with two things that I bought from it as well. It comes with this cam link sort of attachment that is basically attaching to this, this USB that connects to the camera. And this is what charges it. Okay. This is what allows it to connect to my MacBook. So that plugs into the cam link. Then the cam link plugs into this Elgato Thunderbolt 3 Pro Dock. Okay, this is well worth it because now I really only need one plug here to connect everything to my camera. So if I remove my MacBook charger, for example, all right, I take that out. Look, I have one plug that's powering everything over here. We haven't even got to that yet. So this one dock allows me to plug everything in. Okay. It allows me to plug in this cable which ultimately connects to my MacBook, which allows me to charge everything with just that one cable and power my camera. The Elgato prompter, the actual microphone set up here. And it's pretty sick. That's why that's worth that. Okay, so then I plug my camera into this document, into this dock, the Elgato dock. And then this also, this, this cable right here is also plugged into here. This plugs into the back of the Elgato. But you can see it basically plugs in right here. Here. Okay. That's what powers it. And then it goes all the way right there. So next is the lighting. As you can see, this is a pretty sick light. Looks really good on camera. I'll show you again what it looks like naturally lit up. You can see from my videos. This is in the description below with all the equipment as well. It comes with this boom arm which I think you got to buy separately. And then you, you got to buy this as well, but they attach together. Looks like this pretty high intense. I have it far up there for, you know, nice downward lighting, as you can see. So that's good to get. Worth it for sure. And it can also change to the yellow color too. So that's that lighting's key. Okay. You need good lighting, obviously you need a good microphone and audio quality as well. So the XLR cable connects over here and plugs into this. Okay, so now this is a Rodecaster Duo. It has or two plugs for microphones. If you want to do like a one to two person podcast as well has at your home studio, you can do that with this. I just use this one for my one microphone. So this connects to the Shure microphone. And then you buy this separately. Obviously you put this all the way here and then this plugs into here. Okay, so if I can find this one. Yeah, so this one plugs into here and this plugs into here and again, this thing powers everything once plugged into my laptop. So that's why this is so powerful. And this is pretty easy to set up and use. You know, this is just the one input right here for my microphone. You can see it's even picking up because my microphone's right here. And then closer I get to my microphone, you can see it talking. And then this is pretty cool because I could just come over here, press the record button right there and then it'll start recording and then everything's plugged in all the way over here. So I'm not a good cable manager, but you can manage cables a lot better than me. But that's where everything is. You might need to get a couple outlets. You can see I'm using two outlets right there and, and then four more actual power spaces right there. So get an external extension cord. You might need that. You probably will because there's like six things plugged in right there. But that's about it. So now that you know the two filming styles, the quick and dirty and the clean and polished, and you know how to set up your own at home studio if you want to. Now I'm going to talk about how to film your ads in 20 to 30 minutes max. Okay, the first part is pre recording. It's very important that you actually rehearse your scripts the night before to really understand what you're going to be saying the next day. Now again, if you're using the elgato prompter like I do, it's very easy for me to film the ads without having to rehearse anything because the script is literally just on the screen right now. And I'm just reading everything word for word right now. I'm not, because I'm not reading everything word for word. This is inscripted. But if I was reading my script, I would just literally do it as I'm doing it right now. I don't need to do anything, any sort of rehearsing because the words are right in front of me. But I give you this tip because if you're someone who's not used to filming videos, okay, you're maybe shy, you're not as good on camera, you're not as well practiced or well rehearsed. One thing you can do is if you know you're going to film ads the next day, just simply go through the scripts, read everything, act it out as if you're already recording it and get in the flow of reading it. So that way when you Go to sleep that night. You, you have the words in the script in your subconscious mind, and you have more confidence when you wake up and when you actually go to film again, it's just like you're acting in a movie, okay? So there's really no difference between you and you pictured in a Hollywood movie. Actors do what they rehearse their script how often, not just the night before, nights before. But of course, we're doing this as quickly as possible. So this shouldn't take you a long time, especially if you have the right equipment like I've showed you, which again, you can click the link in the description and get. And you're going to be able to do it very easily. So just rehearsed the night before. Now, the second part. This is very, very key, okay? And I tell all my clients to do this as well. Do a dry run. Okay? What does a dry run mean? Well, as you saw in the last clip with the equipment list, there's a lot of things that happen in the studio. And so what you want to do is if you just bought all this new equipment, for example, but you've never actually tested it, the worst thing that can happen is you go to film your ads and then you try filming them. You, you think everything's synchronized properly, everything's working properly. You get done filming everything, and guess what? Your audio didn't capture correctly. You had static in the background, your lighting wasn't working, or for whatever reason, your teleprompter wasn't set up correctly with the right settings. All of those things have happened to me before and have happened to my clients before. So I'm telling you this from experience. What you want to do to avoid this happening to you is you want to do what's called a dry run. A dry run is where you basically set up everything to film, okay? So you rehearse the scripts, you set up everything to film. You press record on the camera, you press record on the audio interface, you press record on loom, whatever you're using, and then you act as if you're acting out the script, okay? Then you stop pressing record, you stop recording anything. You watch it back to make sure the audio was good, the video was good, you liked how you looked, you liked how the background looked, and then you can actually see what the footage looked like. Exactly. This is going to make sure everything is working properly and, and avoid you saying, okay, I'm going to film tomorrow, and you go to film tomorrow, and then nothing's working properly. Trust me, I've Been there. It is not a fun time. Then you delay everything from there. The launch time of the ads, for example. Your team's waiting for you and you're just frustrated. So do a dry run and make sure you rehearse the scripts the night before. Again, Teleprompter makes it easy, but I would recommend those anyways. Part two. Okay, Once you're filming, here's a very, very, very, very, very key tip. It's all about your internal state, okay? This takes practice. Once you've had so much practice on camera, you can kind of just flip on the camera, you know, flip up your state, and you're good to go. This is how I am. I'm very experienced. I've been filming videos for over 10 years now, since I was 18 years old. I knew I was gonna be doing this for my life always. So I just got good pretty quickly. I was always used to filming on the camera when I started filming vlogs in college, for example. So I'm naturally able to perform at the click of a button. But. But if you're someone who's again, not used to filming ads or videos consistently, this is what you're going to want to take into consideration. You want to make sure in the morning, the day of your filming, you want to get a workout in, okay, get a workout in. Move your body, ideally, get some sun on your face, as well as make sure you're hydrated. Okay? You want to make sure you're in a good internal state. Next, you want to make sure that before you press record, okay, before you press record, you are visualizing, picturing, and imagining your ideal client, you, your ideal client profile, who exactly that you're talking to through the camera. The reason why is because it's very important that you convey a high level of emotion and empathy so that your audience feels okay, feels that you can help them with the problem they are facing. For that reason, again, it's very important and powerful to imagine yourself talking to an actual person and not your phone as you record these. So when I'm filming my content, when I'm filming my ads, I picture my ideal client. I know exactly who they are and, and I know exactly how they would want to be talked to. And so I'm writing the ads, I'm filming the ads exactly for them, exactly for you. And this is what you want to do as well. Again, you got to remember, these videos, these ads will impact and change lives, okay? And that's the mindset you should have when you film these videos. So you're in a good state. You're picturing your ideal client. Then what do you do? Well, you press record, and you want to film each of the hooks first. So with our clients, obviously, we write a number of different hooks and a body. Okay. It's usually five to ten hooks, one or two bodies, depending on, obviously, what they're doing. And so what we recommend is you want to film the hooks first. Again, I have videos that talk about what the hook is and how it's different from the body and all that stuff. You can watch those on my channel. But you want to film the hooks back to back to back. We usually recommend at least filming 5 to 10 again, depending on who's writing your scripts or if you're working with a team. For example, after you film hook number one. Okay, so for example, this is me. Hey, this is Brian with adspin.com in this video, I'm going to show you how to X, Y, and Z. That's hook number one. I'm going to stop recording. Boom. And that's. That's it. The file's done. That creates hook number one. Okay. Starting and stopping the recording after every take allows you to easily name the files when you're finished filming and ultimately speeds up the editing process. Okay, this is very, very key. So when you film the hooks, you want to film. Film the hook and stop recording. Film hook number two, stop recording. Film hook number three, stop recording. Film hook number four, stop recording. Film hook number five, stop recording. Now you have the hooks done. Then you do the body. You film the body. Once you're done, you stop recording. Okay? So you want to film the hooks first. Knock them out back to back to back to back to back, and then you want to film the body last. The body is going to be the longest piece of the script, so you want to make sure you knock out the hooks first and then the body last. That way you're just not like, you know, flipping back and forth. A pro tip when filming, by the way, that I learned from my former mentor Dean Graziosi, who, in my opinion, was one of the best at filming any ads. Direct response to cold traffic. It's where I learned all of these tips that I'm sharing with you because I worked for him for three years and he sold hundreds of millions of dollars online using paid advertising, is that when you're filming, if you mess up a word or two, don't stop and go back to the beginning of the. Of the script. Simply restart at the beginning of the sentence you messed up so that you can continue the flow and you don't have like a hundred plus takes and your editing team hates you, plus you'll avoid getting frustrated at yourself. I've seen people do this when they're filming. They mess up one word in the entire body and they get frustrated. And so they scroll back to the very beginning and do it all over again. Whereas if they just went back to the beginning of the sentence they messed up on, they could just start right there and then go from there. Right? So if you mess up, for example, like I'm going to do right now, so if you mess up, for example, like I'm going to do right now, you see, I didn't go to the very beginning of that clip. I just started from the very beginning of that sentence. I hope that makes sense. And again, if you have any questions, you can, you know, leave them in the comments. Once you're done filming, you want to make sure you upload everything to Google Drive, and you want to make sure you organize it for your editing team to be easier and and efficient to get the ads done faster. So here's how we do it. We have a Google Drive folder that looks like this, and we have a Raw Files folder or review folder and approved Ads folder. Once the client is done filming, they upload their files to the Raw Files folder. Inside the Raw Files folder, they have different file. They have different file, different folders for their specific hooks and body. So we tell them to create folders for each file. Hook 1, for example, hook hook 2, hook 3, body, et cetera. And guess what? They upload those files to those specific folders to make it very easy for us to organize everything and begin downloading it and piecing it together in the actual editing software. Your editing team will thank you for this. Trust me. Now, once you've uploaded the ads and edited the ads and you're ready to test the ads, you want to make sure you have a tracking system and what we call a creative production pipeline. So a creative production pipeline is simply a system that you can organize all your ads that you're testing and know exactly what's working and making you the most money. So we use ClickUp, you can use Asana, you can use Trello, you can use, you know, Monday.com, whatever project management system you use, you simply want to have a board that has an ideas column, a to be tested column needs review column, currently testing column currently running Failed test stop working. Every single time you launch an ad, you want to make sure you Put it in currently testing. Every single time you obviously are getting an ad that's working, you want to put it in currently running because it's running and it's working. If it stopped working or if it failed, you want to put it in failed test or stopped working. And of course this allows you and your marketing team, whoever's your script writer or whoever's your video editor, to analyze what's working and then guess what, have new ideas to make it work even better. For example, maybe you filmed a ad using the at home studio setup and you're like, this is working really well. Well, you can then on Mondays when you meet with your marketing team, talk about how you can make five new variations of that ad using the quick and dirty. Right, the quick and dirty style. Maybe you do it with a PowerPoint white background and black text to see how it works with the marketplace. Maybe you do it with a loom screen share. Maybe you, you film the exact same ad on your iPhone and maybe you don't even do any real editing so you can take that same winning ad and then create quick and dirty variations of it or take those same quick and dirty winning ads and make new polished, clean and polished variations of them as well. That's why you have a creative production pipeline and you stay organized with your ads and you actually act as an eight figure business that actually does this. Because this is where I learned how to do this for our clients. Because I realized most businesses don't actually do this and they're relying on one YouTube ad for six months, 12 months, two years, and they're wondering why their cost per lead and cost per call keeps rising is because they don't test enough new ads. So that's how you can film your ads. The easiest way to film YouTube ads for business owners with with the equipment and everything else you need. If you enjoyed this video and you want to learn more about what the creative production pipeline looks like and how to take one control ad and create an infinite number of variations of it to always continue lowering your cost per lead, lowering your cost per call, and lowering your cost per acquisition cost, then click this video right here and I'll see you there. Cheers.
More from Brian


CASE STUDY: How Usman scaled to $200k+/month after joining The Ad Men Mastermind