NRA Basic Pistol Lesson 2
Brooke Cheney teaches NRA Basic Pistol Lesson 2, covering cartridge anatomy, ammunition storage, and three types of malfunctions: misfire, hang fire, and squib load. The lesson then covers shooting fundamentals: dominant-eye exercise, stance, grip, and the five essential elements of aiming, breath control, hold control, trigger control, and follow-through.
Chapters
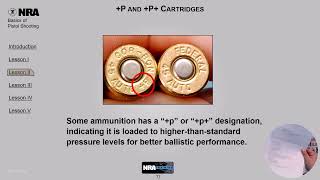
All right, Lesson 2: Ammunition Knowledge and Fundamentals of Pistol Shooting. The Fundamentals of Pistol Shooting: Ammunition Knowledge. All right, learning objectives: identify the different components of a pistol cartridge, explain the firing sequence of a cartridge, explain how to properly identify and store ammunition, state the major types of cartridge malfunctions and how to react to them. Explain the fundamentals of pistol shooting. Cartridge components: bullet, case, powder charge, primer. The bullet is the piece that actually leaves the gun and hits your target. The case is the thing that everything is put together in. Your powder charge and your primer are the chemicals which create the combustion which pushes your bullet down your bore and gets it out of there. And we call them cartridges because there are rifle cartridges and there are shot— whoa, wait a second. Pistol cartridges and rifle cartridges. I try to just say the word ammo because it covers all of it, because a cartridge is rifle and handgun, a shell is shotgun. So if we just stick with ammo, we cover all things that go in firearms. Well, many. All right, difference between rimfire and centerfire cartridges. Rimfire cartridge, the priming compound is contained in the inside of the rim of the case head, where that little— those red areas. This is the part that creates the spark that lights this stuff on fire. Centerfire cartridges, priming compound is contained in a metal cup called a primer in the center of the case head. So size, it's a little bit smaller generally. So rimfire is known for having misfires, which we're going to learn about shortly. Cartridge firing sequence 1: a cartridge is loaded in the chamber and the breech closed. Oh, guess what? We have another test question. If you go to Question number 44, it says the major components of breech-loading pistols include the frame, barrel, and action. Now, to be fair, the answer is not on this, this slide. However, it's the only place here where they talk about breech. So breech just simply means that our ammunition is loaded from the rear of the gun, of the barrel, versus— what's the opposite? Muzzle loading. And we're not dealing with muzzle loading today in this class. So, so question number 44, the answer is true because the frame, barrel, and action are the major components of all pistols that we're talking about today. So the cartridge is loaded in the chamber and the breech closed. The trigger is pulled, causing the firing pin to hit the cartridge primer or cartridge rim in the case of a rimfire cartridge. No matter what it's hitting, it's hitting the primer. The primer explodes with a hot spark that ignites the powder case— in the case. Wow. As the powder burns, it creates a high-pressure gas that begins to push the bullet down the bore. Increasing pressure in the chamber also causes the case to expand outward tightly against the chamber walls, preventing gas leakage to the rear. Here's the thing: when you are shooting a revolver and you then go to empty your revolver, you will totally notice how the case has expanded outward in the chamber, because the revolvers have anywhere from 3 to 10 chambers. And after you've shot your revolver, what has happened is to release the bullet, that top of that shell has to open up. So when you go to put your hand onto the ejector rod, you'll find you'll have to apply a lot of pressure— some— to some in order to get that out. The other thing, if it doesn't fit properly, it will not push the bullet out all the way out. So you must have the correct cartridge for the gun you are firing. Continued combustion of the powder accelerates the bullet through the bore until it leaves the muzzle. The hot, high-velocity gas exiting the muzzle makes a loud bang when it hits the surrounding atmosphere. So all of that hot water, all of that hot air is the noise that it makes. And I was told all sorts of crazy stuff when I started, such as the bullet was breaking the speed of sound, and I believed it because I didn't know. But really, it's just a bunch of hot gas. All right, cartridge designation and identification. The cartridge designation is marked on the pistol somewhere. Like on this one, it's right on the chamber. Some of them have it on the slide instead. Stamped on the head, uh, stamped on the head of the cartridge case, the head stamp. This is true for centerfire cartridges, but it could not be done on rimfire cartridges. And then it is also on the box, the printed on the factory ammunition box. All of these things must match in order for you to have it work in your gun. So more test questions. Pull out your test questions. Oh, that's the answer key. That's not the one I meant to put up there. Anyway, go to question number 30. It says most pistol cartridges can be fired from any handgun, and that would not be true because they must match. Now, to give you an idea, I got that one wrong when I took the test because I'm like, well, If it fits, it will. And so I finished the, the test incorrectly, but that's okay. I still passed. Here we are. Some cartridges have more than one designation, such as 9mm Para, 9mm Luger, and 9x19. And there's also.45 Auto and.45 ACP. And this is why I hate ammunition, because it's so stinking confusing. However, when you start, you will have one gun. And that one gun will take one type of ammunition, which means this and this and this are all going to match. So, uh, I hate ammunition with a passion. It's terribly confusing. Um, it's not a correct number line because 9 is bigger than 22 in the ammunition world, but on my timeline, or, you know, on my number line, that is not the case. If it does not match, it could still go off. I have taken a 9mm bullet and put it in a.45 gun, and the primer was still hit, and it still went bang, but it didn't go very far because without the pressure buildup of the correct size, it will not. I would not suggest you try putting the wrong ammo into the wrong gun, but I am letting you know it can go off. All right, +P and +P+ cartridges. Some ammunition has a +P or +P+ designation indicating it's loaded to higher than standard pressure levels for better ballistic performance. So guess what? There's another test question. So take out your test, go ahead to question number 32. Now this is how they get you. If you look at the question, it says cartridges loaded to lower pressure than standard ammunition are known as +P cartridges. If you look at the slide, it says some ammunition has a +P or +P+ designation indicating it's loaded to what? Oh, higher than standard pressure levels for better ballistic performance. So that would also be false. Ammunition storage. There's not really much to say beyond this slide. However, ammunition should be stored in a cool, dry place. Always keep the ammunition in the original factory box or carton. Store ammunition in a location where children or other unauthorized persons cannot access it. Do not expose ammunition to water, solvents, or petroleum products, or other materials that can cause cartridge deterioration and malfunctions. Wipe fingerprints off cartridges to avoid corrosion due to salty residue. Now, my favorite student ever said, wipe fingerprints off cartridges to avoid getting caught by, for, um, for murder. Cuz you know, normally when you're here in my class, you guys are reading these. The wipe fingerprints off cartridge to avoid corrosion due to salty residue also made me wonder because for the most part we go to the range, we shoot our stuff, and then we go home. So the only time I can think of you'd be wiping fingerprints off your cartridges is if you drop the box and you had to put them away. The other possibility is you conceal carry on a regular basis, so you're always touching your top cartridge as you unload and load your gun for various events. So that's the best that I could come up with. Ooh, we're gonna read and learn about the types of cartridge malfunctions. You have a misfire, a hang fire, and a squib load. Here we go. A misfire is the failure of a cartridge to ignite when the primer or case rim is struck by the firing pin. Causes can be a defect in the cartridge or a defect in the pistol. You need to stop firing immediately and wait 30 seconds, safely open the action, and check the bore for obstructions. So if I am up on target and I pull the trigger and nothing happens, I'm going to wait for 30 seconds because I do not know if this is a hang fire or a misfire. Sorry, I'm jumping ahead because yes, we're going to talk about that. So I'm up on target, I'm going bang, bang, bang, bang, and then I go click. Nothing is happening. That's a misfire. However, I'm just going to take my finger off the trigger, take a nice deep breath, go 1, 2, 3, 4, count to 30, and now I can go ahead, take it down, unload, and see what's going on. Or just, you know, rack the slide and continue on. Then the other option is a hang fire. A hang fire is a perceptible delay in the ignition of a cartridge after the primer or case rim has been struck by the firing pin. This delay may last several seconds. When a cartridge fails to fire immediately, it will not be known if the problem is a misfire or a hang fire. Because a hang fire condition can cause the pistol to fire after substantial delay, the pistol should be kept pointed in a safe direction for at least 30 seconds before the action is opened to remove the cartridge. So here's what's happening. You're up on target, you pull the trigger, it goes click. You're holding, bang. So that is your perceptible delay from you pull the trigger, it wouldn't click versus bang. You have enough time and then it goes bang. So a hang fire is like getting hit by lightning, um, because it doesn't happen that much with commonly produced ammunition. I'm not sure what causes it. I've talked to lots of different people. Very few people have ever had a hang fire, but like everything else in the world, if you think it could happen, you prefer to be safe than sorry. Oh wait, but don't go yet. Um, that is going to be question number 29. If you go to question number 29 on your handy-dandy test That is, uh, here. Question number 29 says a misfire is a perceptible delay in the ignition of a cartridge after the primer has been struck by the firing pin. And what does it say here in front of you on this? It says a hang fire is a perceptible delay. So 29 is indeed false. Ah, squib load reduced Signs of a squib load: reduced noise, reduced muzzle flash, and reduced recoil. So here's what happens with the squib load. You pull, so you're shooting, right? And bang, bang, bang, bang, poof. It literally sounds different. There are some people that can make much better sound effects than I can for that. But what has happened is you have a bullet and and it's stuck somewhere before it leaves the gun. So it left the cartridge, but it didn't leave the gun, so it's stuck. It's an obstruction in your bore. So, huh, for those of you who are well-cultured, remember when Bugs Bunny would put his carrot in the top of Elmer Fudd's shotgun, and Elmer Fudd would pull the trigger and the whole shotgun would fall apart? That's kind of the idea behind a squib load, because the, the barrel here is meant for stuff to pass through it, not to have stuff stuck in it and then have the next one come to a sudden stop. So that's why a squib load could be dangerous. However, as long as you're buying modern-day ammunition, the chances of you getting one are relatively small. If you are like myself and my husband and reload, We had a couple squib loads when he was learning how to reload because it didn't have enough powder in the barrel— or sorry, in the cartridge. Oh, look, in case you forgot, always keep the gun pointed in a safe direction, always keep your finger off the trigger until ready to shoot, and always keep your gun unloaded until ready to use. Now, I know another safe direction people ask me about is the gun pointed at the ground. And let me ask you this: when you have a projectile traveling at thousands of feet per second, do you really want it to land a few feet from your feet? I say no. Other instructors have different opinions, but I just let you know why I say no. Dominant eye exercise. All right, for this, you're gonna make a little tiny, tiny, tiny little hole that you can look through. And then once you've picked something on the wall— I should just stay there because there's ammo. All right, so once you've picked something on the wall, you're gonna have both your eyes open and you're just slowly gonna bring that to your face. And as you do that and bring that to your face, it's gonna go right to your dominant eye. But keep both eyes open and keep that little hole in your hand much smaller than the picture of the lady there. Alright, position. A position is the platform from which all the shooting fundamentals are executed. A position should be comfortable, balanced, relaxed, and properly aligned with the target. Well, as new shooters, we would love to say that you're going to be all of those things, but realistically, you're doing something totally foreign that you've not done before, so the chances of it being comfortable are unlikely. Balanced? Absolutely. We will do our best to make sure that you are as balanced as possible. Relaxed? Well, that's a personal choice. There's only so much I can do for you. We will work on the breathing to help you with your relaxation. And then properly aligned with the target will absolutely work because you're looking at the target, and so it's easy to stand directly in front of it. Elements of a bench rest position. We are not doing the bench rest position. However, if you have an opportunity to go somewhere that has a bench rest, This is a lovely way to sight your gun in. By having your wrists supported by the sandbag, you are taking out a ton of movement from your body when you're trying to shoot. If you can get the pistol here at proper eye level without you having to hunker down, that also makes it much easier. Just like shooting standing, your head is erect, your arms are extended, and your back is straight, and both feet are solidly on the ground. So there are similarities to standing and shooting. We are going to shoot the two-handed isosceles shooting position. Here are your two triangles. First, you go feet to hips, there is one triangle. Then you go shoulders to gun, that is another triangle. And then when you are not done shooting, your, uh, hands come back into your belly button and this actually sort of becomes a third triangle. So the isosceles position is all about triangles everywhere. Oh, we are not going to do this. No, we are not. There is never, ever, ever, ever any reason to stick your hand on the front of a firearm. When there is a firearm in front of you, it is going to be sitting there on a table, and this is going to be open. I can't open an empty one. The first part of picking up a firearm is taking your index finger of your shooting hand and placing it on the frame. Once it's on the frame, you can then wrap the rest of your hands around the grip so that you have a nice solid grip on it before you take it up off the table. Just like this, we've kept your hand behind the trigger guard as well as made sure your trigger finger has a safe home, and that is the first thing that touches the gun so that your trigger finger has a home, versus if you just grab the gun, stuff just goes everywhere. So index finger on the frame, fingers wrap around, pick up the gun. This is actually a one-handed shooting position. Um, we're gonna get into loading, but for right now we're just gonna create the grip. Your right thumb comes up. Your, your thumb can also go on the grip. Your palm wants to fill in all of this space on the grip, and then your fingers are the last ones to wrap around, touching the bottom of the trigger guard here. And that is how we do a grip. The rest of these slides we just kind of go through because they're but we do not want to ever, ever, ever grab the front of a gun. Because here is a full-size gun and this person's hand happens to fit on it, but should you decide to go with anything smaller, it's just a horrible idea to get in the habit of grabbing anywhere in front of the trigger guard. This is the— where the bullet goes. This is the chamber. Basically, you always want to keep your body parts behind that. So we're just not even gonna look at those. Now when you get to the end of the thumb over thumb wrapping support fingers around, all of that is good. So that works out well. Revolver— some people will shoot with revolver thumb over thumb like this. I generally just stick with having the same grip that I use on semi-automatic for revolver. So that's what I go with— thumb over thumb. All right, fundamentals of pistol shooting: aiming, breath control, hold control, trigger control, follow-through. These 5 fundamentals should be formed with every shot. So we're gonna go through each one of them. Oh, and I missed a test question. Go back, go back. When gripping, we want to create that exact same grip every time. So please go to question number 8 and answer A. All right, aiming is the process of achieving the proper relationship between the target, the front sight, and the rear sight. Aiming consists of two components: sight alignment and sight picture. So With any luck, you happen to have the NRA, uh, posters that show you the sight alignment on the sight picture. If not, there are pictures in your book. Sight alignment refers to the proper relationship of the pistol's front and rear sight. So I have very fancy tools here. This is your front sight. This is your rear sight. The way that they, um, I was taught to remember this is equal height, equal light. We wanna make sure the top of my front sight matches the same height as my rear sight. Now the light part is so that we have the same amount of light on both sides. So that's too high, that's too low, that's both, uh, too far one side, too far the other. So we want to move it so it's equal height, equal light. So there we have it. That's how they move. And these are the bumps on the front that we talked about. Your proper sight picture is obtained when aligned sights are put in their proper relationships with the target. So the first thing that happens is you look at the target and then you push the gun out in front of you and you see your sights. Once you see your sights, then you align them so they are proper, and then you decide where on your target they're going to be, and that is your sight picture. Now, sight picture— the 6 o'clock hold means you're underlining the thing that you are looking to shoot. Center hold means that your front sight is covering the thing that you are looking to shoot. Most of us are not doing the kind of precision shooting that whether we're having a gun in our hand that is a 6 o'clock hold or a center hold, um, because generally it's a bit more precise. Bullseye people who are super precise will absolutely know whether their gun is a 6 o'clock hold or a center hold. And it's a personal preference. I like 6 o'clock hold because I like to see what I'm actually shooting at. Whereas with center hold, you're covering the thing, and there are plenty of shooters who like that way. Now, you only get a choice in your sight picture if you happen to have sights on your target that are adjustable, but that is not part of the basic curriculum. All right, here are some errors in sight alignment. As you look at this, you can see that the front sight is off to the left, and that's where the bullet hits are going. Here you can see that's off to the right, and that's where the bullet hits are going. Here we have the equal height equal light, but the entire gun is slightly off to the left, and now everything is just so. So your, uh, your sight alignment, which is your front sight and your rear sight so this and this, is much more important than where you are on the target, right? So one of the things that I'll tell people to do at the range is like, okay, if you're shooting with somebody, you shoot at number 8 and then they shoot at number 8 on the other side. So as long as you have your sight alignment correct, you can create a group because these 3 hits here, this is what we call a group. And when you're shooting, you want to have consistency in your group. Front sight focus. If you will notice, the front sight is clean and crisp where the rear sight is fuzzy and the target is fuzzy. So our eyeballs can only focus on one thing at a time, so we need to focus on the front sight. Which brings me to another test question, question number 5, which is on the front page. On the true/false ones. So if you go and look at question number 5, it says, when aiming a pistol, the eye can only focus on one object at a time. Therefore, you should focus on the rear sight, target, front sight, or bullseye. What did we just say? Oh, what does this say? It says front sight focus. So there you have it. Now you know breath control. Minimizes the body movement produced by breathing, which can impair good shooting. Take a breath before each shot. Let out enough air to be comfortable, then simply stop breathing while firing the shot. Avoid holding the breath too long. This can cause muscle tremors. All right, I'm gonna give you a little hint about the test. There are things that says— that say holding your breath stops muscle tremors or enhances concentration. It does not. All right, so sit up straight in your chair, shoulders back, nice and tall, chin up. Take a breath in. Take a breath out. When you get to the bottom of your breath where there's still some air in there, but you feel relaxed, that's where they're saying simply stop before you fire the shot. To be fair, I do very little breath control while shooting handguns. When or if you get into rifles, it becomes much more important when you're taking a 1,000-round, 1,000-yard shot, or if you are lying down prone and trying to shoot, because then your chest is in contact with the ground and you're moving a lot. So take a breath in, let it out. Feel that pause in between. That's where you're most relaxed. There are other shooting techniques that say bring it in and shoot here while you pause. I don't really like that one. So you do you, you gotta try, but start with something. Guess what? We have yet another test question. All right, question number 38. What does question number 38 say? Oh, what does it say? Tell me, tell me. No. All right. So 38 says your breath should be let out slowly and steadily until the shot is fired. What do you think? The answer is false because it says stop breathing while firing the shot. So again, the first part of it is true and then the second part, not so much. Hold control allows the shooter to maintain proper sight alignment and sight picture while firing the shot. A proper grip is critical to hold control. One goal of hold control is to minimize the arc of movement. So what is hold control? Oh my goodness, it's a little bit of everything. So hold control is having that proper grip. Hold control is making sure that your hands are nice and high on, on the gun, that your palm is covering as much of the grip as possible, your fingers are touching your trigger guard. On the other side, that your, the, your hand is as high up on the back of the gun as possible because you want to be close to where all the energy is. So once you have your hold control, that's one part is the grip, right? The other part is where are we holding this gun? Are we holding it in close to our body? Have— is it fully extended? Where do we want that? So if I was in person, I'd say we do prayer hands. If you put your hands flat together, this is going to be so hard to explain on a little tiny screen. So if you put your hands flat together and extend them at your eye level and your elbows are perfectly straight and you push on your palms really hard, you'll feel the pain and suffering in your elbows with your small finger, your small muscles. If you are out here fully extended, you come back just a tiny bit so that you have a little bend in your elbows, and now you push your palm together, you will engage your chest muscles instead. So I'm gonna have to do a bigger video on that for you guys to be able to show that. So where you hold the gun out from your body is part of hold control. Your stance is also part of that. Your feet roughly shoulder-width apart, knees bent, leaning towards your target. Hold controls, all the things you are currently doing to control the recoil. So that is that, and the idea is you want to minimize your arc of movement. Okay, arc of movement, we need to talk about this. See this lovely picture? This is what people think it's going to look like when they push a gun out in front of them. This is not what it's going to look like when you push a gun out in front of you. If you watch the slide— are you ready? Are you paying attention? Watch it, watch it, it's gonna start moving. See this? This is what it looks like when you have a gun out in front of you. It never holds still. This does not stop. Well, of course it stopped just as I said that, but when you are physically holding the gun, It will always look like that. It won't let me go back to replay it for you. So practice will decrease your arc of movement, but nothing stops it. So again, while you're taking the test, remember that the arc of movement never stops. All right, trigger control is the proper method of activating the trigger to minimize movement that can misalign the sights. Your trigger is between the fingertip and the first joint. So here's my first joint, and here is my— the tip of my finger. I want my trigger to go right here. Can you see that? Right in the middle. If I go too far in, I'm more likely to pull the gun. If I go too far out, I'm more likely to push the gun. So I want to stick my trigger right in the middle. Now, if you have itty-bitty tiny hands, you have to adjust. If you have huge mongo hands, you have to adjust. It's, it's a nice to have. So trigger is squeezed straight rearward in a smooth continuous movement. What I like to teach you is apply pressure, apply pressure, apply pressure until— ready, the next bullet point— the trigger squeeze should produce a surprise break. So imagine— we'll go in reverse— imagine my chicken is a trigger and I'm applying pressure, right? So my chicken here, ready, is going to— if, if he's— if its neck is the trigger, I'm doing this opposite. Remember, I'm applying pressure, I'm applying pressure, applying pressure until it goes bang. I'm not jerking. To make it happen fast. I'm just going to apply pressure, apply pressure, apply pressure, apply pressure until it goes. So what that looks like with your finger is your finger's on the trigger and you're just applying, moving, moving, moving, and just applying a little more, a little more, a little more until it goes bang. And then trigger squeeze and sight alignment are done while maintaining a minimum arc of movement. Remember, you cannot stop the arc of movement. All right, follow-through is the continuation of the application of the fundamentals of shooting through and immediately after firing the shot. To shoot, you have created your grip, you've created your stance, you've lined yourself up with the target, you've placed your gun between you and the target, you've put your finger on the trigger, you've lined up your sights, you've squeezed the trigger, the gun has gone bang. You see your sights back on your target, your finger comes back off, you come back down. Ah, you're finally done. Follow-through is maintaining everything that you did prior to the shot after the shot. I will say I've had some students who start dancing after their first shot, which is lovely once I take the gun out of their hands. However, you do just want to remember that the bang of the gun is not the end of your shot. You want to integrate, maintain, and continue the shooting fundamentals before, during, and after the shot. So— oh wait, so I almost forgot, follow-through is question number 9, and sadly it won't let me go back to that one. So if you go to question number 9 on your test You're going to read it and it is going to say follow-through is important because it integrates, maintains, and continues all shooting fundamentals before, during, and immediately after firing the shot. So B, it helps maintain your grip, is not true because you are maintaining your grip and that's part of, part of your follow-through. And it keeps the gun from recoiling excessively Nope, that's all part of your hold control. And none of the above. No, it is truly A. All right, sorry. So back to the most important shooting fundamentals. The two most important shooting fundamentals are aiming, sight alignment and sight picture, and trigger control. Of those two, my personal preference is aiming is much easier for you to understand because I can physically show it to you. Trigger control is one of those things you will forever be refining to become a really good shooter. NRA rules for safe gun handling: always keep the gun pointed in a safe direction. What direction is that? Oh, that would be parallel to the ground, perpendicular to your backstop. Always keep your finger off the trigger until ready to shoot. And where should it be? It should be— have a home. It should not be floating anywhere. And always keep the gun unloaded until ready to use. As a result of your participation in this lesson, you are now able to identify the different components of a pistol cartridge, explain the firing sequence of a cartridge, explain how to properly identify and store ammunition, identify the 3 major types of cartridge malfunctions. What are they? Misfire, hang fire, and squib. And how to react to them. Explain the fundamentals of pistol shooting. Oops. What are your questions? You'd have to email them to me.