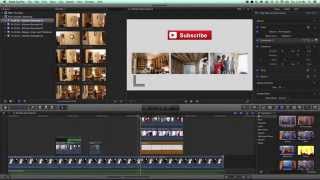
ChatFBP walks through three Final Cut Pro X tricks for YouTube: syncing external audio to DSLR footage with the synchronize clips command, quick color correction via Balance Color, and building end-screen thumbnails by scaling clips down to 30 percent and positioning them with Transform.
Questions this video answers
B
A
Option+Command+B (menu: Modify → Balance Color)
30
Chapters
Three quick tips for editing in Final Cut Pro. Now, just a heads up, I'm by no means the ultimate authority when it comes to Final Cut Pro, but these are some questions that we've had when people have asked us how we are doing certain things with the videos we're doing for Pinch of Yam. So first, we have an audio track down here and our video track up here. So I want to show you how I sync these two tracks in Final Cut Pro. I just highlight, I right click, and then there's an option that says synchronize clips. When I do that, I can rename it and I'm just gonna call this Final Take and Good Audio. There's probably a better name for that, but I will just create that. And it synchronized that clip. And now we have this clip with the good audio. But I wanna show you something here. When I drop that in, it's gonna have on the front end some of the unnecessary audio. So I'm gonna go and I'm gonna press B. That'll switch to blade. And I'm gonna cut that. And then I'm actually going to right click and then say open in timeline. And what that's going to do is that's going to show the two different audio tracks. And if I zoom in here, you can see kind of the ebb and the flow of the audio and we can make sure that it lines up. Sounded weird. Sorry about that. But you can see here that the up and down of the audio, kind of the peaks and valleys match up, which is good. But the one thing we don't want is we don't want the crummy audio that was recording on the dslr. So I'm just going to drop. Drop this down and it will just be the good audio. So let's listen to that. Hello there. We are standing in the kitchen and look at this. We have walls and a floor. We are practically done. All right, so we have the good audio and only the good audio coming through. So that's the first quick tip number two. If I go back here, one of the things that I like to do, and I'm all about really quick editing because if you take way too much time with it, it's going to take forever, is a really quick color adjustment. So I'm going to select the clip and then I'm going to enhance the color. And in order to do that, all that I do is use. I think it's option command B. Let me double check on that. Yeah, there we go. Option command B. And the menu item is under modify and then balance color. And you can see this little orange bar that comes up. Basically what means with that that orange bar means is that it's rendering. So it has to go through and apply those changes. The nice thing about Final Cut Pro is it will be intelligent enough in Final Cut Pro is an intelligent enough to wait until you stop editing in order for that to render out. So if you just want to look and see what that looks like, the before and after, I can do command Z to undo so you can see it's a little bit darker. And then if I apply that again, you can see what it looks like. In this instance, I'm going to actually adjust the color a little bit more just because I don't think we're quite there yet. I might bump up the the exposure a little bit. So I'm going to say show and then I'm going to say correction and then exposure and then I'm going to bump this up a little bit. It's a little bit too much there. If I do the shadows and then maybe this a little bit as well. And that will apply across the board. We were shooting with a really high ISO, so it's going to be a little bit grainy. But if I go back and play it through, we can see what it looks like. Well, hello there. We are standing in the kitchen and look at this. We have walls and a floor. We are practically done. Great. So that feels pretty good. Last one is this. We get a lot of questions about how do we get these little videos on the end of our video. And I'm going to show you here. Basically, it's just little tiny versions of the past videos that we've had. So I'm working on kitchen model or remodel number four. And if I press play here, hey, a couple of things. You can see that there's little video clips that will play. And what we'll do when we import this into YouTube is we'll create little annotations that we put over top of each one of these. So we're not doing that in YouTub, we're doing that in Final Cut Pro. And it's really simple to do that. Basically you just drop a video in. Like I could just show you here with an example. Let's go to this one. And you can see here we have a video. And so what I could do is I could take this and I could drop this in here and I'm going to expand this a little bit closer. And then I'M going to drag the sound down on that and to do that I just grab the sound bar and drag down. And then, and then I'm going to use the blade tool. So I press B and then I'm going to cut it. I'm going to press A on my keyboard to switch back to the selector and then we have this nice little clip and then I can just drop that in over a white background and expand it out as I need to. Now if we were to play it right now, you'd see that we're just in the background, which isn't what we want. So we got to shrink that down. So I'm going to go over to the video area here. I'm going to click on scale, I'm going to say 30, I'm going to hit OK or hit enter. And then you can see we have this little video here. If I press the transform option here, if I press the transform button, I can then take that and move it around wherever I'd want to move it. So in this case I'd move them here and I would use the X and Y position options to get those to line up perfectly. And then basically what you do is you would line that up and then you would make sure that it's only as long as the background. And then I'm going to delete this example and then what happens is that you have these nice little video options that will play and you can put an annotation. A couple things, if you want to see the update along the way, you can check out these videos. You can look. So that's it. Just three quick tips. Some common questions that we've been getting specific to how we are using YouTube and if you have any questions, head on over to the community forum if you are a food blogger pro member and get those answered in the social media area. Until next time, keep creating awesome stuff. Thanks guys. Sam.