Learn to build tall Pinterest pins in Lightroom and Photoshop. Use Lightroom's Print module with a custom 10.2" × 28" template, or start in Photoshop with a 1200×4000 canvas, stack two 1200×1800 photos, add text and a dotted frame, then export as JPEG.
Questions this video answers
10.2 inches × 28 inches
About 720 pixels wide
Each photo is 1200 × 1800 pixels
1200 pixels wide × 4000 pixels high (3600px for images + ~400px spacing)
Chapters
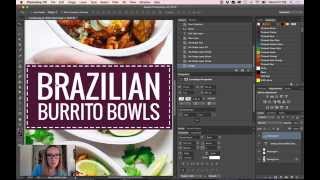
Hey, guys, Today I'm going to show you how to create a long pin image that you could put in your blog post to encourage people to pin your recipes or your stuff, whatever it is that you're doing. So I'm actually in Lightroom to start this up. I'm actually going to show you how to make the long images in Photoshop, but I start that process in Lightroom because that's where I do all my editing these days. So I'm going to grab the two images that I want to put together into the collage, and for me, I just use two images. Obviously, you can make that work for you if you want to use more images than that. And then I switch over into this little thing, which is the print module, and I have a template that I've created for myself that's really easy to create. You could do the same thing within your Lightroom print module if you're also using Lightroom. I just saved it under User Templates as Pinterest with Text title. And this allows me to just grab the images and it will automatically pull up the same template every time. So my settings for this little template are that I have two rows, I have one column, but obviously the two rows. And then I just set the spacing to be. Let's see here. Vertically, it looks like 3.63 inches. I don't really know why I settled on that amount, but that's the amount of spacing that I have there. And then the other important thing to note on my layout settings and everything would be down here where it says print job. I have the custom file dimensions set to 10.2 inches by 28 inches. And that just gives me these dimensions, and it comes out to about 720 pixels wide, which is a good width width for Pinterest. So that's why I set those settings that way. Okay. Anyways, I've got these images here. I'm going to just drag them, position them to the center, and then I'm going to say print to file. And what that's going to do is give me the option to save this as a jpeg. And so I'll just say, yeah, I'll just call it Sample, and we'll just save that to my desktop. And that's going to put a JPEG of this to my desktop, which I can then take and open in Photoshop. You can also do this. Oh, this is one I was practicing. We'll close that out. You can also do that in PicMonkey, I believe. And if you don't have that. I'm just going to show you really quickly what that might look like to do that completely in Photoshop. These are the two photos that I'm using that I grabbed from Lightroom. And what I can do is just go. I'm just going to check the width on these. Okay, these are 1200 wide. So let's buy. Let me check that again. So these are 1200 wide by 1800 high. So I'm going to want them to be. Let's create a new one, and let's go 1200. And then 1800 plus 1800 would be 3600. And let's leave a space in between. Let's say 400 pixels. So that would be about 4000 pixels high. And then I'm going to grab this. I'm just selecting all I did, Command A and Command C for copy, and we'll just plunk that one right on there. And then let's grab this one. Command A, Command C, Command V for paste. And then we have essentially the exact same thing as what we created in Lightroom. Just a tiny bit different in terms of the spacing, but you could get that exactly the same. I'm going to close these out, and I'm actually going to close this one, too, because essentially this will be the same thing as what I'm showing you here. It's just a matter of this one having a transparent background, but we're going to put a box over that anyways. So I'm just going to close that one out. All right, so this is the one we're using. The first thing I'm going to do is add a new layer with this little button down here. And this layer is going to be for the box that I put in the middle. Now, obviously, I'm just showing you the style that I use. You could create this however you want, but I'm just going to grab this little shape tool right here, which is the rectangle tool, and I'm just going to drag a rectangle over this space, and it automatically has purple selected. But I could change that here. I could change that here. I could also just grab the paint bucket. I'm just gonna set that. I could grab the paint bucket and grab one of my colors over here and come in and change that like so. But I like the purple, so I'm gonna go back to that. And then I'm gonna add another layer on top of that, which is gonna be for my text. So let's just go ahead. Let's make this One really easy. I'm just gonna use one font, which will be Oswald Book. That's one of our main fonts. And right away, I can see. I can't see the text when I start typing. So I'm going to make that text white so I can see it. Brazilian burrito. I keep doing that, but burrito bowls. Okay. And then I'm going to make this text bigger to kind of fill it out a little bit more. Let's go 121, 25. Okay. I like that. I like to kind of make things look as. Even as they can. And then what I just did without even thinking about it. But I should tell you, if you have the layer selected that you want to change size on and you want to keep things, the dimensions the same, I just usually hit command T. So you can see that grabbed my text layer. What that means is free transform. So you're basically grabbing the text and you're going to resize it. So if I just drag it up, that's going to be weird and stretch it out. So I'm going to undo that. But I still have it selected. If I hold the shift key, that will allow me to make changes to the text without, like, without changing. Without stretching it weirdly. So I usually press the shift key, and then I grab this corner thing and I just drag it to a place that. Where it looks good. All right, let's do this. And then one thing I'm gonna do just because I'm weird about this and I like to kind of be particular, is I'm gonna grab that bottom row, and I just want to nudge that up a little bit. So I'm gonna come down to this. If you don't see this character panel right here, you can come into your window menu and make sure that character is selected. But once I have this part switch off here. Once I have this selected, like, so if I press the arrow up or the arrow down, that's going to move that row. So if you watch the burrito bowls, it's moving up and then it's moving down. And I usually like to have those pretty close together. So I'm just going to set it like that. And the last thing that we do on ours is we actually add a, like, a little frame around it. And the way we do that is by adding a flower layer. And we again, we're gonna make a shape, but this time I'm not gonna drag it to fill the whole thing. I'm just gonna kind of drag it into the corners and Then I don't want any fill on it. So I'm gonna say no fill there. And then I do want a border. This little symbol means border, and I want the border to be white. Okay. Over here, I'm gonna choose what I want my border to look like, and I want it to have those dotted lines. So I'm gonna select that. And right now it's at zero size for the line, but we needed a little bit bigger than that. So let's go like that. And that looks pretty good. The last thing I'm going to do is I'm just Command plus zooming in so that I can see if this is about where I want it. And then I'm arrowing that over to get it like perfectly in place. Sometimes I find it hard on this particular shape to do a command T. It's just. It gets too tight and it's really hard to do well. So I find it almost easier to just use the measurements in here and go like seven. Let's try like 720. Just go a little bit bigger. Like, if your hands can't handle that, moving the mouse and getting it that specific, this is a good way to do that. So this is the look that we create, and this is how we do it in Photoshop, obviously. Tons of customization options. This is why I like creating these in Photoshop as opposed to PicMonkey or some other software where I found that you can be a little bit limited and what you can do. But here, any fonts, any colors, any kind of layout that you want, Photoshop is like. It's like a blank slate. There's so much you can do. And this is how I create my long pins in Photoshop. The last part of that is exporting or like saving it as a jpeg, because right now it's a Photoshop file. So I'm just gonna go save for web. And then I usually just keep that size the same. And let's go up a little bit on quality just so that doesn't look really terrible when we export. And then I'm gonna save that and we'll just put that on my desktop. And then let's take a look. Here it is. And it looks lovely. That is how I make those long Pinterest images in Photoshop.