A Quick Little Landscape || The Social Easel
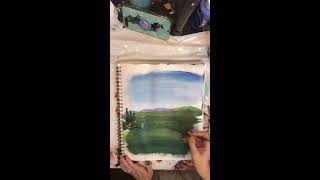
In this live session, Christie Renee Hawkins wraps up the enrollment period for the Social Easel online paint studio, urging viewers to join before the doors close at midnight. She outlines the membership’s core benefits: two full painting tutorials per month, a weekly technique deep‑dive (often featuring guest artists or new mediums), a monthly live Q&A, a private Facebook community, and a brand‑new website that houses a "vault" of all past lessons— likened to a Netflix library. Pricing is presented as a $47 monthly plan (no contract, cancel anytime) or a $470 annual plan (two months free). The platform provides organized supply lists, color charts, and low‑cost material recommendations (e.g., 2‑ounce paint bottles from Walmart). After the enrollment pitch, Christie and an assistant demonstrate a quick, blended acrylic landscape featuring sky, hills, poppies, and subtle color variations, explaining brushwork, layering, and how to create depth. Throughout, she answers live chat questions, welcomes new members, and emphasizes the community’s supportive atmosphere. The session ends with a reminder that the studio will reopen in March 2019 and a preview of the first group painting class for the new cohort.
Chapters
Hello everyone! This is it. This is the final one. So we are getting ready to close the doors to the Social Easel online paint studio, and I am super excited. We have so many new members this go-round.
Sorry, I'm gonna grab a drink really quick. Hey Carol!
So I'm super excited, but I want to make sure this is the last live of the night and then I am chilling. I will have my phone to answer any questions that you guys have. Be sure to go back over the live I did earlier today if you missed that one. You can go to live videos and I give you the whole background side of of what is inside the Social Easel Online Paint Studio. So if you missed that one, go back and watch it. Hey ladies, these are all members right now. So as you guys are hopping on, if you're new, let me know you're new. Tell me where you're from, and we're gonna get started really quick. So I'm gonna do a really quick recap of what the group is, and then I'm going to flip the camera around and show you guys a new little painting. So we did palette knife painting last night, and I've kind of been on a kick with that, and this is going to go back a little bit. So this is going to go back to some blending and some different things that you can learn. So, so real quick, doors close at midnight. The links will be shut off. Everything will be closed on the website.
Hi, Linda.
So I just want to make sure that everyone's questions are answered and there's no confusion. So this is a membership group, and within this membership group you get 2 paintings per month, 2 full painting tutorials from start to finish. You get a week of techniques where I may show you something really in-depth, specific. I may have a special guest. Hey, Kim, welcome to the tribe. I may show you something like watercolor, so maybe a totally different medium. So there's all kinds of things that I can do on the technique week that are just going to enhance your artistic journey. Then we have a live Q&A at the end of every month where you get to ask me anything that you want to. It's a full hour session. You can submit questions prior to the live Q&A. Hey Cassie, welcome to the tribe also. So happy to have you guys all on here. And, or you can join live and ask me questions during the live. So all of that is included in our membership. In addition to our private Facebook group, which is our community, that's our inner tribe. That's what we're always talking about. That's where all the members are. That's where we're talking and hanging out and sharing photos. And it's already— all these new members have already been welcomed in and we're all sharing and commenting and getting to know each other. So, um, we have a ton of fun in there. So if you are looking for other like-minded people like you who love the same things you do and you want to talk about it, um, this is the group to have to do that. So you get all of that, plus we have a brand new website. So when you sign up, you will get an email where you get to create your own login. It will ask you to create a password, so you get to do all that, and then you have access to the website. Which does include— this has probably been my number one question so far— it includes everything we've already done. So all these last months of this, um, paint studio, everything I have already taught is basically like in a vault in your, your own library, and you can access it whenever you want to as long as you are a member, a paying member. It's, uh, I compare it to a Netflix membership. So as long as you're paying for Netflix, you have access to anything Netflix has. As long as you are a paying member to the Social Easel Online Paint Studio, you have access to everything I have created in that group, and it's yours at your disposal whenever you want. So that is everything that is included. The website is very easily organized where you can find exactly what you want. There are supply lists. You will get one in the initial email, tells you exactly what you need, and then there is a color list for each painting, and you have all of that there. So if you know there's a certain painting you want to do, just print that color list off the day before, run to the store, grab your specific colors that you need, and you're ready to go. A lot of these people may be worried about expense. These are 50 cents apiece at Walmart, so you do not have to spend a ton. You don't have to buy big gigantic bottles, which by the way, these are only $2.50. but little 2-ounce bottles are perfect to start with, and you can get a huge variety of colors for a little bit of money. So that's what you're gonna start with. Okay. What else was I gonna say? Okay, cost: $47 a month. So that includes everything. That's a library worth $1,100 in painting tutorials, technique videos, all of that stuff, and then that also includes your new monthly content every single month. So So that's everything that I talked about that you get every single month for $47. So you have that option. You can cancel at any time. There is no commitment. You are not trapped into any kind of contract. So $47 a month, you can cancel at any time. If you do cancel, you can't do it for 2 months, take 2 months off, and jump back in for 2 months. So if you cancel, you would not be able to reenter in until March of 2019 when we open the doors again.
So that's kind of how that works.
The other option is you can do an annual plan if you know you're just gonna love it and you just want to keep painting. You can do an annual plan for $470, and that basically gives you 2 months for free. So you've got 2 options as far as payment. No commitment on the monthly. Obviously, if you do the annual, you're committed for that year, but no commitment on the monthly. You can cancel at any time with that. So I'm gonna flip you guys around. We're gonna do some painting, and I'm gonna pull my iPad up so while I'm painting and I can't see the screen, I can see what you guys are saying on here. So just let me know if you have any questions while we're going along, and I will answer those for you. So you'll have to bear with me for a second. Whenever I film like this, then I have to flip you around and get you the right direction, so it might make you a little dizzy at first.
We'll try to get you the right way here. And I think what I may do, I may even turn this. You guys seem a little crooked there.
Alright, so I said we're gonna do something a little bit different tonight. We are making sure you guys can see everything here.
I always have to take my phone case off when I put it in this little holder.
I'm gonna show you guys a quick and easy landscape. So yesterday I had asked people—
I showed yesterday in a live all the paintings that were included. I had them all set up in my living room for you guys to see what you're getting. And a couple of you wanted to see the Tuscan landscape, so this is just going to be a quick version of that, obviously not the full thing, but I'm just going to basically show you how to do landscape paintings. So I'm going to start with a mixture of blues here on my brush, and I'm just going to start with my sky. And I don't want it too dark, so I'm going to put a little more white in there, especially in the center, because I'm going to add some sun coming in there also. So I'm using my flat brush and I'm just going back and forth, plenty of paint so it glides smoothly. Cynthia, this is the mixed media pad in my online store with all my supplies. So it looks like this, and mine is an 11 by 14. You can get any— there's several different sizes, but I like this size. So this is good to practice on before you jump right onto a canvas if you're nervous, especially if you're just getting started. A lot of the members will practice on this first and then go to their canvas after that. So see how pretty the sky is already? Just a bunch of blues mixed in. You can pick up some white. So there's a lot of blending in landscapes, so— or this style of landscape that I'm teaching you, I should say. So if you like blending, you'll like this style. So now we want to come on and I want to create my ground down here. And I didn't rinse because I'm not too worried about it because I'm using a dark green. It's going to cover it up.
So I'm just going to come and I want there to be a slight hill over here.
So not all your horizons always have to be perfectly smooth— or perfectly straight, I should say, not smooth, straight. So I'm kind of creating a little bit of a hill and then it tapers off. If we wanted to, I may come back here and add— maybe we have one that's just a little bit further away. Let's do like a pale purple back there. So I'm gonna pull this green back over top of it, but I want to create maybe some mountains that are a little further away off into the distance. And then I'm gonna come back over with my green, and I'm picking up a little light To kind of pull that over top because that's where our sun's gonna hit, so there's gonna be a little bit lighter green up here. And then I'm just gonna start kind of streaking this down. I've got like a pretty hunter green color and then a lighter green kind of mixed in. I get a little bit of both. On there. So if you guys are hopping on and you weren't on in the beginning, let me know if you have any questions regarding the paint studio. We close our doors in just about 3 hours, and then they are closed until spring of next year. So we're not opening again until March of 2019. So if you're debating and you're worried about missing out, now's your chance to jump on and get signed up before it's too late. So I want this to be a little brighter in the back because my sun's gonna come hitting down there, so I'm gonna streak a little bit— some yellow in. And then for my forefront, I want it to be darker, and I'm gonna throw some poppies down here too. So I want this to be nice and dark towards the bottom. So you want to have some variation in your grass. You don't want it to be one note, just all one color.
Hey Becky! Hey Lisa!
Okay, so I'm gonna rinse that And I'm gonna pull in— maybe we want to add a little section in the middle here. I'm gonna do a little color mixing here, tone it down just a little. Maybe we just have a little section of maybe some flowers back here. Kind of in the middle. Maybe a little yellow around that. And then I'm gonna grab some of my dark green and add a couple little, like, cypress trees over here. And I want these— some of them at least— to break that horizon line that you see here, because anytime you overlap in your paintings, that creates depth. So just always thinking about that. You want to overlap if you want to create distance. We also created distance by having those mountains faded out back there so that they're further away instead of these ones that are a little closer. So I'm gonna come in front of this and maybe just add some bushes in here in front of the flowers. I covered most of my flowers up. That's okay. We'll add a little yellow on top of that to make those pop out a little bit more. And again, it kind of pushes the, that tree, the trees back there a little bit more. And you can come back and add a second coat if it's a little transparent, if it's a little see-through. And again, I'm just not putting down a ton of pressure while I'm doing it. All right, I'm gonna jump over here with this one since this is clean. I'm gonna grab some white and just the littlest amount of my yellow here, and I want to add just a little bit of this yellow kind of coming in through the sky there. Maybe just a little bit of the sun peeking through. And it's okay, it doesn't have to blend completely. These can be like clouds over top some of your other blue sky. So not everything always has to blend. It's okay to let some brushstrokes show through, have some areas where maybe it's a little more concentrated in yellow, maybe it's a little brighter over here, and then it fades off into the side. Maybe add another little cloud up here, just kind of rough up that edge. We don't want them too thick. Oh, got some dry paint there. Just kind of pull those out. So, isn't that a pretty sky? I love doing clouds in the sky. So then we're gonna jump back down here. I'm gonna add a little bit more dark towards the bottom, maybe a little bit more yellow and some light green here. So see how just those little differences in the colors really start adding to the depth of the painting there?
Thank you. Awesome, Heather. Glad to have you.
So I am gonna jump on over here. Now, I have put way too much paint on my palette for this. I have enough to do like 5 paintings. So you don't need that much paint. That's way too much for what I'm doing.
So I love poppies.
They're one of my favorite flowers. And we're gonna come in and add some poppies down here. But before I do, I'm gonna grab a little bit of that lighter green, and I want to just do a couple of these crazy little lines, real light, not very heavy-handed.
We just want to give the idea of some of these little stems down here. So you guys see how quickly I'm doing that?
I'm barely touching down. Now I'm going to come and grab my red, and I'm just going to kind of push down in these circular shapes down here, and I don't want— here's what I see a lot in class. People— they don't even know they're doing it, I don't think, but they make a pattern. See how that's starting to look like a pattern? And they're all—
none of them are touching.
So you want to have some variation in there. You want to have some small ones mixed in. You want to have them touching a little bit. See how instantly that starts looking like a field of flowers instead of just some big red dots? So don't overthink, just kind of go with it. I always say this, wherever my brush lands, that's where that flower is going to be.
I don't analyze and plan it.
I am just creating and letting the paint and the brush kind of guide me on where those flowers are going to be. I'm going to come in and add some So back here I'm gonna start adding all these little itty-bitty dots so that field is full of flowers. So we want to add all these tiny little dots to that, and again, just barely touching down.
They don't need to be as bright.
It's okay for them to mix in to the green a little bit more. Maybe add a few more in here so it looks like they're behind these ones that we have in the front. So they're all kind of clustered together. These are not a bunch of individual perfect little flowers back here. Maybe there's another little field, another little field of poppies back here. You can just decide where you want to add some color in your painting. I'm gonna pick up a little bit of that mustard yellow that I had, throw some of those down, and then I am pretty thick with my my poppies. I always leave them nice and thick here. And the thing that makes the poppies is the centers. It's my favorite part. I'm getting ready to show you guys that, but before I do, I think I want to add another little section back here. So just have fun with it, just play. You don't always have to have a definite plan in your head of what it's going to look like. With acrylic, it's very forgiving. You can always go back and add some over top of it if you want. I tend to let it dry first if I'm going to do that, because if you try to blend while it's all wet, you just get all these crazy colors. Maybe add a little bit of yellow back here in this field. So just creating these layers in here. Getting a little bit of glare on that. I'll turn it just a little bit so you can see. So then we want to add in the centers of our poppies. And I like these— if you go too small with them, they just kind of look like daisies, so you want to go a little bit bigger. And it doesn't have to be in all of them, but I try to get all my larger ones that are closer to the foreground. Maybe some are turned on their side so you're not getting the whole front view of that one. And then you can also take some of this black. I like to add it to some of my greens too and just make them a little darker.
Richer.
So we talk a little bit about that inside the group too, about shading and highlighting and all that technical stuff that seems maybe harder than something you could picture yourself doing, but it is possible for everyone, and I break it down into simple little steps that I explain to you guys.
So anyone can do this regardless of if you've had no experience before whatsoever.
I'm gonna come back here and add a little yellow back in our field. It's a little brighter back here. Maybe a little bit of red back here too. So you You can just have this little field of different color flowers. It's your little landscape, so it can kind of look like whatever you want it to. Hey, Kay! Hey, Marcia!
So that is it.
That is what I have for you guys tonight.
So very different than palette knife painting. So this is not a, you know, one-trick pony type of thing.
You guys are gonna learn all styles of acrylic painting and all different ways you can do it.
We're going to work with some mixed media, and I'll show you a little bit of watercolor. So there's lots of different things that you can incorporate into your paintings, but I just wanted to show you guys a totally different style, a little sneak peek into another way that you can paint. And just let me know if you have any questions. So best way to get a hold of me from this point until midnight, if you have any questions, just shoot me a message that way I'm sure to get it.
Sometimes things get lost in comments.
I try to go back and catch them all, but if you're really wanting to get in before those doors close and there's something you're not sure about, just shoot me a message and I'll answer it for you.
So I hope everyone has a good night.
Thank you guys for jumping on here with me. I'm so excited to teach our first group painting tomorrow with our new group. We are over 100 members, so I'm so excited and welcome to all of you that have joined. If you haven't joined yet, there's still time. So, um, go back, rewatch this video if you came in late and all the details are going to be there for you. So I will talk to everybody tomorrow. Have a good night. Bye.










