Bless Our Nest - Stencil Tutorial || The Social Easel
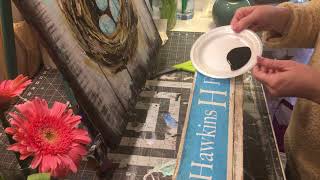
Christie Renee Hawkins shows how to stencil "Bless Our Nest" onto reclaimed pallet wood using black paint and makeup sponges. She uses a gentle pounce technique to avoid bleed-through, then pairs the sign with a matching mason-jar flower holder for farmhouse décor.
Chapters
Hey guys, it's Christie with The Social Easel, and I wanted to shoot you guys a quick little tutorial video today for you to watch during the Super Bowl. Not everyone's going to be glued to the TV except maybe for the commercials, so I thought this would be something fun for you guys to watch instead. So we have one of our new palette sign paintings coming up February 20th. This is Bless Our Nest. And my husband builds all these pallets for you guys, and we start with raw wood. We're going to distress these. I'll teach you how to do these awesome little bird nests and eggs. And the best part is we're going to do our words with a stencil. So I'm going to show you how that works. I'm using another item that I have that is going to kind of correlate with this. So I'm going to zoom out just a little bit. I've got it prepped and ready for what we're doing today, but basically what this is— I'm gonna flip this up for you guys real quick— this is going to be a mason jar holder for these flowers that I've got around here. So basically what we're gonna do, I'm gonna put my, my family name on the front of it, and then when we're all done, I'm gonna show you guys the finished product. Peeling all this off, it's gonna leave these nice crisp letters and just like on our palette sign, and then we'll have a little display for flowers. I love this because you can change it out all season. So if this is something you guys are interested in, make sure you comment below the video, and maybe this will be a fun little craft night that we can do coming up for the spring. Super fun to change out for every season. So I'm going to show you guys that, but the main thing we're focused on today is this awesome little stencil that is gonna leave our words behind. So I will be making these obviously for the palette sign that we're working on, so everyone will get one. No hand lettering required. It's just gonna basically stick on here like a sticker, and then we'll peel it off and it's gonna leave our words behind. So I am going to prop the camera right up here. Give me just a second. We'll get you guys situated so you can see what I am working on. I think that's pretty good. So I'm gonna jump back over here and show you the materials that we're gonna use to get started and how this is gonna work exactly. So the first thing we're gonna do, we want to kind of get a pretty good idea of where we want this on here. This comes with grid paper on the back. This is the part that you're gonna peel off, and we're just going to get a little edge on here. And sometimes if you need to, you can grab— we'll have these tools for you guys the night of the event. So you just grab a little edge there and you start peeling. So you can see that we're peeling the backing off. We're leaving the lettering and the sticker behind. Now if for some reason any of these started to come up and some of that blue was showing up on here, you would just push it back down and then peel it off again. So that's trash. We'll flip this over. This is the sticky side and we're just gonna kind of eyeball and position where we want this. Just a tip for when you're doing your words too, on anything when you're looking at words or placement of stuff, instead of having it exactly centered from top to bottom, it's a good idea to always leave a little bit of extra space down at the bottom. Visually that just helps our eyes, it kind of tricks us, it makes it look more centered. If we actually center it exact, it almost has a look like it's a little lower than what it needs to be. So we're just gonna smooth that on. We'll have these little tools for you guys that night. These are super handy. These are just little scrapers you can get at Walmart or Bed Bath Beyond, wherever you want. So all I'm doing right now is just going back and forth to kind of rub that sticker to make sure it's nice. Nicely stuck on there, and then I'm gonna start peeling back. So now I want my blue layer to stick behind, and I'm peeling this top coat off. So when you're doing this, the closer to— see how I'm kind of just pulling it back kind of flush with it? A little easier for you to pull off and less chance of any of your letters kind of pulling up with your sticker. As you go, if you need to, you can just simply smooth it back down and then go back to pulling again. So anywhere where it's not sticking quite as much as you want to, just go back over with your tool. And this is something we'll be utilizing, you know, going forward. This doesn't work on canvas. So that's another reason I like doing the projects on the pallet boards, the paintings on the pallet boards. It allows us a little more freedom if we want to add the words. That's something that I can create and make these stencils for you guys to use the night of the event, and it makes it super simple. So we'll probably be having like a mason jar painting with some flowers coming out of it that we do on a wood pallet later this spring. That we will be able to do that with, and then we can add our words inside the mason jar. So next thing we're going to do, I've just got a little bit of black paint here. These are makeup sponges that I just cut in half because you don't really need to waste the whole one. Just saves you on materials. So I'm just going to get a little bit of paint on there. You don't want this super saturated to where when you push down it just, it loses the black paint out. I kind of tap mine off just a little bit before I do it, and then what we want to do is a couple light coats, and that way it doesn't seep under our edges of our letters. So all you're doing is just kind of pouncing these on, and again, I'm not pushing down super hard. These are just light little pounces with the black, and if you have a little more on there than what you need to, you can just kind of dab it off on your blue. Try not to get my sleeve in my paint here. So as you guys are watching this, if some ideas are popping in your head or something you want to do for spring, let me know. Comment below. You guys can always give me ideas. I, of course, have some coming up that I'm working on over the next couple weeks, and then we'll be posting our March dates. But we have a lot of fun stuff still going on in February. So if you haven't looked already, if you're new to Facebook or new to The Social Easel, be sure to go to our calendar of events. You can go on my website at thesocialeasel.com, or if you're here on Facebook there should be a tab that just says upcoming events that you can go to, and it's gonna show you everything that we have coming up there. The links are provided inside each event, so you can click on those links. It will take you to the registration page where you can sign up for your classes. So all of our registration is done online just to keep it simple and organized, and you can do that there. So I'm just going back with a second coat. And when you're doing the one on here, you can decide how dark you want it. Obviously, this is going for more of the rustic farmhouse style, is kind of what I have going on throughout my house. So most of what I do for you guys when it comes to this kind of style, it's usually designed to go in my home, and then I share it with you guys because I think you might like it too. So, um, this is just a couple pieces I kind of coordinate together. So this is hanging in my kitchen. This is on my kitchen table inside of a tray made out of this rough wood also that we can paint any color that we want. So I set this little mason jar holder inside that, and then I'll be sticking these jars of flowers inside. And it's just a nice little centerpiece that you can put on any table or a bookshelf. You can really use them anywhere. And these pallet signs, you don't always have to hang them on the wall too. If you have built-ins, bookcases, they look awesome just leaned up against the back of that. So I am going to start peeling this off, kind of show you how this works. So I am doing this quicker just because we're doing a video right now, just to show you. When you are doing this the night of the paint night. We would probably take a little bit more time in between our steps. I'm just kind of running it up here. If you do it while it's wet, of course, you're probably going to end up with a little bit of paint on you. So you can see a little bit on these edges where we've had a little bit of the lettering coming through. This happens to be rougher wood than what we use at the paint nights, so that is part of why that's happening. I'm going to show you how easy this is to touch up too. So I've got a nice little skinny brush here, and I'm just going to grab a little bit of my white paint. So you can see, I'm going to kind of hold that up You've still got some nice-looking letters on there. Like I said, this is, you know, of course since I'm doing a video for you guys, it's gonna be a little rougher than what I would want it to be, but this kind of shows you the basics of how these stickers work. Just gonna peel those off there. So let's say, you know, this happened on yours. You can see up here kind of hold this for the video. It's much more crisp on the boards that we'll be using at the paint night. This is actual old white picket fence that my, my husband reclaimed for me. So all we have to do, if you want, is you can just go in and lightly touch up those edges. Now depending on the style that you're going for, I don't want anything too perfect looking. You know, I don't want it seeping out quite this much, but I also don't want it completely crisp, especially on something like this. I want it to be a little bit rougher. So you kind of get the general idea of how we're going to go in and fix those, those little edges that may have messed up for us. And then you can also go back and we'll have a little sandpaper, you can sand it back out if you want to. So this is generally how that will work. We'll pull out all these extra little pieces and then I'm gonna throw this together real quick just so you guys can see the finished product. Let me fix this little, little black line that I messed up. So the other thing I want you to realize is not everything has to be perfect and neat the first time you do it. Not— it doesn't always work out that way. Sometimes the accidents turn into little beautiful messes and kind of give you something that you want. Sometimes it just takes a little bit of touching up. So I've got to pull out the inside of this A real quick. And then I'm going to show you what it looks like with the flowers inside. So you can use mason jars, you can use glasses that you may have up in your cabinets, just some extra glasses that you're not using, stuff that you have around the house. So that is a quick version of our finished flowers just to kind of give you an idea of what that looks like all finished. Like I said, I'll have a few touch-ups that I want to do, but it gives you a general idea of how our stencils are going to work for us. So we do still have— I think we have about 12 or 14 spots left for this one. So if this is something that you guys are wanting to do, you want to add to your spring decor, or maybe just permanent in your house— mine will stay up year-round— that's something that we'll, we'll have a couple extra spots for on February 20th. So be sure to go to the calendar events when you're at the end of this and comment below any feedback, any questions, and if you're interested in making the little mason jar plant holder also. So just a couple new ideas coming up for the SocialEasel. Enjoy and have a fun evening watching the Super Bowl and the commercials. Have a good night. Bye.










