DIY Halloween Trio Wooden Blocks | Easy Painted Decor Tutorial
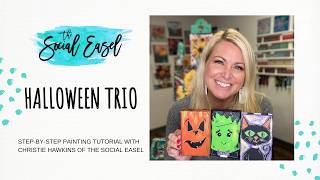
In this hour‑long YouTube tutorial, Christie Renee Hawkins walks viewers through creating a set of three small wooden panels painted with Halloween motifs—a pumpkin, a Frankenstein‑style monster, and a black cat. She begins by explaining her inspiration (tiny wood panels found at Michaels, inspired by a trio of decorative cubes at TJ Maxx) and demonstrates how she sketches thumbnail compositions in a mixed‑media pad to plan colors and layout. Hawkins then prepares the wood by applying a thin coat of gesso to prevent paint absorption, followed by base coats of acrylic paint using DecoArt colors (Warm Sunset orange, Sour Apple green, Purple Iris, etc.). She shares beginner‑friendly techniques such as loading the brush with ample paint, dry‑brushing burnt umber for an antiqued edge, and glazing with diluted paint for smoother coverage. Detailed elements—eyes, whiskers, freckles, stripes—are added with a variety of paint pens and markers (Posca, Sharpie, Arteza, Art Owl, Faber‑Castell) and a thin brush for fine lines. Metallic highlights are achieved with DecoArt 24‑karat gold glaze and brush‑on glitter (Craft Twinkles). Hawkins advises on drying times, using a hair dryer, and sealing the finished pieces with spray or brush‑on sealers. Throughout, she promotes her VIP “Tribe” community, explains how members of all skill levels can join, and encourages viewers to adapt the designs for broader fall décor. The video blends practical step‑by‑step instruction, product recommendations, troubleshooting tips, and community building.
Chapters
So today we are going to do something a little bit different. We are going to do a Halloween craft. I'm going to walk you through what we're going to do today. I'm going to take myself off and go full screen for you. Try to keep these to 20 minutes. We will go a little bit longer today because I kind of just want to walk through you with the choices that I made for the project that I'm getting ready to work on. You'll see I have a mixed media pad underneath here, and then I just went to Michaels. By the way, they're having a huge sale right now, so if you have a Michaels nearby or if you can order online to place an order, I would recommend doing that. Everything is on sale except for these guys, but these little, um, wood I don't even know, I guess panels is what you would call them. Um, they were only like, they were less than $2 a piece. I was looking to see if there was a size on here so I could tell you, but they're very little. I mean, you can see compared to the size of my hand. But what I was looking for was something small to do this little Halloween craft on. I saw these cubes at TJ Maxx the other day. Um, okay, can you guys see this? Try to get it out of the glare. But I was in TJ Maxx the other day and see this cute little square trio here, and I was like, they're so cute, I could make my own little version of those. So I'm doing something a little bit different. I don't have cubes, I found these little wood panels instead. So that is kind of like my inspiration. And then you can see here I've started sketching on my mixed media pad. And so this is what I recommend to anyone when you're coming up with ideas for compositions. Right now our Tribe Sisters are in the middle of a challenge that we do inside of our group where they are combining a previous several. They can choose however many they want to, but they are choosing previous fall paintings that we've done in the past years, and they are, they're making what we call a mashup. So they're taking ideas from several different paintings and combining them into one. So part of them doing that and coming up with their own composition is sketching in a mixed media pad. And so all I did was just— and this is very messy, this is just for you to play with— but all I do when I'm doing thumbnails is what these are called. If I'm doing a square canvas, I just draw draw a bunch of little squares on here. If I'm doing rectangles, obviously I do rectangles. And then inside each one of those, I'm just kind of sketching out my ideas. And then you will see underneath that sometimes I'll put notes on. So like, I know like these different colors are going to be like the base. Thinking about it and I'm like, well, maybe I'll want some like polka dots behind here. I'll come in and I just kind of make those notes, or maybe I'll like add in some little scribbles. These are just ideas. This is where you're coming up with what you want to do. Um, so I just thought I would show you a little bit of my process, and you could take it a step further. Sometimes I even go in if I'm not sure on my colors, I go in with either watercolor or marker and color in just to have a better feel for what I'm doing. And for those of you asking about Tribe and what it means to be a Tribe sister, those are members of my VIP membership, and we only open doors to the public a few times of the year. So this is just gesso that I'm putting on here right now. I don't use this when I'm prepping canvases because they're pre-gessoed. Most of the panels and canvases that you buy at the store store have already been gessoed, so there's no need for you to do it again. However, when we're painting on wood, wood can absorb the paint, so this helps create a barrier between the wood and your paint so you're not having to use as much paint. So that is the first thing I'm going to do. We're just going to coat all of these little rectangles in gesso. And I plan on using these as like little shelf sitters mixed in with my Halloween decor. And we're just going to use some craft acrylic paint today, um, some paint markers. I pulled over my gold and my glitter paint just in case I feel like adding some of that on. I as well. So just let me know in the comments if you have any questions. Let me know if you're a Halloween fan. I know it's not everyone's thing, so I would encourage you, if you are not a Halloween lover and you don't want to do the designs that I'm doing today, I encourage you to come up with some other cute fall designs that you can still use this tutorial that we're doing today to add some fun things into your fall decor. You could do some sunflowers or pumpkins and fall colors. There's so many ideas, but it's fun to paint on different things, not always just canvas. I'm always looking for fun little things to paint. I also got, the other day I ordered some wooden bookmarks. So I thought maybe in a couple weeks we'll do some little bookmarks on a Facebook Live as well. And we have questions all the time about NTRIBE, do you have to have any experience experience before coming a member, and you do not at all. We have a mix of lots of different types of ladies in there. I went years without painting in between high school and college and having kids and all the things, and then finally came back to it. And then we have women who, before maybe even doing a Facebook Live or something like this with me, who have never painted before are now a part of Tribe and learning to paint, even selling their work after they've posted it on their Facebook page. Some are doing paint parties and some are just doing it for the joy of painting and the fun and the camaraderie that we have inside of the group, getting to paint with a group of ladies every single month, seeing what everyone's working on in the group. So it's a lot of fun, and I teach live, um, a couple times a month in the group, and that's where all of our Tribe Sisters can share their work in progress with the fellow ladies. Okay, I'm gonna try to lift these up off my newsprint so they don't stick to it. So we've got those gessoed. I'm just going to lift my camera and scoot it on this piece of paper so it quits pulling. I'm just continually moving these around just to make sure they don't stick. So let's go back to my ideas here. So I only bought 3. I planned on doing a trio, and, um, just in general with like design and when you're setting things up, odd numbers always look better. Um, so, but here's my problem: I can't decide which ones I want to do. So I for sure want to do a pumpkin, I know that. Sure want to do Frankenstein because I just think he's so cute, and I love the bright green. I love Halloween colors, um, the purple, the green, the orange. All together, they're just fun festive colors. And then I was trying to decide between a cute little ghost to do on this one, um, which obviously would be white. But we have this little, um, Halloween cat at home. It's a bowl that I got from Hobby Lobby years ago, and it holds our candy corn. And Sophie, my 12-year-old, absolutely loves this cat. So I was thinking about painting a little black cat instead. Of the ghost. But I was thinking the purple and the black would still look great with the green and the orange. Those are all the Halloween colors, um, that I love. So I don't know, we'll see, we'll see what I decide. I think Sophie would be pretty excited if I did the cat. She just loves it when I do the cute little stuff like this. Okay, I'm gonna set this aside. And then you could decide how you want to do this part. Um, I am probably not going to sketch anything on ahead of time for my pumpkin or my Frankenstein because those are just going to be solid blocks of color. But for the cat this is still a little wet, which I don't care, I'll just drag my, um, pencil through it. I thought about just like how that was on my sketch, so I'm going to start with like an oval, like a sideways oval, because this is going to be like a funny, silly little cat. We're not trying to be realistic here. With some big old ears, and I think I'm going to give him a skinny little neck here. Hmm, maybe I don't want that much of him to show, or I could do— oh yeah, let's do this instead of his little hands will be down there anyways. We could have his little tail sticking up over here, or maybe have it curl. So anything that I'm doing on there, all that, like, that's just pencil, but I'm not really worried about it. I'm just kind of sketching my idea out. Um, obviously I'm dragging that through the wet paint. You can tell I like to get messy. A little curled tail off to the side. So I'm thinking something like that. That's my idea. What if I did— I could do a cute little We could do a cute little witch hat off to the side, almost like a little party hat. We'll see, we'll see what I get through today. This may have to be a two-part session. The color that I use is called Warm Sunset. It's a really good orange. It's one of DecoArt's newer colors. Okay, so I'm just rinsing that orange out of my brush. Green is called Sour Apple. It is a great, just bright green from DecoArt. See, just like that. Um, sometimes I just squirt it right on there. It's just easier than adding it to a palette first. So I'm just using a round brush here. If you are newer to painting, you want to make sure that you get plenty of paint on your brush. A lot of times people will see me, you know, do brushstrokes and they're like, why doesn't mine ever look like that? And when I used to teach in person, you know, obviously I could go around and see what was going on. Most of the time it was because people did not have enough paint on their brush. So don't be afraid of your paint. Load it up. And then you can get these nice smooth lines like I'm doing. So when I'm doing that, I have plenty of paint in my brush. That oval— see, running out of brush there, or paint there. And you get a nice smooth line. Same thing down here. Ooh, guess what I just thought of to do on the side of this? If you've been with me a while, I bet you can guess. We'll see if anyone comes up with it before I tell you. Winner, winner, winner, you guys guessed it. We're going to do stripes. So I love black and white. I love Mackenzie-Childs. So yes, I'm thinking I'm going to do some black and white stripes along this edge. How cute. Will that be to decorate our edges? I mean, you could even do that on the other ones. I kind of like my silly little cat. Okay, this guy's still dry. Okay, so while those are drying, he is about dry. Actually, let me do this. So One of the things I wanted to do on this one, instead of just doing bright orange, I want it to look a little antique. So I'm just going a little dot of burnt umber, and I'm gonna grab a dry brush. I'll just grab this filbert. It really doesn't matter what shape it is. And I'm going to kind of go along these edges. Now I'm going to work quickly here. Even going to water that down just a little bit. So I'm watering down my brown acrylic paint. Okay, I'm going to go along the edges, but I'm doing this quickly because I don't want it to set just like that. I want to get it on, and then I want to take either— this is just a paper towel, but you could also use a baby wipe— kind of do some antiquing around our edges here. I think I scraped a little off with my paper towel in the middle. And I still do have brown in my brush. I'm not worried about that mixing in with the orange. It'll just add to that little antique look there. Piece of paper towel. You can also use your finger if you like to get messy like me. Let's do a little around the edge too. I need a little bit more of my orange. So is this sparking some ideas for you guys? Something you could do with some cute little wood blocks? Look how easy that is just to give that little bit of an antique look. This would be really cute, especially if for those of you that are doing like only a fall version instead of Halloween. And you don't need to be careful about this either. No one's going to be coming and looking on your shelf and critiquing your antiquing of your little board. All right, so I kind of like the way this is finishing up. Add a little bit more orange here. And don't forget, anything that you're doing, whether it's a craft or a mixed media pad or on a painting, if you don't like something that you do, let it dry and you can paint right over it and it'll be just fine. For this one, I'm not sure what I want to do. I'm kind of thinking about black antiquing on the side. I'm going to leave that for now. So I'm grabbing purple. This is Purple Iris. And I'm going to use my skinny liner. So purple is a really transparent color, so I'm going to grab a little bit of white with my purple initially for this background to show up. I don't want it pale, but we're just adding just enough white to it. It makes it a little bit more opaque and less transparent. It's like a little heart here. So again, making sure you have enough paint on your brush, you can make these brushstrokes. And most likely with purple, you are gonna have to come back for a second coat, so Keep that in mind. And what I don't want you to do— everyone listening— what I don't want you to do when you're doing this is continue to put coats of paint on while it's still wet. That is not going to benefit you in any way whatsoever. All it's going to do is make your paint thick and gloppy. So go around with one coat. Tell your brain to ignore all the lines and streaks that you see. Okay, we're not worried about that. We're going to come back to it later. If you try to just keep loading paint on here, you're just going to be moving wet paint around and it's going to frustrate you. It's not going to help you have better coverage. So the great thing about that too is If you accidentally pull any of your black into the purple, it's not really going to matter because this is just our base coat. Sour Apple was the green color, yes. And I may or may not put that hat back on there, the little witch's hat, but for now it's going to be much easier to paint this all solid purple, and then if I want to do that, I can come back and add it. So I'm just getting a good base coat on there, making sure I don't see any white little specks coming through where the paint's not covering. The brown is just burnt umber. Any brown is fine. It doesn't need to be a certain brown. Just getting a touch of white to add to that again. Okay, so I'm gonna let that purple dry. Before adding anything else to it. I think these are going to be super cute next to each other. Don't you love these colors together? Show you, this is the sunflower painting, the impasto sunflower painting I just did inside of my tribe. I went back and played with it a little bit more and edited it. I'll be sharing more of those photos too. So this was done with modeling paste and gel medium, but on something this small like this, I could kind of lean it against the wall and it could be like a shelf sitter. But I'll be hanging this one, and we're just going to make some little zigzaggies. Up here. Yeah, I guess I didn't really need to paint that green over top of that, did I? I think I'm going to carry this around the side. And if you want to protect these and so they don't get scuffed up, you can put a sealant on when you're all the way done. There are several different options for that. You can use a spray sealer, you can use a brush-on sealer. So there's lots of things you can do to seal these to protect them when you're done. So I'm literally just scooping up a bunch of paint so I can spread it on here faster. I can already picture him. I'm still going to leave that one for now. I think I want to go ahead, kind of draw my eyes on here, maybe give them little eyebrows. And this is still wet, so it's scratching through the paint a little bit. I don't think you guys can see that. I got these little wood blocks at Michaels. So now there's two options you could do here. You could use black paint and fill this in, but I have another tip for you. We'll do one like this. You can also do a paint pen. Let me make sure I have some good prime ones. Matte or shiny finish, what do you prefer? Do you want these to be shiny or do you want them to be matte? So those are— it's all preference. There's no right or wrong on that. So anywhere this is dry, I can go ahead and do this. How much faster is that? The other thing I thought would be really cute, if you like mixed media and you have scrapbook paper, to do a base on the front of this. So, um, this was one I started on, um, on our last Facebook Live. That's— this is a mixed media piece with scrapbook paper. Under the painting. That would be really cute under— on these wood blocks as well. I forgot I had that wet there from touching that up. I'm going to leave that little section right now. We're going to leave him for just a moment. He's not done yet, but we're going to take a break with him. We'll leave him for the time being. He's not done yet, but he's getting closer. I use a lot of different brands. Um, I'm always trying new ones too and looking for different affordable options for you guys. Posca is definitely one of my favorite. I also have Arteza, and then I have a bunch of like waterproof, um, black pens as well. So I think we're gonna do similar here. Actually, you know what, so this is, um, this is a PC5M, so this is a little bit thicker. My skinny one that I wanted to use is dried up. I gotta order another one of those. So my other— let's see, let's see if this one's working. This is a Sharpie brand paint pen, so this works fine too. I wanted something skinnier to do his little scar across his forehead. So remember how I talked about we're going to use chalk in that fall workshop? I'm just going to kind of sketch out with chalk kind of an idea where my placement's going to be so I can visualize it a little bit better. I know you can't see this very well, but I can see it just enough for my marks. Now for these skinny lines, you could also just use a waterproof black pen. That's not wanting to work. Y'all, I'm gonna have to order some new paint pens. Okay, hopefully this one will work. This is the Faber-Castell soft brush pen. This is waterproof, much better, so you can get those dainty little lines. So back to the question about paint pens. I don't think there's just one. I think when— if you're going to have your own little space where you're creating art —and do— I would recommend getting a variety of different paint pens because just like for this project, depending on what you're working on, you may want bigger, bolder brush strokes with a thicker paint pen, or you may want skinnier. Let's make his eyes a little bigger. He's just a cute little bashful Frankenstein. Time. Okay, now I get to show you something else that's fun, and we are adding these to my store. They're not in there yet, but we are adding them. So again, I'm always looking for new fun things to use in my art. This is recommended for nail art, and I thought, well, why wouldn't I want to use it in regular art too? For little dots and designs. So we're going to give them some little freckles, and I can just tap the end of that in my paint, and now I have perfect little dots for his freckles. And then I'll be able to do the same thing once those eyes are dry, a little white dot on the inside side of his eye. And then I added, um, to the bottom of mine— we could leave him like this, but I kind of pictured him with like a little suit on and maybe a bow tie, so I was just gonna draw that on here. Let's just carry that over to our sides. Maybe paint like the inside of that bottom part white. I'm going to go ahead and use paint for this outer section. All right, so we're just at an hour, so I've already added extra time to this one today. I'm kind of anxious to see these little things come to life here. Now obviously this bottom part really doesn't matter. I'm still going to go ahead and paint it black just to have it done. I just think he is so cute. All right, you guys want to see my little kitty cat finished here? Let's dry that off. I'm gonna grab some white. Oops. That's okay. That's going to be coat number 1, and it pulled some black into it, so now it's kind of gray, but that's okay because it's just coat number 1. I'm just mixing my white and purple together a little bit over here on my, um, palette to get a little bit lighter color. So did you guys know— I'll give you a little color lesson here as well. The reason these colors go so well together is because they are spaced equally apart from each other on the color wheel, so they are naturally pleasing to our eye because of that. I do think I am going to take a little bit of black. I'm just going to use my finger. And just kind of add in a little bit of— that looks cute. I kind of like the rough look of that. I don't want them to be so clean and perfect. Don't you kind of like it scuffed up? I do. I think it gives it a little bit more character. This kind of looks like a sideburn, and I'm probably still going to come back and add some white Posca pen and maybe even gold, possibly some glitter to these guys. So on this— did I show you guys this? On this little cat that I— I wish I had a picture of the one that we have at home that my candy bowl is, but I'm gonna do these lime green eyes and similar color. I think I am going to do orange for the nose and the ears. So for the eyes, I'm going to paint those on. And I'm white first to give me a little bit of a separation between the black and my color. It's going to help the green show up better. I'm going to do the same thing where I'm putting orange. That little base of white first— looks like a little burglar now— helps with your color showing up better. You can see— okay, let's get this in just a little. Look like little glow-in-the-dark eyes. And here's the thing, if you mess up kind of like I did there on that eye, it's not a big deal. So try to practice not being so hard on yourself or expecting it to be perfect, but if you do little oopses like that, you can come back and easily fix them. This is just water. On my brush, I can get up some of the excess there. And then I can just come back with black, or even a black paint pen if you wanted. And I'll probably be adding a second coat of green to that as well, so I'm going to let that dry and move on to my ears. I'm going to use a paint pen for the little smile and the whiskers. What do you guys think so far? Let's go in with some of our purple for a second coat while we're letting that dry a little bit. So you can see how much that second coat makes a difference. So you go from like streak to smooth. And that is the benefit of you waiting and not trying to rush it by glopping two heavy coats of wet paint on top of each other. You want to let your paint dry in between coats. I'm not going to worry too much about my edges here because I know I can just come back with a black paint pen and tighten anything up. My biggest concern right now is just getting that second coat of purple. On here. So I keep a hair dryer at my workstation, both at home and here at the studio. I use a blow dryer quite a bit, especially because I tend to be a little impatient and don't want things to take as long as they do to dry. But when you're working on— it depends on what I'm working on. If you're working on several different pieces like this, it's easy to just let it dry on its own and come back to it. All right, let's do a quick look at our little buddies here. We're almost done. I'm gonna put a second coat of white on here. If you liked this, be sure to hit the share button. Share it with your friends so they can come and do a fun craft with us. Okay, so now we're, we're down to the finishing touches. I do think I'm gonna test this. I'm gonna do a quick blow dry on these two guys so I can do some paint pen work on them. Nice and easy. This is my first cat face I have done like this. I actually quite love him. He's so cute. Let's do a quick little outline around these eyes, a little, little bit of definition. It's going to show up there. We add some little lines inside. So this is, um, just an Arteza gel pen instead of a paint pen. Great for little accent marks. And then let's see, I don't know if I have a skinny enough orange. This and all of this is in my Amazon store, by the way. Um, I'm gonna throw this banner up really quick. If you text the word Amazon to that number on the screen, it will give you a link to like some of my favorite art supplies. I could have used that white one. Um, this is— the brand is Art Owl, but I love them because they're super skinny, so they're great for this detailing. Oh, I love that, that little accent mark. Look how bright that orange is on the nose. I don't know if that's showing up on camera. Paint pens are just so fun. You can do so much with them so quickly. I think he's looking pretty cute. So the other color I just, uh, grabbed is like a pink. I might throw a little pink in here too. Give her a little collar. Cute little accent marks inside his little bow tie here. Got my white primed here. Go a little bit heavier on our white there, maybe a couple little accent marks here. A lot of times I like to do the accent marks outside of the actual shape too. Kind of gives a little bit of movement. And you could do polka dots or whatever you wanted to in the background of the cat. Too, if you wanted. All right, let's do some quick little detail work on this guy. Again, I try to be fast with my movements so it doesn't look too overworked or too Perfect. It looks better when it's not. We don't want this to look like some computer made it. We want it to look handmade. Um, the name of these skinny paint pens is, um, Art Owl is the brand of them. Maybe we'll add a little bit of white to this guy. Makes them stand out just a little bit more. The other thing I thought about doing with him— we'll see if I like this or not— I thought about adding— I think I might do a couple little lines. Yeah, I think I like that. What do you think? He looks a little more finished now. Okay, last but not least is do we want to add any gold or glitter? And then I'm gonna have to jump off here. I got a little carried away, but it was fun. Um, I think I might do a tiny bit of gold. Sometimes I like to use the gold as almost like a glaze. So this is Extreme Sheen 24-karat gold by DecoArt. And I'm almost kind of like— a little dry piece there— dry brushing that on just in the orange. I'm gonna even water that down just a little. That's gonna look really cute sitting on the shelf. Now you get an extreme shine like that on the camera, that's just from the ring light shining right on it, so it won't be quite that shiny. So again, I've watered that gold paint down pretty decently so that it's acting like more of a glaze than really thick paint. Of course, all this is optional. I'm going to be adding glitter to this as well. I can already tell that I want to. Where are my glitter fans at? Glitter or no glitter? It's always a debate. Like, I want a little bit more pink there. It kind of faded. All right, so I'm just going to use the Craft Twinkles. This is brush-on glitter again from DecoArt. I want to do a little glitter in the background too on the cat. I love glitter over top of purple. Oh, almost dropped it. You can see the glitter and the gold. Hopefully it's a little bit more noticeable the drier it gets. We're just going to do a little bit inside the black on the pumpkin. That way, if you're doing like a collection like this, you want to somewhat tie them together. They should have some similarities between all of them. So that they coordinate. Those just turned out way cuter than I even thought they would. What do you guys think? The only thing I have left to do is add the black and white stripes on the side of my cat. So I'm using the large flat out of my 15-piece brush set. This is my custom brush set that you can get in the store. So I threw up the link to our store. That's also where you'll find um, our new products— aprons, sweatshirts. But this is the perfect width, I feel like, for stripes. And of course I'm just eyeballing because we don't want it to be perfect, right? That's going to be so cute. And then after that dries, I think I'll put some glitter on it too. Running out of my black paint and I'm being stingy. I don't want to put more on there. All right, so that kind of shows you— I'm not going to finish that here— shows you what the sides of that are going to look like. Um, the glitter, I always get clear. It's usually called crystal. This is Craft Twinkles. Any— you don't need this brand, you don't have to get this kind. Any brush-on glitter that comes in a paint tube like this works great. Hope you guys had fun with that. Make sure you share with your friends. And, um, come and join us. Bye!










