Do I use Gel Medium or Modeling Paste? Answering all your questions today!
Christie Renee Hawkins compares gel medium and modeling paste for mixed-media art. Gel medium thickens paint and stays transparent; modeling paste builds 3D texture in white and needs 24 hours to dry. Mix gel into paste to prevent cracking.
Chapters
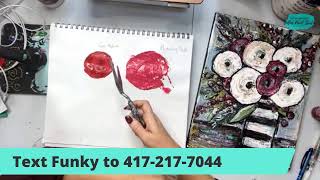
Hello everyone, it's Christie Renee Hawkins with The Social Easel, and today I am going to share with you the difference between using gel medium and modeling paste. So I'm going to give you guys a second to jump on here. Sent out our text alert to let you guys know we are live. As you are hopping on, let me know that you can see and hear everything okay, so I know that we're good to go before I go any further. Alright, are we live? You guys are good. Sometimes when the numbers don't go up quickly, it makes me nervous that we're, that we're not really live, but we have sound today. So no glitches like we had yesterday. So today we are going to discuss the difference between modeling paste and gel medium. This is a question that I get all the time, and we're gonna discuss the differences between the two mediums and why you use one over the other. For me, it's not an either or. I use both of them in my art, but I'm gonna explain to you the difference between the two and why you would want to use one with your paint versus without, and so on and so on. Okay, so you guys are good to go. Okay, so the first thing I want to talk about is gel medium. So this is something that you are going to use to add to your craft paint or acrylic paint, whichever one that you're using, and this is going to give it a thicker texture. So it's going to make it stand up a little bit more. I'm gonna— I'm trying to see if I have a different painting in here I can pull over for you. I don't see one off the top of my head, but you can kind of get the texture that you see in the Funky Winter Flowers. But I'm going to show you how to do this, and we're going to do it with palette knife so you can see how I make palette knife flowers as well. So you're going to add gel medium. Now I am choosing matte because my finish is usually matte. If you're using craft paint, you can choose different finishes. So you can choose whether you want it matte or gloss. It dries clear, so you can add gel medium to your paint without changing the color of the paint that you're using. It is transparent. So again, it's not adding anything to it, and it's going to make the colors a little bit more vibrant. So when you add it to your paints, it's going to make them more vibrant. And it's also going to extend your paint. So let's say you have just a little bit of paint left on your plate, and maybe it's a color that you mixed, and you're like, shoot, I don't want to mix another batch of it because it's not going to turn out the same. You can add gel medium to that, and it will extend your paint, meaning it will go further. And it's also going to make it stay wetter longer. So if you've worked with acrylics much, you know that they dry pretty fast. By adding gel medium to your paint, it is going to extend how long it stays wet, in addition to just extending the paint itself. What else? You can make glazes with gel medium. And this is— if you guys have seen me do any mixed media, you can use this as an adhesive in your mixed media art. So you can use gel medium to stick napkins, paper, cloth, anything you can think of. You can use it like a glue on your, on your surface. So that is gel medium. Now I'm going to talk about both, and then I'm going to show you both. Okay. Does anyone have any questions about gel medium before I move on? To modeling paste. The modeling paste is really, really fun. I've just recently started really playing around with it and loving all the different things that I can do with it. So I'm going to share some of those techniques with you. I'm going to grab one more painting just to show you another texture that I've made with it. So hopefully this is really informative for you guys and will help you make a decision when you're making your own art, which one you want to use. Okay, so I don't see any questions popping up for that, so we're going to keep on moving along. Let's talk talk about modeling paste. So modeling paste is very high viscosity. So what that means is it really— like, when you think of it like a really thick frosting, so it's gonna give you those peaks and that ability to literally stand up on your canvas and create that 3D effect. This is what I used in the Funky Winter Flowers to get this texture. So again, if you look at this painting, up close, you can see, especially from the side there, all that texture. That was all created with modeling paste. If you are interested in painting this, you can just— I'm going to throw this banner up really quick. You can text the word funky to my text alerts and it will send you the link to sign up for this. It's only $10 to sign up and it starts next week. On November 3rd. So, um, for the modeling paste, this is the difference. When I talked about when you add gel medium to your paint, the color of the paint stays the same, right? I told you it was transparent. It dries clear. Um, with modeling paste, it dries white. So think of this in your head like a really thick, thick, thick white paint that is going to dry with texture that can be painted over top of. So, for instance, when I did this, I took a palette knife and I— before I had any color on here, just a blank canvas— and I took modeling paste and scraped it all on there. So I'm just going to show you an example. Let's— and this is what it looks like. Now I got this from Amazon. The link is in my Amazon store. Allison has that posted in the comments. Diana says, does the gel medium work to protect a painting that is put outside? It's not meant for protection. So if you are putting something outside, I would recommend getting a sealer. I am going to be doing a Facebook Live over sealers and the difference between them. You can do spray sealers, brush-on sealers, types of different things. So we'll talk about that in another Facebook Live. But that is not what gel medium is actually meant for. Think of it more of like a glue. So yes, Pat, you can mix paint with modeling paste, and that's what I'm going to show you. So in the Funky Winter Flowers, I am just putting the modeling paste— this is a mixed media pad that I'm using, by the way. And I know you can't really see. Let's just kind of spread this around here. And it's creating— I'm going to hold this up so you guys can see it. It's creating that texture. I'm just going around in a circular motion, depending on how thick you want it. So see how like this doesn't move? It is super, super thick. You can make really high, high peaks and texture. With modeling paste. So I'm going to lift this up so you can see. So you see, see that texture that that creates. Now this is going to dry white. So when you're using modeling paste as a texture for your paintings, you're actually going to want to apply it to your surface first, and then you're going to let it dry. For 24 hours before adding paint to it. If you just— if you don't want the paint to mix with your modeling paste, because again, it's white. So think of it as the same as adding white to your paint. If you don't want your paint to change colors, you're going to let this dry completely. And now I'm going to show you the difference between letting it dry completely and adding paint to it and not letting it dry. And adding paint to it. And if I miss some of the questions, I'll go back to them. So this is a canvas that I prepped last night. I am going to be painting a new, um, Santa on here for my tribe group, and, um, I want it to have texture on the background before I paint it. So I just did some heavy scrapes of the modeling paste all over it. It's kind of hard to tell when it's white, but I think you can see that texture. So I did this last night and let it dry because I knew I was going to paint it today. Let me switch this. I'm going to switch this to this banner because all the products I'm talking about are in my Amazon store. And if you text Amazon to that phone number, you'll get a link to my Amazon store where you're going to find everything I'm talking about. Okay, so I'm going to grab a little burnt umber and a little black. I always like to add a little bit of black to my burnt umber. It's never dark enough for me straight out of the bottle. They recommend 24 hours drying time for modeling paste. Um, someone was asking, can you blow dry to speed it up? Yes, you can. Sometimes, um, you will experience some cracking with that if you dry it too fast. But another trick you can do— remember how I talked about the gel medium being an extender, meaning it makes your paint stay wetter longer. If you add gel medium to modeling paste, it will decrease the chances of that cracking happening. Um, so Karen, you don't need to comment the word Amazon. You have to text it to that phone number in order to get that link. Um, Shawn, I'm going to show your question real quick. I've seen sculpting medium to add To paint, will that do in a pinch? So you can actually use modeling paste and you can sculpt it as well. So if I left this to dry and tomorrow I wanted to go back with something and sculpt into this and dig some lines in there, I would be able to do that. So you can sculpt into modeling paste as well. Okay, so let's go to this one. Just gonna lay this over top of here and again This has been dry— I say 24 hours, it's really not been 24 hours because I did it last night, so it's probably been about 15 hours. So I'm just going to get some of my brown-black mixture here, and you can see this texture show up. From that modeling paste that I have put behind there. So you can see where it's more of like a dry brush over here where I didn't have a ton. You can see it pick up the grooves of that modeling paste. So what I'm going to do in this particular painting, not here today, but like when I teach this, I'm going to put this dark coat on here first. That's going to grab all these grooves of the modeling paste, and then I'm going to use a palette knife in a different, contrasting color over top of it, to where you're going to see some of this dark showing through and then some of the light showing through, and it's all going to have that texture. Of the modeling paste. So can you guys see that okay and kind of see the texture that that creates? Here's another example I want to show you. This is one I taught last week in my tribe. I love this little guy. This cool texture that you see on here, this was done with modeling paste. So you don't have to just scrape it on with a palette knife. When I did this, I applied it with a palette knife. You can apply it with whatever you want to. Palette knife is easiest. And then I took a brush, and I kind of stamped all over it to give it this rough texture. And then the different colors that we put on top of it grabbed all of that texture. To give you this cool crackled look, and I just think it's super fun. So it's just adding a different element to your painting. So that's what happens when you add paint to modeling paste when it is dry. So let's say I wanted to add color to this. I'm going to put this directly on here. This is just a red paint, and again, remember, modeling paste dries white. Gel medium dries clear. So that is one big difference between the two. Let me go back to comments here. So I'm just going to squirt a little red in here and let's see what happens. Now you can do it this way. Again, if you don't care if your color changes and you want pink, then you've got pink. So it doesn't leave I'm just gonna scrape all that up. See how it has a pinkish kind of rosy color tint to it now? Actually, you know what, I can zoom this in today because I'm not doing a front view of me. Get you a little bit closer to this so you can see how it changed the color. It's no longer bright red. It's kind of a rosy pinky color, but it's still gonna give you that cool texture, right? Okay, so I'm gonna set that down. This is modeling paste. So let's see what happens when we just do gel medium. I'm gonna wipe this off and apparently get it all over my fingers. No, Susan is asking, would thick body paint do the same thing? It does not do the same thing. It's still thick, but you can't build that. You can't build that texture with thick paint. What am I doing? Okay. Now I'm going to put this on my palette. And yes, this is a messy palette that I reuse all the time. Alright, so this is just craft paint, right? See how drippy and droopy that is. But see the difference in color? Really dark red, kind of a rosy color. Michelle, if you came in late, I am discussing the differences between the two, so you will know when to use one over the other. So go back to the beginning where I explain all about gel medium and why you would use that versus modeling paste. We'll do like a recap at the end. So look, already it's making it thicker, right? But it's red, not pink. Gel medium dries clear. Modeling paste dries white. And you can also tell, yes, it made this thicker and I can add more to it, but it's not nearly as thick as the modeling paste is. Okay, so that's the difference. This is gel medium, modeling paste. You see the difference between the colors. So that's difference number one. And then hopefully you can see the difference between the texture as well. Look how much thicker that modeling paste is. So let's say you want to use modeling paste because you really love the thickness of it, but you don't want it to change the color. That's why you would do your canvas and let it dry for a day. And that's what I did in The Funky Winter Flowers. So I added all this texture on here and just left it to dry. And then when I came back the next day, I added all my colors on and everything else to give it that fun texture in the painting. Um, let's see, was there anything else I wanted to share with you about that? I think that is the main difference between the two. So I'm just going to kind of go over the two again. This is gel medium. You can get this in any brand. This is the one I have in my Amazon store. That doesn't mean this is the one you have to use. Just look for gel medium. Um, that is different than a matte medium, or like, there are different things. Make sure it says gel medium on your container. Container. There are different brands. You can do DecoArt, you can do Liquitex, Artist Loft from Michaels. They all have it. And then this is the modeling paste. Same with this, doesn't matter what brand it is. Modeling paste, gel medium, they're going to be the same on every brand. Okay, so gel medium, it's going to be— it's going to make your paint thicker. So this was me taking a regular craft paint adding gel medium to it, and it's giving it a thicker texture. It dries clear, meaning it is not going to change the color of the paint that you are using. Okay, it's going to stay exactly the same. Modeling paste is also going to make it thicker, but it gives you an ability to build. So this is going to be a lot thicker, higher viscosity than the gel medium. And it's going to have more of a 3D effect off of your painting surface. However, modeling paste dries white, so when you add it to wet paint, it's going to change the color of your paint. If you don't want it to change the color of your paint, you add the texture to your surface, you let it dry for 24 hours, and then you come back and add the color to it. So another benefit of the gel medium is if you are running low on a certain paint color, you can add gel medium to it. It's going to extend it. It's going to leave it wetter for longer, and it's going to make more because it dries clear. You're just making more of that same color. You can also use this to make glazes. So if I took a little bit and mixed it with a color and then brushed it over, it would, it would form as a glaze because it's transparent, right? So you're just adding a little bit of color to it. So it's mostly clear, and then you're scraping over a glaze with it. And you can also use this as a glue in mixed media pieces. So that's kind of your roundup on gel medium. Modeling paste dries white. It's going to leave more texture to to your canvases, so it will change the color of your paint when you add it. When it's dry, this is how you're going to add texture to your paintings. So I showed this example earlier. I added the gel medium on— or, I'm sorry, not gel medium. I added the modeling paste on here, and then I used a brush and stamped it while it was wet to create this texture. In this one, I scraped it with palette knife to create this texture on here, and then I've let this dry overnight so that I can paint this today, and that texture is going to stand up on my canvas. So those are the main differences between the two. Um, hopefully that explained it all to you. This is a question I get all the time. Um, so, um, that should be a good description for you, and hopefully it explains the difference. Again, I use both of them. But it depends on what you're using them for and what project you're using them for. So I'm gonna go answer some questions that I see here. Debbie said, did I only use modeling paste on the flowers or the whole canvas? So for this one, this is our upcoming workshop that starts November 3rd, goes through November 5th. I teach live in a Facebook group for 3 days where I'm gonna break this painting down for you. For this particular painting, I use modeling paste to create the texture of the flowers. And the berries, but I also used it on the background as well. So I used it everywhere. I did not use gel medium on this piece. I only used modeling paste on that, and it's only $10 to sign up. But you do only have a week left to get it at that price. If you wait past next Wednesday, you will not be able to sign up for $10 because the class will already be live. Alright, looks like I answered Sherry's question. Yes, Bonnie said, so I could really make a little red pop on a painting with the paste. Yeah, if you want a certain part of your painting to stand out and have more focus than another part, that's a good way to use that and add that texture. To your painting. Pat is asking, how much paste do we need for the Funky Winter Flowers? Not very much at all. So I have this gigantic container that I've had for a long time. I mean, I don't have an exact amount. Like, it's probably, I don't know, 3 tablespoons worth. So you just need a container of modeling paste. Thank you, Shirley. Okay, I think I answered all the questions. Do you guys have any more questions for me before we jump off here today? Tomorrow, let me show you some some ideas that I have because we're gonna go live each day this week. This is something— I have literally so much stuff piled on this table, y'all. A million things. I mean, that's not surprising, I'm always like that, but it's a little excessive right now. So this is just a fun project that I thought I would do with you guys, um, either tomorrow or the next This is just little chalk hanging chalkboard things I got at Hobby Lobby. I actually bought them for the girls' first day of school and put their, um, you know, what year of school they were in. They had to hold them in front of the house like they love to do. But I have extras because they came in a 6-pack, super cheap. Um, you get a— it's a 5 or 6-pack at Hobby Lobby. Um, but this is just chalk. I just drew this on here, just kind of sketching ideas. But I thought I'd make a fun little Christmas with you guys this week. So let me know if that sounds good and you want to learn how to do that. That's one of my ideas for this week. And then I've got two different little— I love painting on different things, so I don't always just paint on canvas or mixed media pad. I've got— this is just a little I think it's a 5 by 5. I think both of these are— this is a little wood panel. This is a little burlap canvas. So these are 2 other options that I may paint something fun and Christmasy with you guys on too. And when we paint on the burlap, we're gonna use modeling paste because it's going to prevent that soaking through of the paint. So when we add our modeling paste on here, it's going to create that nice thick texture. Therefore, the paint is not going to soak through the burlap. And then I got this new stencil. You guys know I love the black and white check and all that good stuff. Look at this new stencil from DecoArt that I thought would be cute on here. I may paint this over white. This was me testing a color to paint my cabinets in the living room. Um, and then paint something fun on top of that. So that is what is coming later this week. Um, let me see. Thank you, Judy. What size canvas? If you're talking about doing the challenge— I call it a challenge workshop, whatever you want to call it— this is an 11 by 14. I'm going to zoom out so you guys can see that a little bit more. This is an 11 by 14. I've done the other funky flowers on 16 by 20s and 18 by 18, so you can do them on whatever you want to. I'm still debating what I'm actually going to do it on next week. I kind of would like a bigger version of this, but 16 by 20s and 11 by 14s are, um, the same ratio, so the format of it is going to look the same. So you can choose whatever size you want to. You guys like the Christmas sign idea? Um, Linda's asking, do we need to prep before the class? No. So if you have not done a workshop with me before, I really like you guys to not do anything ahead of time. I want you to just come in, um, just soak up everything that we're doing in there. And my actual preference for for you is to watch the videos first and then go back and paint after when you're watching the replay, because you're able to better absorb all of the information that I'm giving you. You're not going to feel rushed. You're not going to try to be keeping up with me and missing vital information that I'm giving you. So, um, you actually don't have to prep anything ahead of time. We're just gonna do it all on day 1 together, along with some devotionals each day to kind of help you move forward and learn to trust the process with painting, and not let that fear stop you from trying something new. So yeah, you guys like the burlap too. The burlap is fun. I love the look of it. Okay. Sounds good. I'm gonna jump off with you guys. If you do have more questions, you can leave them in the comments, and myself or my team will come back and make sure those are answered. Um, if you want to sign up for the Funky Winter Flowers, again, it's only $10 to sign up. Just text the word funky to that phone number. When you text that phone number, it'll also put you on my text list, so you get live alerts every time that I do go live on the Social Easel Facebook page as well. And it will send you the direct link so you can sign up and join us for that challenge. And I highly encourage you to join, even if you're unsure. Um, and even if maybe you don't like these colors and you want to make them your own crazy Christmas colors, then do it. You don't have to do what I did. But for $10, you're going to get so much value. You're going to love being a part of this community in this group and learning all the step-by-steps on how to do this. And you can create your own composition with the techniques that I'm teaching you. So I would love for you to join. If you are scared of a palette knife, don't be. I'm gonna show you on day 1 how to use palette knives, how I use them. You saw a little bit here today. But listen, if you just literally don't want to use a palette knife, but you still want to paint this painting with this, you absolutely can. I'll show you how to do it with brushes. It's not going to look identical because a palette knife just looks different. But you can still make a beautiful painting with paintbrushes and not use a palette knife. If you are a Tribe Sister, it is included with your membership. You do not need to sign up separately. All the information is in the Tribe Sister Facebook group in the announcements. Patricia said, where did I get the burlap canvas? I got those a long time ago on clearance somewhere, but I have seen them at Hobby Lobby. So I know you can get burlap canvases at Hobby Lobby, and I'm sure you can on Amazon too. I haven't even looked yet. Patty said, I agree with watching the process first. I get a bit frustrated when I try to keep up. And listen, most people do, so that is completely normal. Um, and that's why I honestly prefer you guys not even try. Like, you're gonna enjoy the process so so much better if you just watch and hang out with me, take the tips that I'm learning. Here's what I would recommend you doing. If like on day 1, day 2, whatever, get yourself a mixed media pad or scrap paper. If you don't want to buy a mixed media pad, whatever you have, um, to paint on, you can practice while I'm talking and just kind of play around and doodle and practice, but don't actually try to like do all the steps that I'm doing while I'm teaching, because it'll be much more relaxing for you to go back and watch the replay and do that. Um, and I know from doing this so many times and from so many women's feedback, that is their favorite way to learn. Um, Mari, funny that you said that. She said, I think a nativity scene on burlap would be so appropriate. That is actually going to be something that I do for my Tribe Sister group in December. Pauline said, do you prefer plastic or metal palette knife? I prefer metal, but you get whatever works for you. If you're— if you don't want to buy a set, by the way, this is a set of 5 that's in my Amazon store. It is not very much money, but if you prefer to just spend like $1 on a plastic palette knife, it will definitely work for the painting as well. Sherry said, yes, I scribbled along with your first session, much less stressful. I agree. Pauline says, yes, practice, practice, even for me. So that's all I got for you today, you guys. Um, have fun, um, playing around. I hope that helped you. Um, all the links are in the comments, or you can text the phone number on the screen if you want more information about the flowers. So I will see y'all again tomorrow, and I'll send out a text alert when we go live. Bye.










