Easy Tulip Painting Tutorial for Beginners | Acrylic Step-by-Step
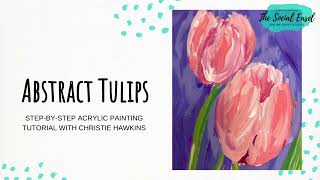
Christie Renee Hawkins paints loose acrylic tulips in 30 minutes, mixing Berry Cobbler and periwinkle to layer wet-on-wet and dry-on-dry. She shows how to build depth with varied brush pressure, fix thick stems, and let happy accidents guide the work.
Chapters
Today we're going to do a tulip. I'm going to start with a pencil and just do a quick sketch, and, and then we'll get started. So this is going to be a very loose interpretive tulip. This is not going to be super realistic or anything like that. So I think I showed you guys this last week, but I just— these are all my photos, all just different pictures of tulips I've taken from my yard. So I'm going to use one of these as an idea to go off of. So I always like to have just light pencil at my art station. I'm working in a mixed media pad today, and I'm just going to do a quick kind of loose sketch of a stem or two. Let's do And then you can choose whether you want to add some, some leaves to your tulips, but they're going to have kind of like a U shape on the bottom. This one's going to come down quite a bit more. So I kind of like to start with just two U's, and then they've got the thicker petals on this one. This is the main petal in the front. On my other one, it's kind of to the side, so I'm going to have it split this way. Oh, I wish these tulips were from this year. They are actually from last year. I feel like maybe it's just early. Maybe I was just hopeful they would be already blooming. All the greenery has come up, but the actual tulips have not budded yet. So I'm going to start with just a basic round brush here.
I'm going to grab some white.
Is Hauser Light Green. You guys want to get notifications when I go live. Be sure to sign up for our text alerts. I think I'm going to grab some of this Berry Cobbler, which is kind of like a burgundy, and maybe a little bit of purple to kind of do some of our background colors today. So I'm going to show you really quick. This is my kind of reference photo, but I don't want to make like a grayish brown background like that, so I'm going to add in some more vibrant colors with some purples and blues back there. We are using acrylic paint today, so I'm just going to get a little bit of water on my brush. So I'm going to start with a little bit of this berry and add just a touch of white to it. Don't need to be super, super dark. I'm going to lay in some of those dark colors first. So I like to use a round and let my bristles kind of make the top, but we're kind of doing very loose abstract type of tulips today. So I'm going to lay some darker in first, and then we'll come back and add the lighter colors. So I'm just adding just a touch of that periwinkle blue to that. So I'm not putting a lot of pressure down. The more pressure you put down, the thicker your brushstroke is going to be. Okay, so just keep that in mind if you're newer to painting and you haven't kind of gotten the gist of that yet. The more you practice, the better you're going to get. I don't do anything the same every time I paint. Every painting is different. I don't have an exact method in which I teach because I do lots of different types of styles. So now I'm coming in with my kind of mid color. I've got my darker one I laid down first, then kind of our mid-tone, and then our lighter. And then of course I can even go lighter by adding white to that too.
I want this to be our focal point here. I'm just doing quick brush strokes. This is going to be real loose.
So I want to be careful not to overblend. If you do, that's okay. You'll be able to come back and change it up. So I'm going to come in with that periwinkle color because I think that's going to be really pretty in the background.
Maybe add a little purple to that for some contrast.
So again, this is going to be very loose, interpretive tulip that we're doing. I really like those colors together, so I'm just kind of mushing everything around in the background here. I'm not too worried about what that's going to look like.
Let's take a little bit of white over here. And I'm even okay with letting a little bit of white show around the edges.
If you made your stems too thick, here's where you can go back and fix it. Once Something is dry on your canvas, you can easily go back and change it. So I wasn't quite happy with the thickness of that stem, so I can just go back with my background color and go right over top of it.
I'm kind of loving the way these look already. I might do a couple more.
Right, sometimes like loose and pretty. It's not always about the detail or making it super realistic.
And the tulips have these big leaves. I'm going to need to get a little bit darker green over here. I think I'm gonna grab— we'll see if I like this one.
This one's eucalyptus leaf, so I'm just mixing a little bit of that. It's kind of like a bluish green.
Let's lay in a couple brushstrokes here. Let me switch to a smaller liner.
And Sherry's asking how much pressure I'm putting on the brush. I don't ever put a ton, like I'm never like pushing down with my brush. You're just doing quick pushes. Your bristles should not be doing this. So you notice I kind of left this alone for a little bit, let it dry, and then I can come back and add some more color to it.
I haven't done any of my really light— let's make a really light pink. So the lighter is towards the top here. I'm gonna go a little darker in the center, maybe even mix these two.
Um, Lisa was asking, is there a reason I don't fill in the background then paint over top? It just depends on the style of painting I'm doing. A lot of times I like to do the subject matter first and then come back and fill in the background around it. So for this style that I'm doing today, I'd mentioned earlier, it's more like abstract. But sometimes what I'll do is, like, if you look at a reference photo, I kind of like blur my eyes when I'm looking at it. So it kind of breaks it down. You can also use some apps to, um, do that for you, but it's kind of a fun way to break things down, get the colors and the contrast.
And you know, it's a tulip without it looking like a photograph of a tulip. I'm going to get a bigger brush here, fill in some more background around it. So let me know what you guys think of this style, if you like this style, if you prefer more photorealism.
I like to paint loose and messy. We may throw in a couple more leaves.
I'm not sure yet. I'm really just loving these colors together.
You can hear my dogs barking in the background. That's because they're mad that I put them in the basement while I'm painting.
Pickles wants to be upstairs, but I can't let him upstairs because if anyone walks by our house, you will hear 3 dogs going crazy right now.
This is— I get 2 of these. It's a disposable palette paper. It comes in a 2-pack on Amazon, so you get 100 sheets, 2 pads. And I love them because obviously use them and then rip them off and toss them without having a stack of plates, which is what I used to have. So I'm even going to take some of this berry color down here. Let's mix a little bit of that in so we get more of like a plum purple. So I just play with it. I do back and forth. I do some dry on dry, and then I do some wet on wet and let it blend a little bit. The idea is just to be as loose and messy as possible, not overthinking it. Just kind of let your hand go wild and start filling in that background. And then you can kind of step back and look and see what you like about it, what you don't. But I kind of like the variation and all of that in the darker background against the lighter pink tulips as well. You want the link to my Amazon store where I put like all my favorite supplies. You can just text the word Amazon to that phone number on the screen. I'm going to go ahead and paint over this. See what I mean? How once you paint something on there— I was just showing you guys technique up here, but it's distracting me. So we're going to go ahead and paint over top of it. Now, since that's dry, I don't have to worry about anything blending or any of that green showing through. We're just going to go right over top of it. Sometimes I like to hold the brush down and kind of mush my wet colors together. Then where it's drier, it leaves kind of like a dry brush effect to it.
Let's get a little bit more of that background color.
So now you'll never know that green was there. So just remember that when you're painting, if you don't like something the way that it is, let it dry. Repeat that motto to yourself, just let it dry and go back and paint over it. And just remember, the best thing you can do to become better at painting is to paint more and not worry about whether you're making mistakes, not worrying about if you're making a masterpiece. It's not about that. It's learning learning about how to control your paint. It's learning about practicing and trying different techniques and brush strokes. And the more trial and error you do, the better you are going to get. So that's why you'll see me paint in a mixed media pad a lot as well. This is a very affordable way to start practicing your painting skills.
Let's throw in some lighter over top.
So you can see how loose and fast I'm moving with that brush because I just want those random brushstrokes. And if I think, oh, look at that, and I'm like, oh, I don't like it, I shouldn't have made it quite so light.
Not a big deal, just go back and change it.
So I think my leaves need a little bit more going on though. I'm kind of digging where my tulips are at. I don't know if I feel like I need to add too much more to them.
Let me look at them for just a minute. I'm trying to keep the lighter pink to the outside of those petals. A little darker around the edge there. And then I'm going to come in with some of the lighter up at the top here.
So this is kind of close up, so you can kind of see what a mess it looks like close up, but it's kind of cool looking. So the key is to keep picking up your brush. You don't want to stay connected, you don't want to keep blending your colors, you want there to be separate brush strokes. So, um, see how lightly I'm holding that?
I'm just kind of dragging it up. Very little pressure.
And by dragging it, you get a nice light, loose line. Um, my mixed media pad's also in my Amazon store.
I just use Show you the brand.
It's Canson. It's an 11 by 14, which is my favorite size to use because then if I really love something, I can just take it out of the mixed media pad and I can frame it.
I'll be honest, though, most of mine stay in the pad.
And it just becomes like my workbook.
See that little glob of green that dropped there? We'll just call that a happy little accident. Okay, so I think I'm just about done. I'm gonna go in and mix a little lighter green and add a touch of that in, but I am loving these tulips. So I'm going to take some white with my green, use this for a couple areas where we have some highlights.
Okay, so that's about it. I'm going to finish up the background. If you had fun painting this with me and you want more in-depth tutorials, a full lesson, a full painting, Painting of the Month Club is open right now. That is my online painting membership. The link is in the description And it is only $20 a month to join Painting of the Month Club. So super affordable way for you to get some of my very favorite paintings that I have taught. They are pre-recorded lessons, so you can go and view them whenever you want to. And you have your own membership library, and as you stay a member in Painting of the Month Club, you'll build your library and you have lifetime access to them. So they're always going to be there for you to go back and paint more whenever it is convenient for you. But they are limited time only, and they are only available the month that we have them in Painting of the Month Club, and then they go back into our vault for Tribe Sisters, which is my VIP membership.
So I'm just gonna go in and add a little bit of dark around here.
I like these rough edge backgrounds as well.
Oh, that berry color is pretty up here.
Yeah, I love these quick lessons with you guys. So my hope for you is that you allow yourself, you know, 20-30 minutes a day, a couple days a week, that you can sit down and do these quick win videos and start building your skills. Just pulling out a little bit of that more berry color in a few spots down here. Okay, one final close-up and I'm gonna jump off here. So we've got our loose abstract tulips. I'm loving them. I think this would be super cute cut down, maybe like a 5x7.
All right, hope you guys had fun.
We got our tulips painted today, and I will see you next week. Bye!










