Easy Watercolor Hydrangeas Tutorial for Beginners
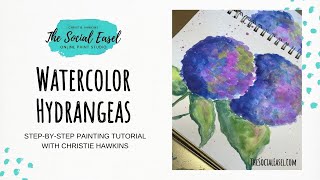
Christie Renee Hawkins paints loose watercolor hydrangeas on a 7x10 pad, showing how to layer pigment, mix blues into purples, and build depth with multiple washes. She answers viewer questions about materials and mistakes, then pitches a $20 watercolor class to fund a mission trip to an orphanage in Honduras.
Chapters
But I painted this a few weeks ago after I painted the acrylic hydrangeas in my tribe, which is my private membership. And after I did it, I showed it to you guys and asked if you would want to paint it with me. So that is what we're going to do today. This is just in a mixed media pad. This is just a small one too. Let me show you. I'll never remember what size. This is a 7 by 10. All the supplies I'm talking about are in my Amazon store, and you can just text the word Amazon to 417-217-7044. You don't have to remember that, it's in the description of this Facebook Live, so you can just scroll up and look at that. Text that word to that phone number and it will send you a link to my Amazon store, and that is where you'll find the mixed media pad, um, the brushes that I'm going to use today. These are my round brushes from my Nik Pro set that is in my store. Um, so those are there. And then these are the watercolors. I love these watercolors. So you could use a plate, or, um, I just use— when I'm like mixing and playing, I usually just use the tin. And then of course you could clean this off. I haven't because why would I prepare ahead of time? That would be weird, wouldn't it? Um, So anyways, that are— those are the supplies that I'm using today. And so it's very, very simple. This does not take very long. You can tell by looking at it, this is not a super detailed interpretation of hydrangeas. It's very loose, but I loved it when I got done with it, and it really just made me want to start playing around with more watercolors and more types of flowers. So Please let me know in the comments if you guys like this style, if you want to see more of this and some different types of flowers in this, in the watercolor look. And you can also use— if you don't have watercolors and you don't want to order more, you can water down the craft acrylics that you already have and you can get the same effect with them. So here's my palette knife ones. If you missed this, I I taught you this last week, so I'm actually going to go ahead and take this out so I can have it as a reference. And then you can— this is another reason I love mixed media pads is because you can just take the paper out, and then I could find a cute frame for this and frame it, and then you have a piece of art for your home. And these look really pretty framed and then put as like a set together on your walls. Okay, Lisa said, your watercolor paints, what are they again? I looked quick in your store but didn't see that exact set. So it's in there, but I probably— under my favorite supplies. I need to organize that store just a little bit, but this is the brand and it's a 36 set. Okay, so I'm going to start with one of my bigger rounds. So these are 8 and 9 out of the set. They're pretty similar. It doesn't really matter. And I'm just going to go ahead and wet my brush. And I started with this deep blue. So it's kind of like a cobalt. So if you're unfamiliar with watercolor, just a couple quick tips here. The less water you have in your watercolor, the more pigmented it's going to be. So the darker it's going to be. If I really, really watered this down, it'd be more translucent and even more so. The more water you use and the less color. Okay, so I usually start in layers with mine. So I'm going to start pretty heavy pigmented and we're just kind of starting with some circles. And I'm just dabbing it down. And I'm having my darkest colors on the left side here. So I want to show you, just starting like this. I think I want you to be a little bit closer so you can see that's already started drying. So I went back in to the paint and I can do a little heavier over here. Now I don't want it to be a perfect circle. I want there to be Some rough around the edges, like petals of a hydrangea. Okay, so that's making it darker. Now, if I just got more water in my brush, I can just add more water to this and see how it gets lighter and just keep going around. I want some lighter blue up here. Then I grabbed this really pretty, like, lavender-ish lilac kind of color, maybe dot some of that in. It's a little more purple because I didn't rinse the blue out. Forgot about that. But that's okay. We want some of that purple in there anyways. So see how I'm literally just dabbing it down. So it doesn't really matter how you hold the brush because the water is just going to kind of seep into it and kind of creates that look. It's already pretty, don't you think? I love it. So I'm going to rinse a little better. Let's grab some of this brighter pink. And so it's going to start out really strong. Let's add just a little— I don't want it to all just be one. No, I don't want it to just transition from one color to the next. I want some variation in between there. As it starts drying, you're going to see that brightness kind of fade away and it's going to soak into the paper a little bit more. What do you guys think so far? And so what it's naturally doing right now too is I had pink on my brush, but where our blue is still wet, so when I'm dabbing those together, it's creating a purple because red and blue make purple. And pink and blue make a shade of purple. So that's how you're getting that mixture of color in there. Now I'm rinsing again. I'm going to grab more of like the purple lavender. Trying to get this to where you can see. So this is more of like just a base purple. I like that color. So this is really relaxing to do because there's really no right or wrong to it. It's just you kind of having fun putting color on paper. Now in that original, see that really pretty green at the top? We're going to add some of that in. And if you look at hydrangeas, even on the blue and purple ones, like they have some of that green in the leaves. So I thought that was just a nice addition. I'm going to show you something else you can do that may not look super pretty right now, but wait. I told y'all I wasn't all the way prepared. I forgot my paper towel over here too. So once you put watercolor down, you can take your paper towel And blot it up in some areas. And you can even see that, that little bit of texture from my paper towel in the original too. Look how pretty that is. I'm loving that bright color in the middle. Barbara said, can this be painted on regular canvas or only watercolor paper? It's going to perform better on watercolor paper than on canvas. If you want to do on canvas, I would recommend doing it with watered-down acrylics instead so that pigment's a little bit stronger so it goes into the canvas better. I'm just going to come back and add a little more deeper color over here. Yeah, this would be great on cardstock for cards. And then if your paper— like, you can see this warps just a little bit. All you have to do once it's dry dry is lay it under something heavy and let it sit for a day and it'll flatten it, flatten it out. So now I'm going to do my second flower. So I'm starting with the blue again. And I'm going to leave a little bit of white space in between some of that. So it doesn't look like much right now, right? But it will. I'm just kind of doing this just to get my shape down. Now you could even, if you wanted to, just kind of go in here and even add more water and just kind of get a background of a light blue in there. This is what I love about watercolors is they're so subtle, and just the few little things you do already kind of give it shape and form. So you can already tell that that's going to be another hydrangea. If you guys are having fun watching this, I would love if you would share with others and spread some of this watercolor love that we're having fun with today. Look how that's already coming together, just those little dabs. On there and they give the illusion of petals. Barbara said, once I paint this on cardstock, how can I make prints of it to make many more without having to paint it all over again? So Barbara, you can either take a really good photo of it and take it to like Shutterfly or Vistaprint. I'm trying to think of some other companies. I'm drawing a blank off the top of my head, but you can Google like you know, what, what to make note cards, and a bunch of sites will come up. I know Shutterfly is a great site. I've used Vistaprint for business cards and stationery and other things. Or you can scan it into your computer. I forgot this other color I wanted to add. See this bright blue over here? I did just a touch of that. In some areas. It's just subtle, but it does give a different look. You want to be careful that you're not making a pattern. Okay, so to stop that from happening, you want to move quickly and you don't want to overthink what you're doing. If you try to overthink this, it's going to look like you overthought it, and everything's going to look super planned out, and it's going to look like every brushstroke is exactly the same. So don't overthink it. Just have fun playing with your colors, mixing them, seeing what happens. You can always blot them up with a paper towel, but I think it's fun to kind of let it dry. And kind of see what happens with it. And if you don't like it, turn the page and start over again. What I don't want you to let happen is like fear stop you from doing it. Don't be fearful. God did not give us a spirit of fear, right? So whenever you start getting like that, just remind yourself of that. That is not from God. He wants you to try this. He wants you to trust him, and he wants you to try new things. He made you creative. He is the original creator. So whether or not you think you have it in you, you do, because he put it there. It's had a little bit more green in a couple areas here. Awesome, Shirley. Thank you for that tip. She said— I'm going to see if I can show this. Shirley said, I've purchased watercolor blank cards at Hobby Lobby. They work well, but they're a little bit pricey. But that's okay, right? If it's, it's cheaper than buying cards, I can guarantee you that. You can see how expensive cards are now. It's ridiculous. Now, if you don't like the texture of like the paper towel in your flowers, you could probably use— I really like this. You could probably use a Kleenex instead that wouldn't have as much texture to it. You know what's funny? Every time I repaint something, almost always I make it bigger than my original. Look how much bigger these, these blooms are than the original. But that's okay, right? So I'm going to go a little bit smaller on my next round to do the leaves, and it doesn't mean I'm completely done with these. I'm going to let them dry and just see what I think and maybe come back and add a little bit more. Do you like the hydrangeas in this one? They're a lot brighter. I love this bright pink in the middle. Let me know which ones you guys like more. I splattered water on this one. It's okay. It's okay. Yes, Rhonda said her watercolor kit came with a sponge. You can use that to soak up your brush in between colors instead of a paper towel as well. All right, what am I doing? Green. You know, hydrangeas have those huge leaves. We're just going to give the illusion of some here. And I just play with all the different greens and just put them down and see what I think. Now I'm going to go see how I left that white in the middle there. Cindy, yes, she said you could use the corner of the paper towel to wick up the wet. Yes, you can. So I'm going to just use water. Just kind of push that in there. So it makes that lighter area in my leaf. Maybe a little darker on the bottom side here. I mean, here's the thing about watercolors, they're gonna last you forever. Look how little you used, it's crazy. Um, and then I'm gonna go into— what do I want to do? Okay, you guys can't see this, I'm going to scoot this over. There's this like almost like neon yellow in here. Let's use that as a highlight. Maybe a little more of the base yellow too. Oh, I like that yellow. Just ignore me when I get excited about something happening in the painting. You know, I'm just as surprised as you are as what it's going to turn out like. Let's go back to some darker now. Have this one kind of droop down a little bit. So let me know in the comments if you guys have questions. Let me know if this is helping you figure out how to use your watercolors at home. Hey Lynn, welcome. Um, yes, anything I do on Facebook Lives is always saved and you can go back and view at a later time. So if you missed the beginning or you can't stay for the whole thing, you can come back and catch the replay. And then we also take it over to my YouTube channel, so if you're not following me on YouTube yet I would highly suggest it, especially if you're new to learning acrylics or watercolor. I have some other watercolor ones on there as well, but acrylics are my main medium that I teach. So now I'm going to do the stem, and I'm still using this big brush, but I'm just barely going to push down. I love that little bit of vibrant green in there. Cindy is asking, if you let the paint dry completely, then apply wet paint next to the dried color, will the wet bleed into the dry, or will it just go into the unpainted paper? So I'll actually show you. It'll basically just add another layer of— what is the word I'm looking for— opacity to it. So it'll make it darker. It'll make your color more vibrant. So it's basically kind of like we do in acrylic where you're just layering the paint on. I'm going to kind of melt these— I'm saying melt, but you know what I mean. I'm just going to— I'm adding water in here. I want it to be a little bit softer. So you can't see the lines so much where they, where they change. And then on this little dropdown, I just want it a little bit more pigment there. So I'm doing very, very little water, lots of paint. See how we get that deeper, richer— that's the word I'm looking for— richer color to add a little more up here where we've got some shadow underneath there. And that— cool to see just that little touch. It gives it more depth. And then I'm going to do a little bit of that bright yellow. So a lot of people always ask this, like, how do you know where the light is coming from? You decide, because it's make-believe world, so you decide where your light's coming from. And this one, my light's kind of coming down like this. It's still going to hit the top of this leaf over here. It's going to hit this one. Could add a little bit of yellow on that side. And then obviously up here. So see, that's all dry. And now I'm coming back and adding a little bit more of the green in some areas, and it just makes it a little bit more vibrant. And I could just keep playing with this. But you guys get the idea of how you can build your layers, play with your colors. Add a little more purple in this one. Thank you, guys. Now I'm going to do a big fat leaf. Over here. I think about like that. All right. See how I just kind of mix these. I mix them right on top of the palette. I don't even— I brought this plate over here to use. I haven't even used it. I'm just going to smooth this out. So Barbara said, if you make a mistake, how do you paint over it with watercolor? Number one, you can, you know, blot it up if you realize you don't like what you did. See, that takes it to almost white again, and then you can paint over it. But it is not as forgiving as acrylic. It's not like you can just paint over anything in watercolor, but it's a lot freer and looser style. So it's really not about getting it an exact way. I kind of just let it happen. And then I wanted to add just a little bit, maybe like there's a little bit of pink in those leaves, just kind of fade in. So I'm just adding more water, just, just a touch of a contrasting color there. I think that got a little wonky over here. I'm going to change the shape of that. All right, I think we're about done. I'm going to show you one last thing. That I did. But let me know what y'all thought of this. Let me know which one you like better, the original or this one. Barbara's saying, is it better for the beginner to use markers to draw the shapes and then paint in? I wouldn't. Do you mean like actual markers? I would say no. You, when you're doing watercolor, if you want to sketch very lightly with a pencil, you can do that, but you would not want to put marker on there. So I'm going to do a little splatter. On here. So I really like that pink color, so I got a lot of water. Now I could— I'm just literally dropping water right into this. Okay, so it's nice and watery, and then I'm just gonna tap it and Well, you really got to just be able to let go if you do this because you can't control where these splatters go. But I just like the way that they look on there. You guys like the one I just did? It's fun and bright and vibrant. Alright, let's get a little bit closer here. I'm trying to get the whole thing on there. So as these little paint splatters dry, they will not be so vibrant and they'll kind of fade into the background. As well. Um, Barbara said, what background color would you apply here? I actually wouldn't. I would just leave it white. Um, if you wanted to do a background color, I would make it super, super subtle because you don't want it to fight with your composition. So I hope you guys had fun. It was fun too. I needed this to just kind of step away from a stressful day, um, of things not going as planned, and I thought I could go back to work. Like, this isn't work. This is work, but this is fun work. I could go back to the computer and work on some stuff that I need and work on another project, or I could jump on here and paint some watercolors with you guys, which sounded like a whole lot more fun and more relaxing. I want to tell you about my newest painting that everyone on here can sign up for. This is my Spread Love Like Wildflowers girl. I just painted her. Last week, and this painting is a fundraiser for our upcoming Honduras trip that we leave for on March 25th. So it is coming up super fast. Um, and we still are short a little bit on funds for all the things that we want to get the kids. So I'm doing one more fundraiser for Honduras, 25% of the proceeds to this class. Go to our Honduras trip to help us finish with all the supplies, travel needs, clothing, all the, all the things that we need for the trip. It's only $20 to sign up. I'm going to teach it March 9th and 10th in a private Facebook group, um, and replays are available. You do not have to catch it live at that time, um, and then you will have lifetime access. So it'll stay in the Facebook group for 30 days And then it goes to our website where you will have lifetime access to it, and you can watch it 100 times if you want to, and it'll never go away. If you want to do this, you can either text paint party to my text number or scroll back up in the description of this Facebook Live, and the link is there for you to sign up. So I would love to have you join me. This is going to be a ton of fun. I haven't done a girl before, so I really love this. And just to kind of share my vision of the idea behind her. Um, I really wanted it to kind of represent what we're doing on the trip, which is just going to love on these kids. If you haven't heard me talk about the Honduras trip yet, we're going to an orphanage there in Honduras, and we're taking— my entire family's going, my mother-in-law's going, and women from my group, and also Casey, my friend who owns Whatever Letter, women from her group, and we're all going as a joint missions trip, and we are going to love on these kids for a week in Honduras. So just to tell you a little bit about them, otherwise, if we don't come and hang out with them for a week, they don't get to leave the orphanage. So we are like their vacation. And it's been a dream of mine for many, many years to be able to take art to kids all over the world who otherwise wouldn't have it. And this opportunity presented itself. And God has just orchestrated this whole thing together. And so that's what we're doing on the trip. And I think of it as like his light. We are his light in this world, and this is his light shining through us. Obviously, I made this girl blonde because she represents me, but it's God's light shining through us, and we're spreading love like he spreads wildflowers in this world. So that is what the painting means to me. And inside the class, I will obviously teach you how to do different hair colors, different skin tones, so that you can make your girl look like you or whoever you want it to be if you want to give it as a gift to someone too. So, um, I would love to have you guys join me, and the link is in the description up above. This one is acrylic, by the way. I think someone was asking that. Um, Veronica said, is there an option to give more than $20? Yes, there is. Thank you for asking. We are finishing our final wish list to put together if you'd like to give a physical item. All the items ship directly to me from Amazon because we're the one bringing all the supplies. Or I have a link where you can give financially, and I will share that later as well. You can always email customer service if you need that link, just in case I forget to do it while we're live. And then I will also be posting it inside that group. Lisa said, I wish I could have gone. Maybe if you ever do it again. We're hoping this is a first annual. We would love to be able to go back each year. This is sponsored through Rice Bowls. If you guys haven't heard of that, I recommend looking them up because it's an incredible nonprofit. And Johnny is the CEO of that who has helped organize all of this, and he's just amazing. So I would highly recommend looking them up if you're not familiar with them. Okay. All right, you guys have fun. Share if you haven't already. I'm gonna jump off. It's probably already time for me to start getting dinner ready, so I will talk to you guys soon. If you are not already getting my text alerts and you want to make sure that you catch me live whenever I do go live, um, just text alerts to that phone number in the description up above and we'll, we'll be here. All right, I will talk to you guys soon. Bye.










