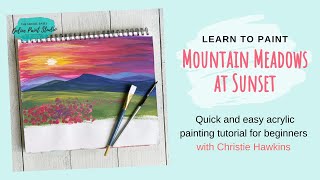
In this 2021 YouTube tutorial, Christie Renee Hawkins walks beginners through creating a vibrant sunset landscape with mountains and foreground flowers using acrylics on a mixed‑media pad. She begins by selecting a limited palette of pinks, purples, blues, and warm yellows, emphasizing the importance of loading the brush heavily for smooth wet‑on‑wet blending. Christie explains the warm‑then‑cool color order to avoid muddy browns, demonstrates how to vary brush width for skinny versus broad strokes, and shows how to build depth by layering mountains from background to foreground, adjusting hue saturation as objects get closer. She highlights the fast‑drying nature of mixed‑media paper, the ability to re‑wet dried areas for a second glaze, and encourages improvisation with custom color mixes. Throughout, she promotes her free Social Easel Facebook group for community feedback and a complimentary dandelion tutorial. The lesson concludes with adding simple flower blobs that decrease in size with distance, reinforcing perspective and encouraging viewers to enjoy “happy little accidents.”
Chapters
Good evening, everybody. Wanted to jump on here with you guys tonight and do a little sunset. I've got a variety of pinks and purples. I'm gonna start with some warm colors first. All right, how many of you have painted sunsets before? Done this before? Is this something you're comfortable with, have experimented in at all? So I'm going to show you. I've been talking to you guys about having kind of like inspiration pieces, right? Kind of where to get some of your ideas from. So I found this. This is another calendar that I had saved, and someone had mentioned wanting to do a sunset the other day, and then I found this picture. And I'm not going to do the flowers and everything with it, but I want to show you how pretty this is and a great verse. So we're going to kind of use this as our inspiration tonight for our sunset, and you do not have to use this many colors. I'm just doing— these are just the bottles that I had here and they look like fun sunset colors, so that's what I'm going with. So we're just going to start, just a big 1-inch flat brush So when you are doing a sunset, this is just a very basic one. You're gonna really load your brush up. That's kind of the key to getting your sunsets to work for you is getting plenty of paint on your brush because I want this to be nice and smooth minus my dried paint that came off there. So see how even with those two colors initially It's a lot of blending, so if you like to blend, you will probably really enjoy doing sunsets. So do you guys see what I'm doing so far? I'm gonna back this light off so the glare is not so bad. If you guys are not already in the free Social Easel Facebook group, that's where you can go in and share all your work with other artists. That are working through some of my paintings, whether it be through the live tutorials. You can sign up to get a free dandelion tutorial sent to you when you join that free Facebook group too. So if you haven't done that yet, I would definitely recommend doing so. So yeah, we've got all of our kind of cool colors over here. Now I can get away with blending these, um, this kind of bluish purple with the pinks because the pink can still blend into that and just make it another shade of purple. But if I already had orange and yellow in my brush, I would not want to go to these cooler colors. So you want to do all your warm colors at one time and all your cool colors at one time so they don't mix and you don't end up with brown or green in your sunset. I actually kind of bounce back and forth. It depends on how wide you want your lines. So if I'm wanting skinny lines, we're gonna come down here and I'll show you, like, let's have this kind of mountain come up in the front. So I'm using the skinny side. If I want some of those bigger— kind of pull this down over here— if I want some bigger sections filled in, then I'm going to turn it where it's wide like this so you can cover more area. So when you're working in your sunset, it just depends on what kind of brush strokes you want in there. The main thing you want to remember when you are doing sunsets is to keep blending and move quickly so that your colors are still wet. You want them to be wet on wet. If your other color dries and then you go back to try to add to it, then you're gonna end up with those, um, really like stiff-looking stops in the paint, if that makes sense. So I'm just kinda blending this in and playing. We'll come back and add some more dimension to it, but just kinda getting down a background color there. So we're just gonna kinda pull that down and blend it in. And I'm gonna jump back up here in my sky again. And because I'm working on a mixed media pad, which you guys hear me talk about this a lot if you follow me, but this is kind of like a sketchbook for painting. So this is really awesome to have. It can handle the paint and it's not too thick for it that it warps You'll get a little kind of waves in it, but then when I'm done with the painting and it's all the way dry, if I end up wanting to frame it, then I just lay it in between something really heavy to kind of flatten it before I put it in a frame, and that works perfectly. But what I was gonna say is it dries super fast on here, faster than it does on canvas. So this top section is already dry, so I can actually go back over and start working a second coat in. So this is kind of see-through. I'm not sure if you can tell that. I'm gonna get a little bit of my purple and navy. So again, don't be afraid to color mix. Make your own colors by mixing your bottles of paint together. You don't always have to use what's straight out of the bottle. And I just want to add some variation in here. So I'm using kind of the skinny side now, and you can kind of streak that out. And then I can come back underneath that, maybe make another shade of pink here. We'll test it and see if I like it. The thing you have to remember when you're painting, if you mess up or you do something you don't like, just let it dry and it's not a big deal. You can come back and fix it. You just let it dry first. You can paint right over top of it and you'll never know it was there. So I'm gonna add a little bit of purple back here, kind of like a faint mountain in the back, and I'll pull these blues back over top again. So I'm just going back in and just adding some streaks of color where I want. It doesn't all have to blend perfectly. You can have some lines that kind of stand out a little bit more if you choose. I mean, think of all the different sunsets that you see. Obviously none are alike. Everyone is different. So just make it your own and just have fun kind of playing with these colors. I love this warm pink that I'm kind of working in right now. I'm going to come in with a little bit more purple over here, kind of streak that in. So we're kind of darker over on this side because the sun is over here, so this part of the sky is going to be darker. And then I'm going to rinse my brush and pull in some of the warm over here. All right, so we're gonna grab a little bit of yellow here, and I'm going to start kind of streaking that in. I may pick up a little bit of white with this. I want to tone it down just a a little bit. I'm using a littler brush just to kind of pop in here and add a little bit more concentrated yellow here where the sun is going to be. Just kind of pull that in, and you can decide how much you want that to fade out. Maybe gonna put a little baby pink kind of around it in some areas. So again, you can mix your pinks and yellows because those are just gonna make like a coral color, so that's still considered warms. Pink is one of those colors where it can go either way, so you can kind of work that in. And then right in the center of my yellow, I I'm just gonna come in with a little bit of white, just kind of make that pop just a little bit there. My paint's still really wet there, so I'm dragging it in a couple couple areas. So I'm just coming in really light. I have a lot of paint on my brush, so I'm just kind of laying it down and leaving it kind of thicker like that. And then you could come in and even add like a couple little streaks of yellow kind of drifting over this way, or you can wipe your brush off and maybe do the same thing with some purples that you want to kind of pull out a little bit further. I really like this. It's Cranberry. That's the name of this one, and that's an Apple Barrel brand. Isn't that fun? So you can just keep going with this. So I'm just gonna put in some background mountains here. Maybe get a little bit of white with this one, kind of tone it down a little bit. And then I'm gonna pull this front mountain. Let's add I'm gonna add another layer. Let's do another, another color of mountain right here. Just small little peaks. It doesn't have to be anything too extreme here. And then this one in the front is a little bit darker. I'm actually gonna grab a little bit of just a tiny bit of like a hunter green color to mix in that, and it'll kind of change the warmth a little bit too. I want to go in and make that a little sharper. I'm gonna pull this one back over the top so it's pushing those other ones behind. So I'm just getting lots of paint on my brush again. I'm just going to blend this in and pull that back over top again. When you are starting to paint, number one reason people struggle is they do not have enough paint in their brush. So make sure you get enough paint in there. Now we'll pull this one over, overlap it a little bit here. Pull it down over top. So the color is starting to get a little more saturated, a little deeper the closer it's getting to us. So these mountains in the back are a little more faded, and you can just keep going with this as you, you get closer to the front. Can even add like a little bit of yellow, and then we're going to have like maybe pull this down, and this is where it's going to start getting closer to us. It's getting warmer because we're adding the yellow to it. And this foreground is a lot closer to us. Maybe a little bit of that sun kind of hitting the top of that hill there because it hasn't set all the way yet. Don't you love this transition of color here? We could even have this kind of swoop in. Oh, got a little bit of pink in there. That's okay, I'm just gonna leave it. Happy little accidents. Just kind of pull that down, maybe add just a little bit of more yellow warmth in that, that section. And then you can bounce back and forth between your dark and light greens So you could just keep going down the page here, but you kind of see what I did there. So we've got our beautiful sunset in the back. We've got some mountains. Now we've got our front area, and then you could just come in— like, again, this is my kind of inspiration piece, what I'm going off of as an idea, and that's just my quick little version of it, but it's got all these flowers in the field in the front. So I'm just going to come on really quick, and I start bigger in the front, and these are just little blobs, nothing too fancy. And you could just start adding those in, cluster them together a little bit. And then as you go back, they get smaller and smaller because they're further away on the field. So does that make sense? Smaller back here, just little dots all around, maybe a few over here. So just tiny little dots, and they get bigger the closer they get to us. And I'm just coming really heavy with my paint right now just to try to get that feeling of that being filled in because these flowers are really close to us. Maybe we want some purple ones mixed in there too. So I'm not gonna go the whole way across here. This one was super fun. Hope you guys had fun tonight. Bye!