In the Shop!! Rustic Wood Frames for your Paitnings || The Social Easel
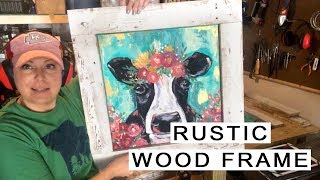
In this live YouTube session, host Christie Renee Hawkins invites her husband Cory to demonstrate how to build rustic picture frames for her paintings using reclaimed white‑picket fence wood or standard 1x4 lumber. The walkthrough covers material selection, measuring and cutting to fit 18" × 18" canvases, and assembling the frames with a Kreg pocket‑hole jig, clamps, and a brad nailer. Cory explains tool choices (Kreg K5 system, affordable Harbor Freight alternatives, saws, and fasteners) and shares tips for dealing with warped reclaimed wood. The duo discusses adding a recessed 1x2 backing, hanging hardware, optional white‑washing, and how to customize frames for different canvas sizes. Throughout, Christie promotes her Inner Tribe painting membership, directs viewers to an Amazon affiliate store containing all recommended tools, and invites comments for links. She also fielded audience questions about workspace, hiring help, and frame permanence, and concluded with a reminder about a fall challenge sign‑up issue.
Chapters
Hey guys, we are going live today with my special guest Cory, my husband. Say hi. So a lot of you have requested to see how he builds some of the stuff he builds, and one of those things is the frames that he has made me for, for my painting.
So I'm going to show you the one that he did for me really quick.
How awesome is this? So he is making these out of reclaimed wood. These are old white picket, um, white pickets from a white picket fence, um, that someone gave us. So he's going to show you with that, but if you don't have reclaimed wood that you want to do this with— hey Tammy! Hey Renee, you can use 1x4s. So just regular 1x4s, nothing fancy from your lumber store or wherever, wherever you get that.
So if you're just hopping on, this is what Corey's doing for me.
Oh, where did it go? He's going to show you guys how to make these frames. So these paintings I have, the cow, the rooster.
Is my pig out here?
No, it's in the back of the car. So anyways, I have a collection of 3 of these that we are hanging up in our dining room. These are from my Inner Tribe membership, so if you want to learn how to paint these, get on the waitlist because we open doors on September 15th. But we're going to show you how to build these, and if you don't have reclaimed wood, you can use 1x4s. If you want to know what tools tools we are using, we went into my Amazon store and put everything in one section. So it's tools that you need to know how to build a pallet board and to build frames. So it's all in one spot if you want that sent to you.
All right, it says we're active.
So if you want those, that link to the store so you know all the tools that you need to be able to do this, or to have your guy do it for you, whatever, just comment "link" or "links," either one, and you will get a message from me and it has all the links of everything going on with the Social Easel. So you will, you'll get a message from me in your Facebook Messenger and if you scroll down in those links, it says link to my Amazon affiliate store and then when you click on that, there is a section that says tools for building pallet boards and frames, and it's all there for you. Now you can use that list and you can order straight from Amazon, or you can use that list that if you have a Harbor Freight in the same town as you, that's what Corey loves, and you can use that as a list to go into that store and get some better deals. So we put it all in one spot for you.
Good morning, Mom.
All right, so I'm just making sure these are not mitered edges. No, I like the—
it's just rustic. I just like them flush up next to each other. Hey, Linda. Okay, ready?
Yep.
So essentially you're just going to box in your canvas. Very simple. You're just matching up your 1x4, your reclaimed wood, until you just have basic squared edges. The issue with flat frames like this is how to tie them in. So what we're going to use is a Kreg jig, which creates pocket holes.
Can you hold it up so they see the wood?
Did you already put the—
no, I'm gonna show them how to do that. And pocket holes will end up looking like this. It's a recessed hole that will be on the back side, and so there's no exposed fasteners. It makes it nice and clean.
It's pretty awesome.
But it's a $100 investment, but I use it like crazy, so it's well worth it. They have a little I think $39 set, but it doesn't clamp onto the wood. It's— I'd only buy it if you're only going to do this one time. Otherwise, just invest in the K5, which is this system. It just takes your wood, clamps it in.
Okay, I'm gonna, um, stay there.
Don't take that out. We're going to— I know you just did that, but I want to show them up close so they can— hold on, I'm going to flip you guys around. Give me just a second so you can see. So basically what you're doing is you're just putting the drill in that hole and it does the job.
Nice part about this system is depending on the thickness of the wood that you're you're using, it does all the work for you. You can alter it up to some almost 2x4 stuff to tie all of that in. So it's a very user-friendly system.
So flip that up here. I'm gonna— so that's what, what it does. So you can see that those are holes in the wood.
But the drill bit and the driver come with, so there's nothing additional.
And this is the exact one we have in our Amazon store, right?
Yes. They have Kreg clamps. No offense to Kreg, but these at Harbor Freight for $2.99 are going to do a pretty similar job. The same with the ones that we put on our store. If you don't have access to a cheaper option, those are great, but you can usually get them cheaper. And there's a square drive, which is nice.
Say that again?
The square drive. For their fasteners.
Does that come with the set?
Yep.
Okay, so see, show them that really quick. So that has— this is just storage, but all those pieces come with it?
Yes, because you will misplace everything. And there's— you can do doweling and all sorts of different things with this system. I've kept it pretty simple though.
All right, is this view good for you guys?
You want me to, uh, keep holding it like this so you can see what he's doing? I think it's better for you to see it a little closer up than for me to put it in this stand that I'm going to trip over. And hopefully I can better catch your comments on this side of the camera. Brandy says they have 3, 3 Kreg jigs.
Why do you have 3?
Are there different ones?
Who loves my rooster? I'm so excited to get it framed. I'll show you guys the—
we just repainted— or I shouldn't say we, I picked out the color. Corey repainted my dining room. And now it's a really pretty gray, and we're putting these 3 farmhouse paintings and frames on the wall in the dining room. So when we get it all done today, I'll show you the finished picture. So he's got everything. You guys see how he's just framed this up? So a lot of measuring.
What he has found is all canvases are not created equal.
So you are going to have to custom build these per canvas. You can't like just make 3 of these in a row, right, Corey? You had to—
yes and no. The way we're actually doing this, we're going to have a recessed holder here with 1x2s, so even if the front is a little tight, you can tap it into place and then it will hold. But yeah, I prefer if you've got a specific piece art that you're building it for, build it around it. You're going to be happier with it.
So what he did earlier is— will you just show them like you're just laying the wood and then, um, show them with a 1x4? Do you have a 1x4 handy? I just wanted you to show them basically what you do when you're sizing it up. So he's coming up next to the painting, and he's just laying the wood next to it, and then he'll come with, you know, and mark it so he knows exactly where to cut it with the circular saw, right?
Yes. Obviously it's going to be much easier to do it with the radial arm saw, but you can make it work with the circular saw. If you're going to do it a lot, it's worth investing in a miter saw.
All right.
Gotcha, Brandy. See, I obviously know nothing about any of this. Tony asked, can you make this on your kitchen table or do you need a workroom?
Depends how messy you want your kitchen. You can make it anywhere. We used to build easels on the kitchen floor with the kids.
Yeah, we did.
So yeah, you can do it anywhere.
All right.
Craig also has a really simple guide on material thickness so you know which fasteners to use. This is the fastener set that we put online in the store.
Thank you, guys. Okay, so let me get you up here so you can see what you— what have you done? You've put the clamp on so that this is clamped the frame onto the workstation.
Yeah, just so we don't get any slide.
So you guys see what those holes did is basically it's allowing him to screw the screws right into the other piece of wood and keep it flush, and you don't have anything sticking out. How's everybody else on hearing? Can you guys hear okay? Make sure your volume's up all the way if you're having trouble hearing. Do I still need these on? No, I hate wearing those. Brandy says you're gonna be a video superstar.
So especially with reclaimed wood, old junk like this, everything's warped. It's going to be uneven, so you want to double-check everything. And even if you do it all right, you're still going to get some warping. But the Kreg jig is really good versus like just air nailing it. This really sucks the wood down and holds it tight.
Mary wants to know if she can rent you so you can make their stuff too.
I don't know, Mary, where do you live?
Probably on the other side of the United States. So my suggestion is, if you're not handy with tools like me, then share this video with whoever is and tell them to go, or I guess you would buy all the stuff for them and then have them watch this and they can do it for you. And I am sure there are handymen in most towns who— there's probably guys who would love to do something like this. So I'd put a— if you don't have someone that can do it for you, I'd start asking people if you know anyone that works with wood and find someone that does. And I guarantee you there's some retired guy in your neighborhood who would love something to do and would love building frames. So you never know. Dad, are you on here watching? You could be doing this in Fayetteville. Fayetteville, Arkansas people, I can hire my dad out for you, Shelly. We've got some husbands watching with these ladies while watching the Mizzou game. I'm sorry you're watching Mizzou. Not that the Hogs are any better right now. I can't really say much. All right, so I'm gonna— um, yeah, you can. All right, so who lives in Fayetteville, Arkansas? My dad is out for hire. He'll build you some frames. My dad's the original craftsman. He built everything when we were growing up. So I'm zooming in on this because I want you to see this is all flush. So no mitered edges. You could honestly— one, I don't even care for for the way mitered edges look. Personally, I like the more rustic look of things being flush like this, especially for a farmhouse frame for what we're doing. All right, so this is the, the back side here. So the frame's built. Now he's laying it in to put the, um, the back support system in. That's a lot better without the, uh, lawnmower going.
Yeah, um, just stand by for 30 seconds. We need that air compressor on.
Okay, it's going to be loud for a second. Yes, Diane, I agree. So these are 1x2s.
So we're just doing a really rough boxing here. You just want just enough to hold the frame or the canvas in, and this is more of just eyeballing.
Once they do this, is there a way for them to get the— is this a permanent frame, or is there a way for them to change out paintings if they wanted?
Oh yeah, you can pop them out. They're not going to be stuck in there by any means.
So tell them what you're using now.
Uh, this is just a really simple We put a brad nailer online there. This one's like 50 years old. I got off my dad. He never used it, but it's really lightweight. And when you're building— some weeks we'll build 80 pallets, and if you're firing off a couple thousand nails, you want the lightest possible thing you can get. I've got bigger ones, but they weigh about 3 times as much to do the same job. So if you can find something really small—
and we have that one in our store, the light one.
Yeah.
Shout out to Amazon for making it so easy for us to put things in a store for you guys to find.
So I'm just going to press that against the top, and you'll find you may want them more or less snug, um, because once they're on the wall, it's not like they're going to get bounced move around a lot.
So what exactly are you doing right now? You're pushing—
I just want— I want to try and match the canvas up with the front edge of the inside of the frame, which you just have to play with until you get it where you want it. And on these, there's no perfect science to these pieces. We know it's an 18-inch frame or canvas, so I'll go like 18 5/8 on the top and bottom just to sort of box in and go 17 7/8 on the sides just so everything sort of meshes together. But again, you can do it pretty much however you like.
It'll all work.
Oh, she looks so pretty. She, he.
So, and if you're an ultra perfectionist, if you want to go back in, if you do use reclaimed wood, you can go in and do a pickling or whitewash on the white wood just so it matches everything. And Christie's taught you how to dry brush in this kind of stuff anyways. If you really wanted to go in and make sure that all this matches perfectly, but if you set your canvas in right You won't see any of that anyhow. And I like to put a backing just to hold a little more support when I get it set where I want. Just take a little 5mm— this is what we used to do door hangers out of, so I've got a million pieces of it— and just corner it in just to give the canvas a little something extra to butt up against. It's not a must, and you could use about anything for it. You just don't want anything real thick because we're already 3/4 of an inch off of the wall. You're going to put your door hanger or your wall hanger up here. I kind of like it because it stands off the wall a little bit, has a little bit of presence to it, but you just, just real simple standard hanger. Will work fine because even if you're using fresh 1x4, as long as it's not sopping wet new wood, it's not going to weigh very much.
Yeah, these are really light.
But I would use either a legit nail or, uh, some sort of drywall plug just to make sure it doesn't come out of the wall because even with the pocket jig and air nailing If one of these drops from 4 or 5 feet up on the wall, it's going to torque it a little bit, and then you're going to have more gapping where the seams are. So you want to make sure it's on the wall to stay. Otherwise, but yeah, these, they'll hold good. But yes, you can pop it out if you want and interchange whatever else you have.
Will you set them both up next to each other so they can see the finished So you remove the canvas from the front, you're just popping it in and out.
So again, these canvases are 18 by 18.
That's what I taught the class on. I wanted, I wanted some big statement pieces for my wall, but you could do these any size, same thing.
So we have one more to add, and that's my Petunia the pig. So what do you guys think?
Helpful? Good?
Say bye. Everyone tell Cory thanks.
Thanks for doing it, hun.
All right, so I'm gonna flip you around again and chat with you for just a second because yesterday was supposed to be the last day of my Fall Challenge, and for whatever reason the website glitched, and I got— I don't know how many messages yesterday, people saying they couldn't sign up and their payments wouldn't go through. So if that's you, shoot me a message and we'll get you the link and we'll get you signed up today. The challenge starts for the Fall Chapel on Monday, so I'm headed to the computer after this to help all those people. So if you want the information on all the tools that we use just comment links in the comments and you will get sent an automatic message from my bot. And everything that we use today is in our Amazon store. So hope you guys enjoyed that, and if there's something else you want to see them do, let us know. So I will talk to you guys soon.
Bye!










