Kids FREE Tropical Sunset Painting Tutorial || The Social Easel
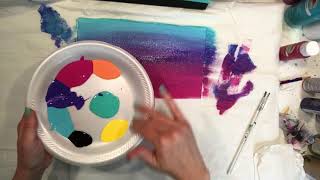
In this kid‑friendly tutorial, Christie Renee Hawkins walks viewers through creating a vibrant tropical sunset on canvas using acrylic paints. She begins by listing affordable paint colors (black, Caribbean blue, bright magenta, bright yellow, Tropic orange, Ocean Breeze) and brush options (flat 3/4‑inch, round sizes 4 and 1) that can be sourced from common craft stores or her Amazon art set. The lesson focuses on blending sky colors—turquoise, purple, hot pink, orange, and yellow—by loading the brush with ample paint, using long, consistent strokes, and repeatedly overlapping adjacent hues until seams disappear. Hawkins emphasizes rinsing brushes thoroughly between color families to prevent unwanted brown mixtures, and demonstrates a paper‑towel brush‑shaping trick for clean strokes. She then paints the horizon line with Ocean Breeze, adds a black silhouette for an island, and shows how to layer a second coat after drying to boost color intensity. The tutorial continues with constructing palm‑tree silhouettes using curved brush strokes, varying brush sizes for leaf thickness, and adding simple bird “check‑mark” shapes to suggest depth. Throughout, she offers troubleshooting tips—letting mistakes dry and painting over them, using a blow dryer, and avoiding corrections while paint is wet. The video concludes with encouragement to personalize the scene, clean brushes, and an invitation to join a summer kids’ art camp.
Chapters
Hey guys, we are ready to get started on our sunset painting. I'm really excited to teach you guys this. So here's the original. I'm gonna walk you through step by step how to do this, and this painting we're gonna focus on blending. So it's all about blending these pretty colors together all the way down to our ocean. So we are going to go ahead and get started. I'm going to show you the paint colors that I used really quickly. So we have black, and you can get that from anywhere. Caribbean— any of these Apple Barrel ones I got from Walmart. You can find colors that are similar whatever store you shop at, whether you're at Michaels or Hobby Lobby. But I'm using Caribbean from Apple Barrel Purple. You can get an Apple Barrel or Craft Smart. This is Michaels store brand. And then I have Bright Magenta, Bright Yellow, Tropic Orange, which is kind of like a coral, or you can use regular orange if you prefer. And then this is Ocean Breeze by Craft Smart for my ocean color. So those are the colors that I'm using in the painting today. You don't have to get the exact brand You can get whatever you want. So I'm just going to scoot this over here, set my colors to the side, and we're going to go ahead and get started. So for your brushes, you just need a flat brush, and this is like a 3/4 inch. You can do it 3/4 inch or an inch. This is from my Addie's Art Set, which is in my Amazon store. And then I've got two different size round brushes. This is a 4 and a 1, but you can use whatever you have available. Michaels also has a great starter kit of paint brushes. So we're just going to start right at the top with our blue. So the most important thing you want to remember is to load your brush up, not so much that it's dripping, but enough that you can spread your paint easily without having to fight it. So we're just going to start at the top, and all of our brush strokes are going to be the same. For this background. We're just going to go back and forth. So I'm going to reload my brush again. It should go on really easily for you, nice and smooth. If you have enough paint on your brush, it shouldn't pull or tug when you're putting it on your canvas. And I am using an 11 by 14. You could use an 8 by 10, or if you want to go big, you could do a 16 by 20. So any size is fine. We're going to start with our turquoise, and then I'm going to leave that paint in my brush. I'm not going to rinse it out, and I'm going to go straight to my purple. And again, getting plenty of paint on there. And what I want to do is overlap that line, okay? So it's partially on my white and partially in my blue, and I'm going to go back and forth again. This has got a little dried paint in there, so I'm just going to kind of push that off to the side. Okay, so back and forth, grab a little bit more purple. So I'm going to show you something just a second once I get this purple on here. So right now, if we stopped right now, we just see that line, and we don't want to be able to see lines in between our colors. So what I'm going to do to fix that is where the two colors meet I'm gonna start overlapping them back and forth. Okay, so I'm just kind of blending it in to that color above. I'm gonna wipe off some of that purple, grab a little bit more of my blue, and so I just keep going back and forth until I can't really see where one color stops and the other begins. See how pretty that is? It's just really fun to blend. When you are doing this, you want to try to make long brush strokes too. So if I stop like halfway, I get these little breaks in my paint and you see these little lines. So try to go from one side to the other when you're painting. Just get those little dry pieces off. So I'm gonna rinse a little bit of this blue out of here. When you're rinsing, don't be afraid to really push push your brush down in the bottom of your water cup, wipe off that excess water, and then I'm going to grab my paper towel. And this is my little trick to keep your brushes in good shape. I'm going to take a paper towel and squeeze my brush and reshape it so it looks like a nice clean brush again. You don't have to keep changing your paint water as long as you do that little trick. You don't have to worry about those other colors going in. So now I've got my blue and my purple. I rinsed my blue out before moving on to the pink because I don't want it to pull too much of that blue into the pink. It's just going to make it more purple again. So I have my biggest section of my sunset, the hot pink color. See how when I stopped there— could you see that little stop? So try to pull it all the way across. Now you can let this dry and then go back and put another coat on if you see any of those little stops in your sunset. You don't want to put super, super thick paint on your brush. Okay, so we want nice thin coats of paint. If we get too much paint and we keep adding wet paint on wet paint and really layer it up, it gets real gloppy and it's hard for us to kind of work with. So you can decide how much of what color you want in your sunset. So I got a big section of pink there, but I want a little bit more purple, so I'm just going to come back up top here and just add a tiny bit more. And if you really want your colors to stand out, let this coat dry all the way first, and then once it's dry, you can come back over and kind of repeat this if you choose. And you can have streaks of your purple down in your pink. It doesn't all have to be just one section of color at a time. I'm gonna pull a little bit more blue up here too. So it's all about just going back and forth, back and forth. So now I want to rinse really good again because I do not want my purple or blue to mix with this orange. So if you don't rinse your brush and you just keep going from color to color before you get to your orange and your yellow, which are our warm colors, it's going to turn into a brown. So anytime you mix blue and orange or purple and yellow, it turns into like a brown color, and we don't want brown in our sunset. So make sure you rinse really, really good before moving on to these warm colors. So I'm going to do the same thing again. Nice clean brush. Now I'm going to grab that coral color that I had, and again, I want to mix it a little bit with my pink, and then I can come down and have more of like a brighter orange if I want to. That's a really pretty color. So I just keep going back and forth, and I want to keep my lines nice and straight while I'm doing this. So just pull horizontal lines back and forth just like that, and then I'm just going to wipe off a little bit of my excess. Now I've only got orange and a tiny bit of pink in here, so it's fine for me to go straight to my yellow. Look at that. Isn't that so pretty? You guys having fun blending so far? I could do this all day. I love doing sunsets, and sunsets are fun because you can do whatever colors you want to. You can change it up if you don't want to do exactly the colors I'm doing. So I think I'm gonna leave it like that. And I'm going to rinse again. So we have a fair amount of rinsing here, just so our colors don't turn into brown. Okay, so now I want to do my ocean color. So I've got this Ocean Breeze, and here's my trick for getting kind of like a straight line for our horizon line, the back of our ocean. If you're right-handed, you can start from the left and pull right. If you're left-handed, just switch. I'm just gonna pull across just like that, and I came right below my yellow because I don't want them to mix too much. If you get a little bit of mixture in there, that's okay because it's just gonna look like the sun reflecting into our water. So now once I've got that line on there, I can come down and fill in my ocean color and just really get enough paint on my brush that it's easy so you don't see any of that white canvas showing through. And you don't have to go all the way down to the bottom because we're going to put black down there, and it's going to be kind of like our silhouette of an island down below. So fun! I love those colors. I'm rinsing again. Now I'm going to grab my black. And I had mine raised just a little bit, kind of not like a super straight line, maybe curve up a little and then come back down, maybe curve where that, um, where that palm tree is going to be. So I just kind of pull that line across. So here's an important tip for you guys while you are painting. If you are new to painting with acrylic paint like this, if you mess up— let's say I accidentally dropped a little bit of my black paint in my water and I didn't mean to— when you're working with acrylic paint, if you make a mistake or do something you're not happy with, just let it dry. Mom can get a blow dryer and blow dry it for you really quick, and then once it's it's dry, you can paint over top of it and it covers any of the mistakes that you had. So let's say maybe you accidentally mix some colors and it made like a brownish color. That's okay, just let it dry completely, okay? And you'll know it's dry when it's not shiny anymore, it's nice and matte. So that's all dry up here already. Once you let it dry, you can paint right over top of it. So if you had a little brown spot in the sky, it doesn't matter because we're going to cover it right back up. The main thing you want to remember is just don't try to fix it while it's wet. It will just make a big mess for you. So we're going to let it dry if we do something like that before we try to fix it. So while I'm letting this dry just a tiny bit, I'm going to grab my blue again because this is a little see-through up here. And I got a little dry paint in there. Just going to grab my blue. And go right over top. See how because I let that dry, now when I add my second coat of blue on there, it stands out a lot more. And I can do the same thing with my purple. I want my purple to stand out a little bit more too. And this is optional. If you are happy with the way it looks when you got done with yours, then just leave it. I'm gonna grab a little bit of pink right there, and then I'm gonna leave the rest. I don't want to pull any more down there. See how much brighter that made the blue? All right, so I'm gonna leave that brush in my water cup. Whenever you're not using your brushes, make sure you leave them in your water cup. But when you're done painting, you want to make sure and clean your brushes and lay them flat to dry. So the next thing we're going to do is add our palm tree. Now I had mine kind of come out like a curve. You can make yours however you want, or maybe you want to add 2 palm trees or 3 palm trees. This is your painting, so it does not have to look just like mine. So I'm going to start at the top and then come down. That way I know I've left enough room for my palm branches to go out. So I want mine to come about right here, so I'm just going to put a little dot there and just pull it down. Blow it up again and go back and forth until that's nice and solid. Now I did not let my paint dry underneath And that's up to you whether you want to. I kind of like for it to pull a little bit of color maybe from some of those background colors, and then I just kind of blend it in here. So you can decide what you want to do there. Now to start our palms, we're just gonna make like kind of— it's gonna look like a firework at the beginning, and we're going to start— everything starts from that same point, and I'm just going to pull these little curved lines down. And doesn't matter how thick you get here because we're going to cover them with other lines. So curve around that way, then this one's going to curve the other way. Okay, so kind of looks like a little hill there. Then this one, it's going to come out like that, and we'll just kind of keep going around, just like kind of explodes like a firework, right? So I have 1, 2, 3, 4, 5— I have 6 branches. You could add as many as you want to. Now is the fun part. We're going to start adding all the little palms. We're going to go along this line and just pull some quick little lines down. So here's where, if you want to, I'm going to show you with the same size brush. This is my number 4. So you can do like this, and if you want them longer, pull them a little bit longer. So here's my trick for doing those. I do have lots of paint on my brush, but I'm not pushing down really hard, and I'm going to show you why. What will happen if I push down super hard with my brush? I'll show you on the back of this little plate. So again, plenty of paint. So watch me from the side first and see how those bristles are barely moving. Okay, they're not pushing down really hard. And then if I push down hard, see how much flatter that looks? And this is what it looks like this way. So same brush, skinny lines, and then pushing down really hard and you get those big lines, which is how I did my palm branch— or palm trunk, sorry. So that kind of shows you that. And then with my arm, I'm just kind of doing quick— the, the quicker you are about this, and you can practice on a scrap piece of paper if you want to before you go straight to your canvas. Practice on a little piece of paper first, and you're just gonna do quick little curve pulls down. The thing I love about palm trees is there are so many different kinds. They're not all skinny itty-bitty little palm leaves. Some of them are thick and big. I'm just going to keep going around just like that. Okay, so it's thicker towards here and then it kind of gets skinnier. That's with my number 4. Or I could switch and get my skinnier brush, and you get skinnier lines. And you keep loading your brush up. When you're working with a little brush like this, it doesn't hold very much paint, so you have to keep getting more paint in there. So you guys see how I'm doing that? I'm just going all along the line and just pulling down these lines. And I showed you with two different brushes, so you can play with it and decide which one you like better. There's no right or wrong. So I'm going to show you something. So far we've done all on the bottom of these branches, right? All just coming down. This one kind of sticks up a little bit and goes like that. Now if I wanted to, staying with that line, I'm going along that line, I could come back and pull some kind of sticking up. They're shorter because it's kind of bending going that way. So you can have a couple different kinds of palms if you want some to stick out on both sides or if you want them to just go on one side. So there is our palm tree, and the very last thing we have to add is our little birds. And I like these because they're like little check marks, so all I'm doing is going down, up, down, up. So you again can practice when you're doing that. And I have mine in different sizes, so maybe I have a little one back here, maybe this guy's a little bit bigger, and then I have another one up here. And that's it. And the ones that are littler, even if you— let's say if I wanted to add another little one right back there That just means those birds are farther away. So we've got birds that are far away, a little bit closer, and then even closer to us. And that's it! You have your tropical sunset painting, and you are all finished. So I hope you guys had a lot of fun with that lesson, and I can't wait to teach you more in the kids' summer art camp that we have going on this summer. Have fun! And see you guys later.










